
It is a common practice to add numbers to slides, which makes it easier for us to understand the location of the current slide and the progress of the presentation.
Under normal circumstances, this can be easily achieved through the numbering function that comes with PPT.
But sometimes, you have some [Special needs]. For example, I want to start adding numbers from page 3 or even page 4 onwards, or I want to make the starting number larger.
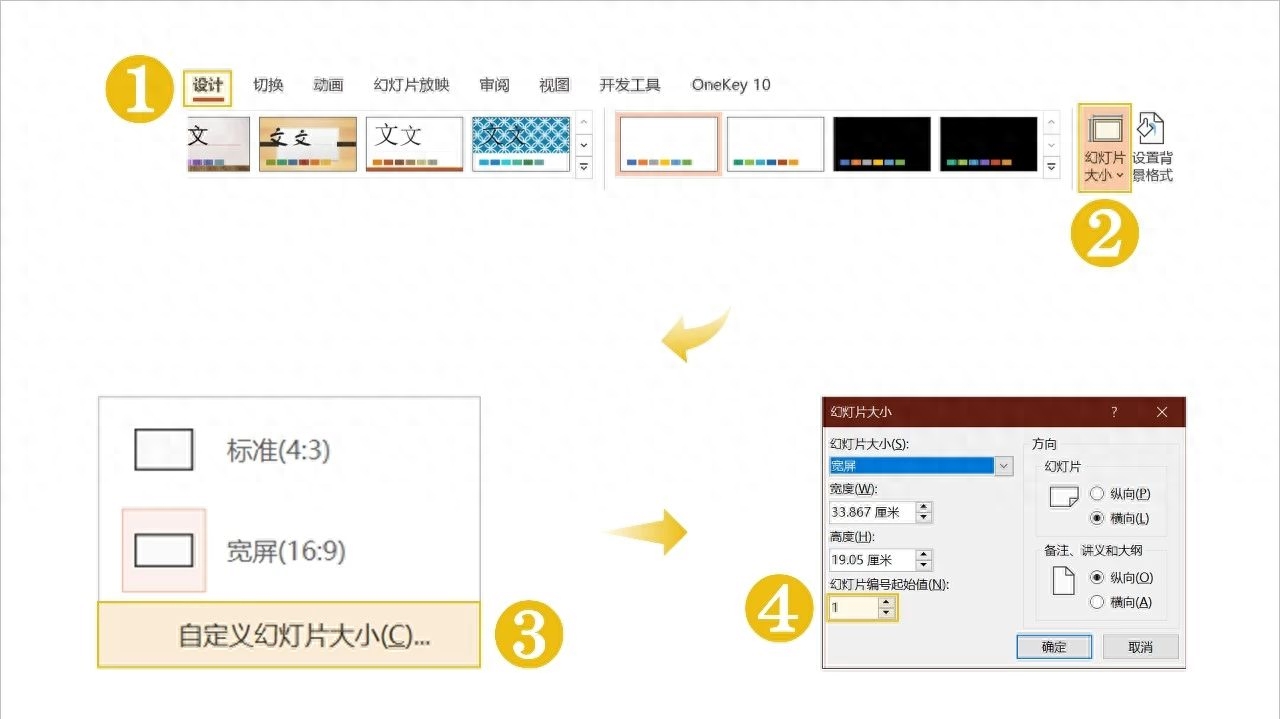
For make the starting number larger, you can go to Design → Slide Size → Customize Slide Size → Slide Number Starting Value to adjust the starting number. Modify, the maximum can be set to 9999, haha, this can fully meet the needs.
For numbering from page 3 or even page 4, it cannot be achieved through the above method, because the minimum starting number can only be set to 0, so even If you manually delete the number on page 1, you can only start numbering from page 2.
Below, based on the numbering starting from page 3 of the slide, I share two methods for your reference.
① No plug-in method:
Adjust slide position + customize slide show
② Plug-in method:
OK Number progression + picture selection and paging
①
No plug-in method
Adjust slide position + customize slide show

The first method is to adjust the slide position through custom slide show.
Proceed as follows:
1. Add automatic numbering
2. Move some slides
3. Add a custom show
4. Set up a custom show
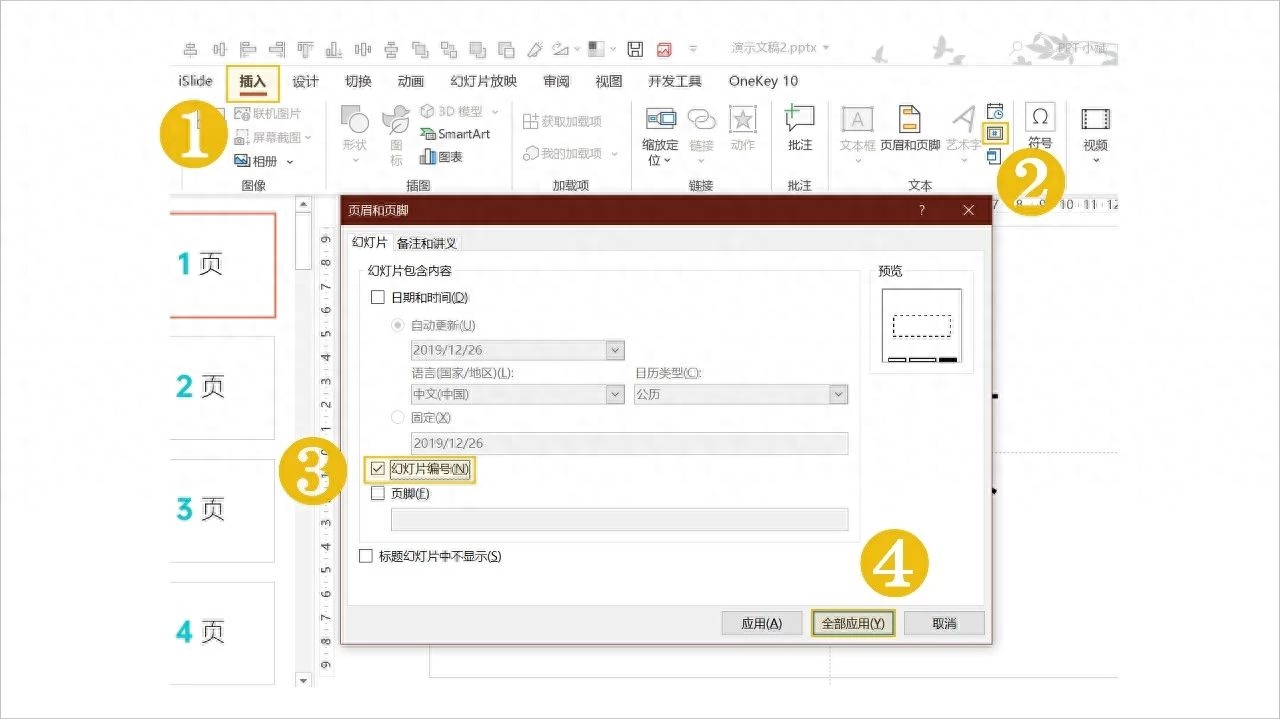
1. Add automatic number
First, add automatic numbering.
Insert→Insert slide number, check Slide number, click Apply to all to complete adding the number.
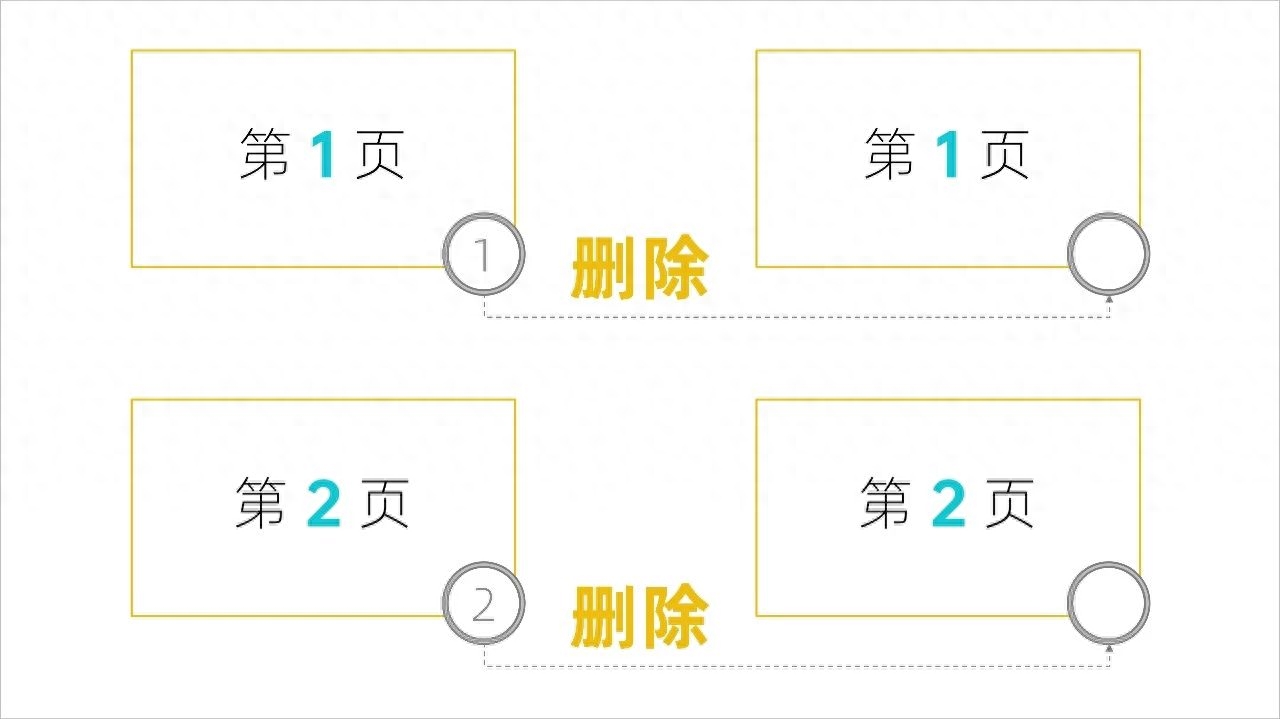
Based on the numbering starting from page 3, then the first two pages do not need to be numbered.
At this time, delete the numbers on the first two slides.
2. Move some slides
Next, arrange the position of the slides.
Hold down the Ctrl key, select the First two slides, and drag the mouse to the end of the PPT.
(You can also hold down the Ctrl+Shift keys while selecting the first two pages and press the Down Arrow (↓))
In this way, after the numbers are automatically updated, the numbers of other slides will be correct, and these two slides will not have numbers.
3. Add custom show
The third step is to determine the order of the slide show.
Slide Show→Custom Slide Show→Custom Show,
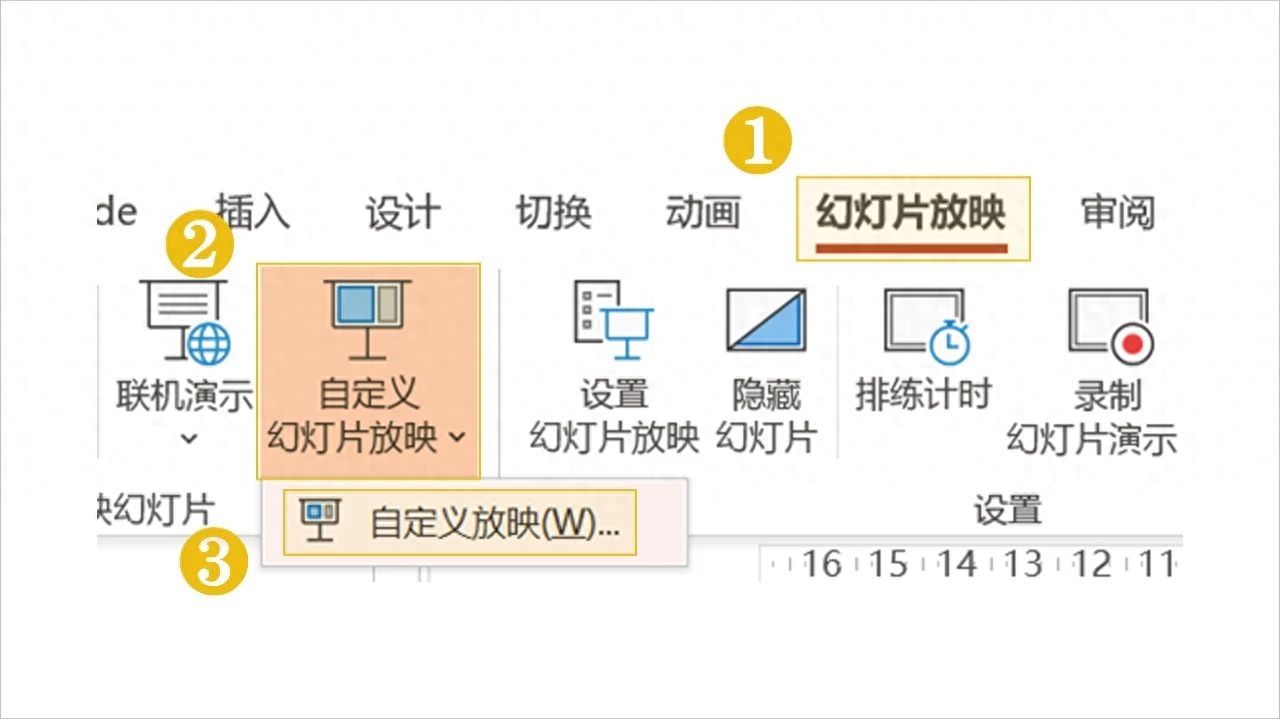
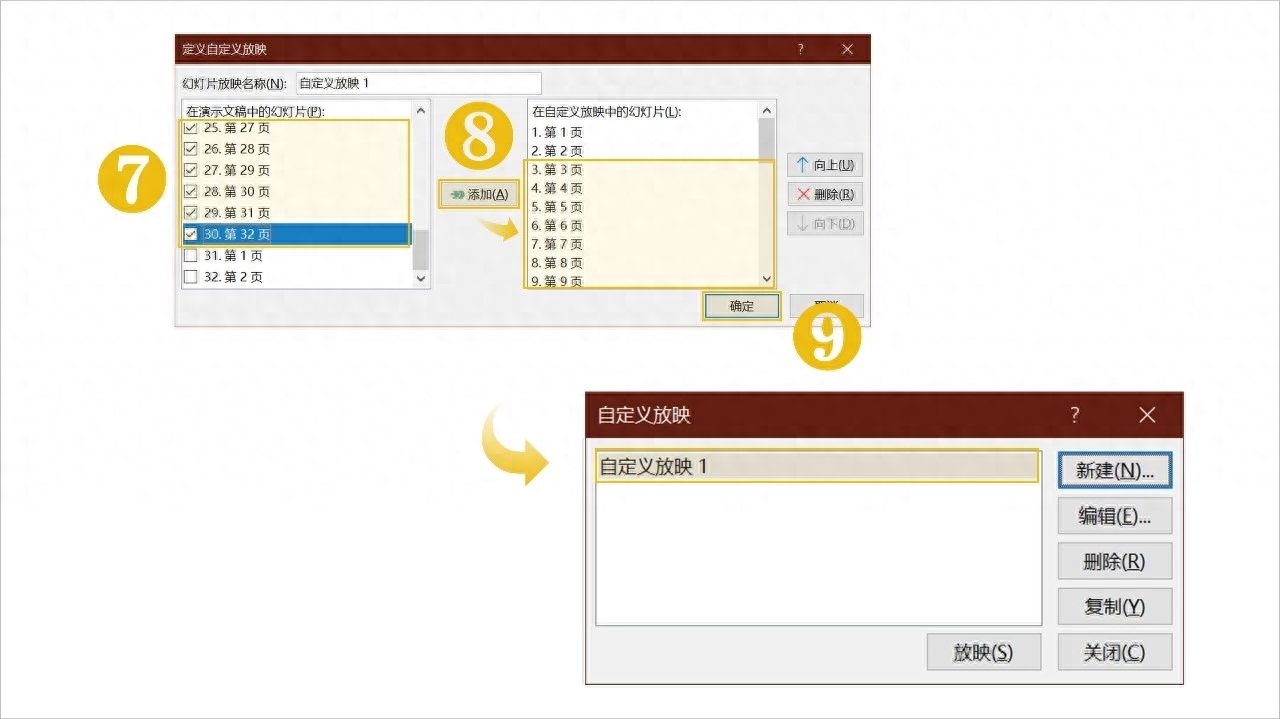
In the "Custom Show" window, click New. In the pop-up "Define Custom Show" window, click "In Presentation" in the list on the left Scroll down to find Last Two Slides in "Slides in ", select it, and click Add to add it to the list on the right;

Next, check Other Slides in the list on the left, click Add, and add them to the list on the right.
Click OK again and close the window to complete the addition of the custom show.
4. Set up custom screening
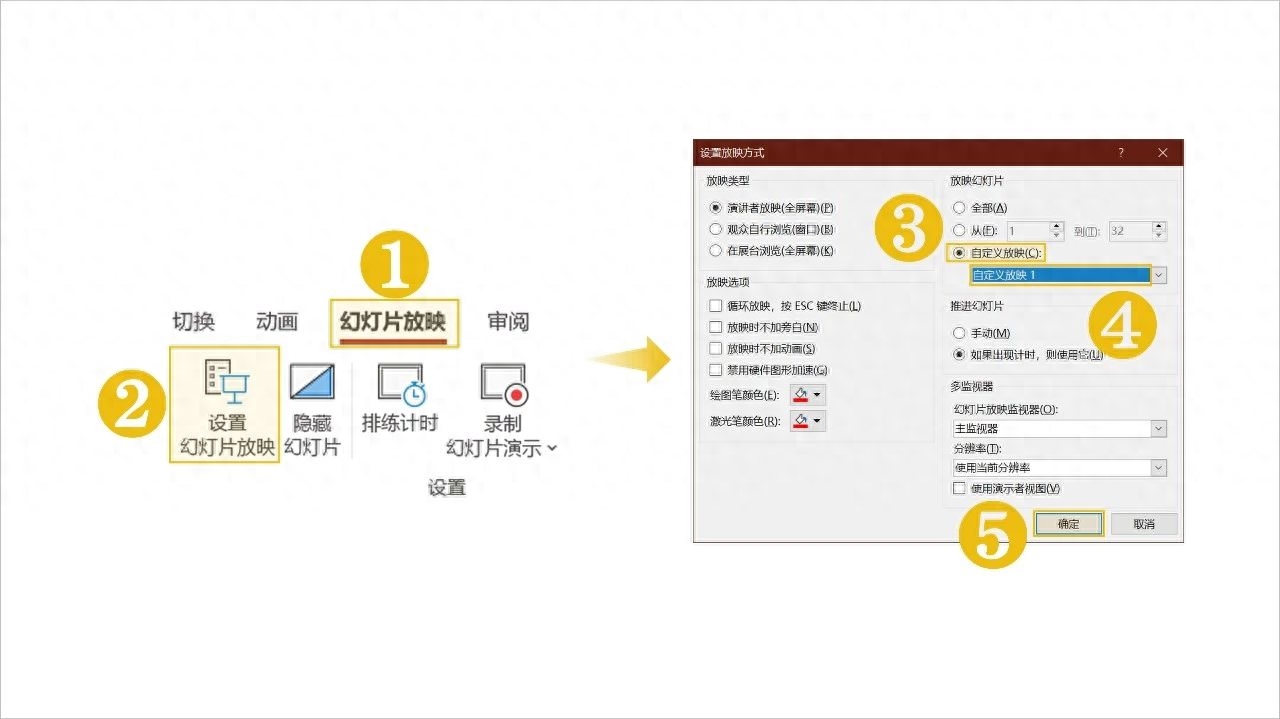
Finally, let the PPT play in the set order.
Slide Show→Set Slide Show, select Custom Show→Custom Show 1 (if you change the name to another one, select it by another name), click OK, Complete setup.
Okay, the PPT has finished numbering starting from the third page.
The same principle applies if you want to start numbering from the fourth page or other pages. Just move the corresponding slide page number and set the corresponding custom show.
Of course, the above operations can meet the needs of demo, but if you need to print, there may still be problems.

If you only print one slide per page, that's fine;
But if it is required to print multiple slides on one page at the same time, then we can process the PPT as follows.
1. Convert to picture presentation document
2. Adjust slide position
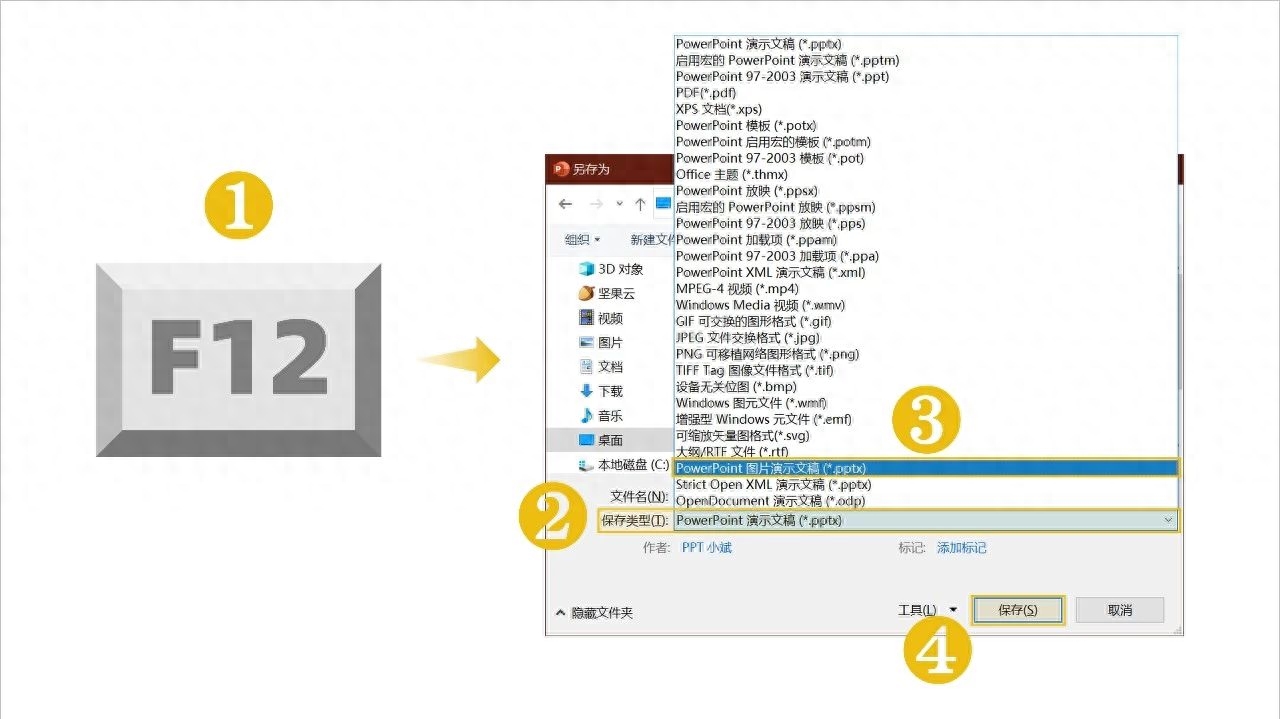
1. Convert to picture presentation document
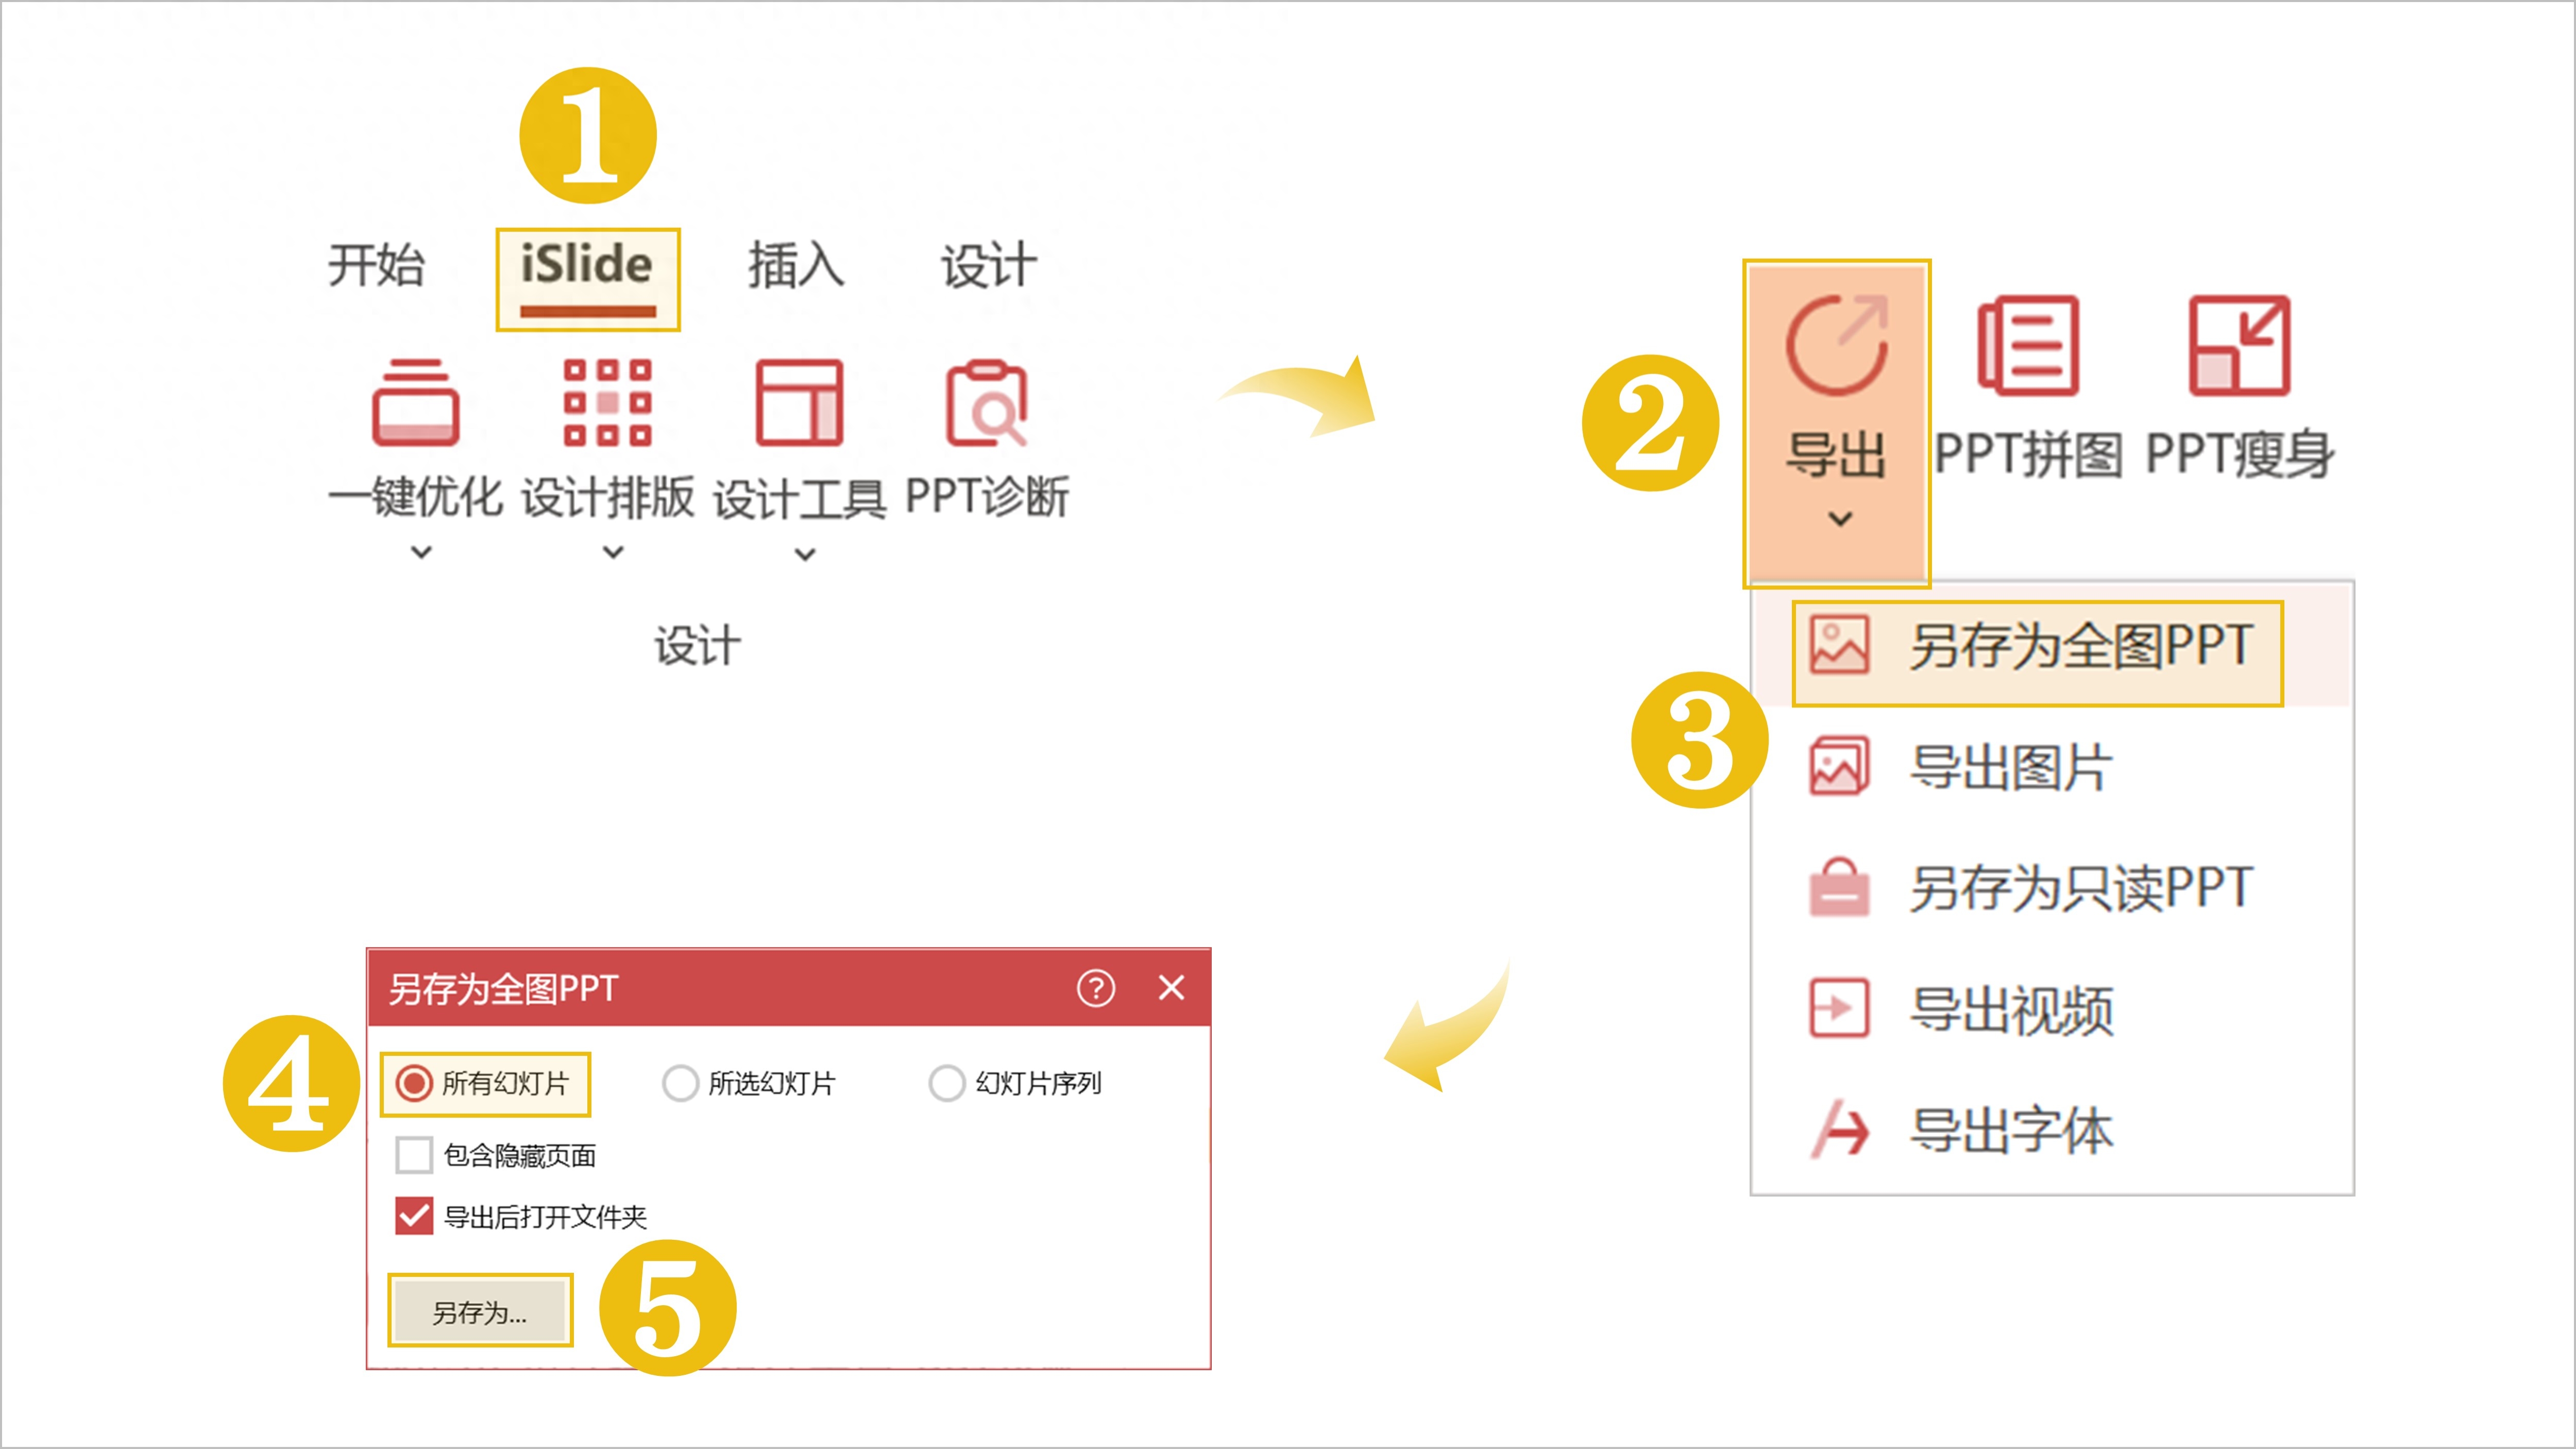
For PowerPoint versions above 2010, you can press the F12 key → select the save type as PowerPoint picture presentation document → save and convert it to a picture-type PPT document.
(Here, you can also convert through the iSlide plug-in→Export→Save as full picture PPT→Select all slides→Save as)
2. Adjust the slide position
Move the last two slides to the front position of the PPT.
(You can press Ctrl+Shift to select the last two slides and press Up Arrow (↑))

In this way, you can print normally.
Rating:
- The advantage of this method is that the numbering can be updated in real time;
- The disadvantage is that the slides have When deleting, you need to adjust the custom show again or convert it to a picture presentation document again.
Compared with manually adding page numbers to each page, especially for PPT with a large number of pages, this method can still speed up the process.
②
Plug-in method
OK Number progression + picture selection and paging
The second method is accomplished with the help of the OneKey plug-in.
(Plug-in official website: oktools.xyz)
Proceed as follows:
1. Text box preparation
2. Digital progression
3. Select pictures and paginate
1. Text box preparation
First, prepare the text box.
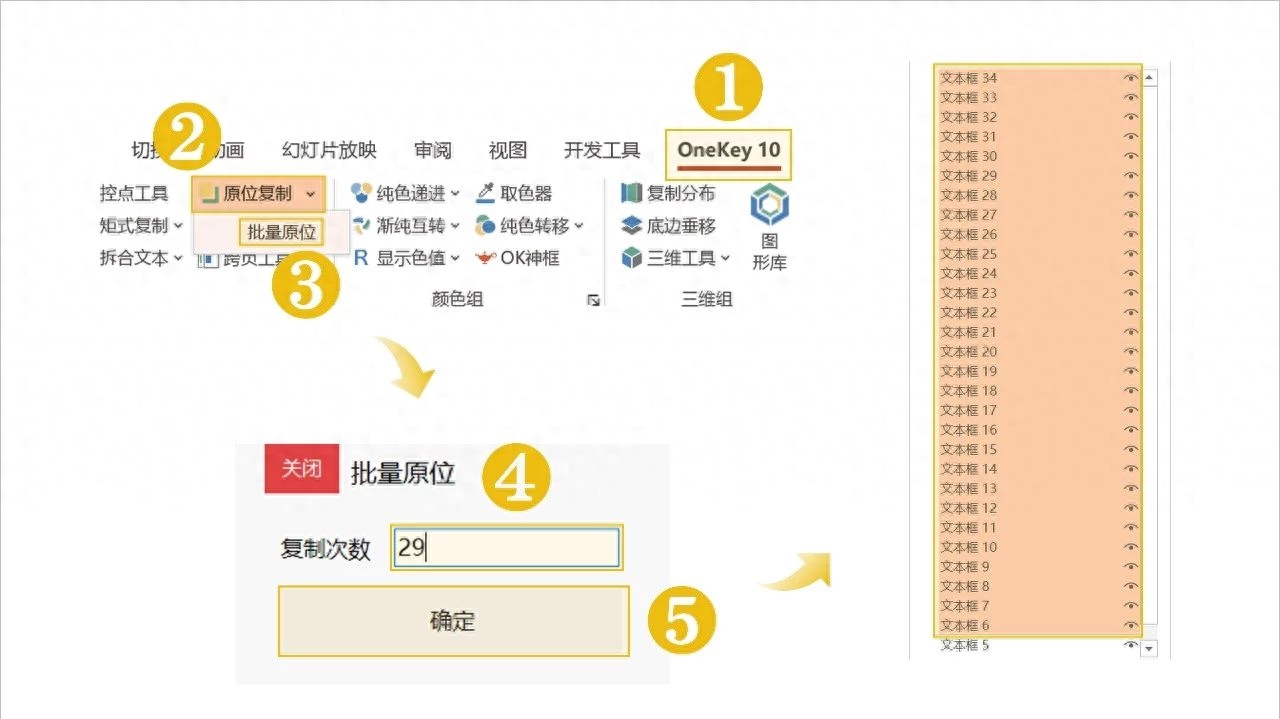
On the previous page where you need to start numbering (if you want to start numbering from page 3, navigate to page 2), go to Start→Draw→Text Box and draw a text box.

Select the text box, OneKey 10 → Copy in place drop-down arrow → Batch in place, and enter the corresponding Number of copies according to the number of pages to be numbered (if there are 30 pages, then Enter 29) and click OK to perform batch in-situ copying.
2. Digital progression
The second step is numbering.
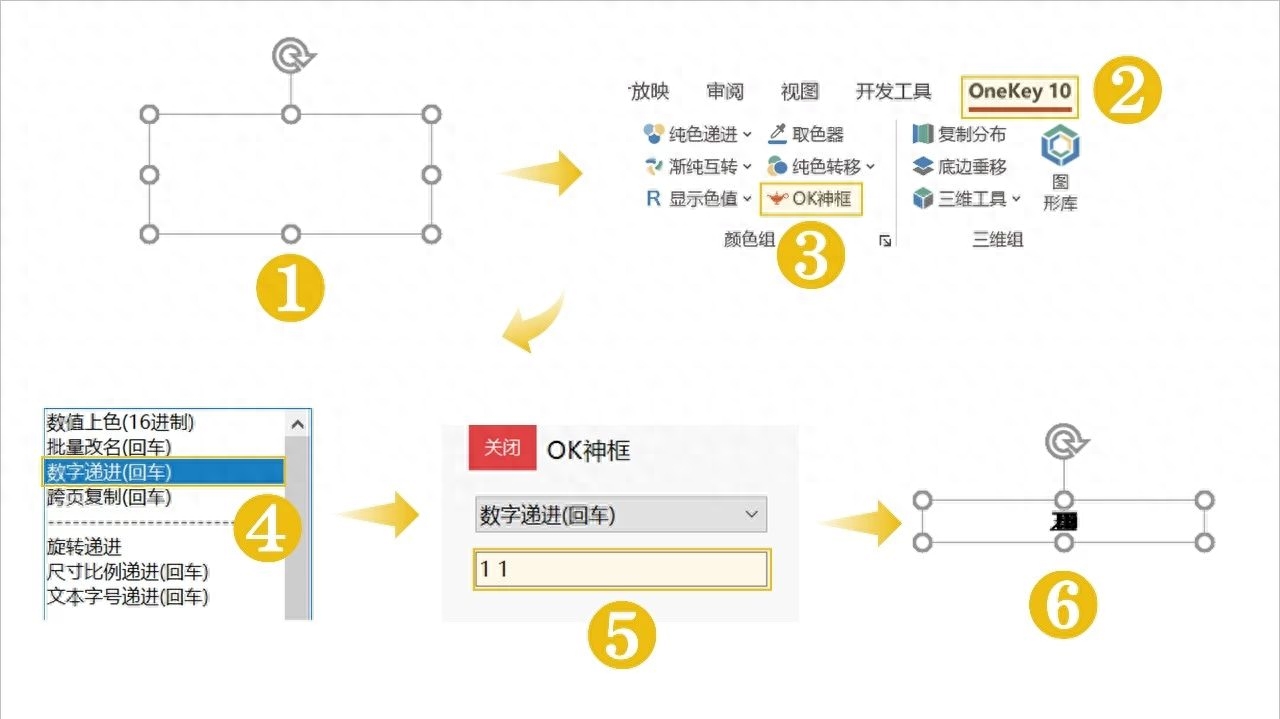
Select all prepared text boxes, OneKey 10→OK box, select Number Advance (Enter),
Enter the starting number and the number interval in sequence, separated by spaces, that is, enter "1 1" and press the Enter key to complete the addition of the number.
3. Select pictures and paginate
The final step is to assign a number.
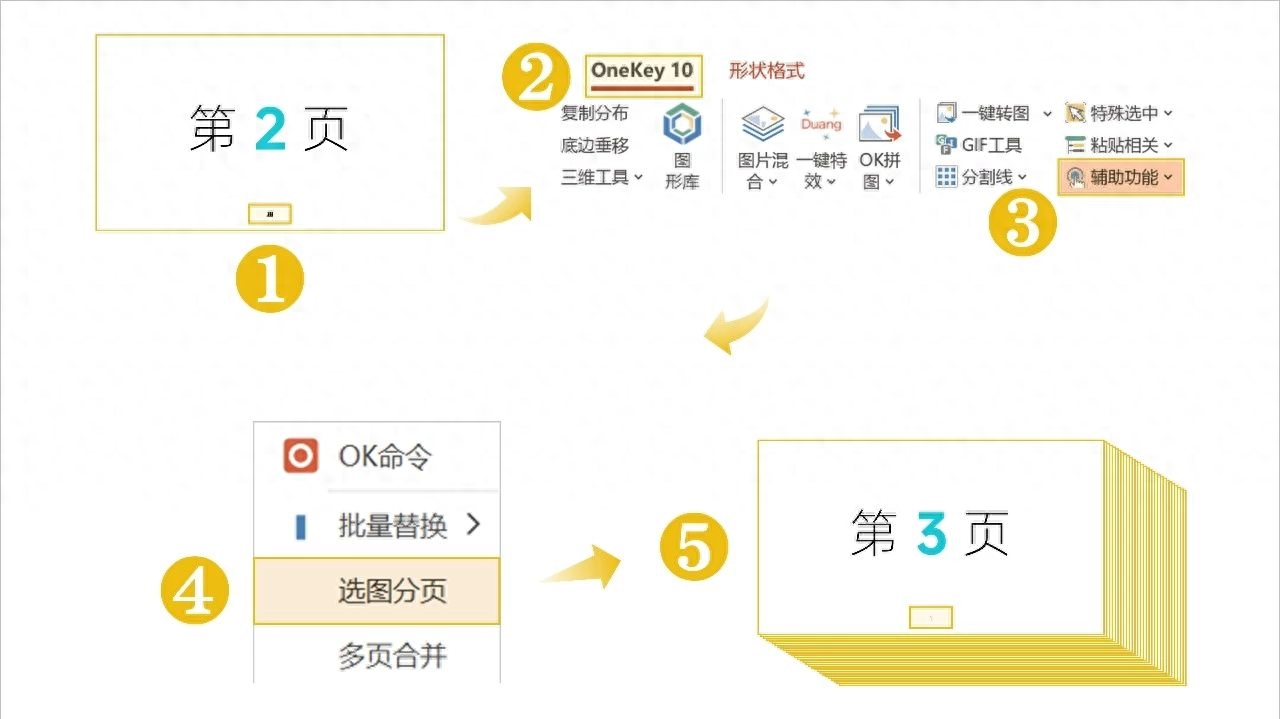
Select all the numbered text boxes and place them in the appropriate position. OneKey 10 → Accessibility → Picture selection and paging to complete the number assignment.
In this way, the numbering process is completed and can be directly demonstrated or printed.
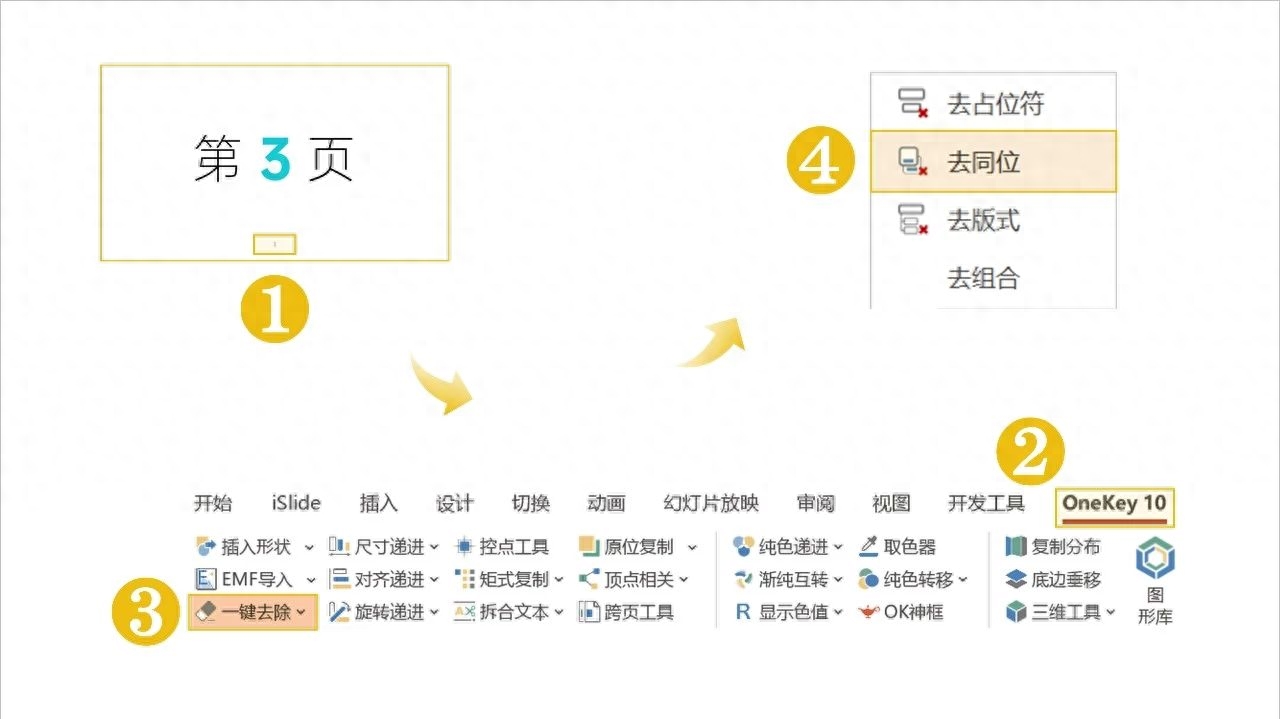
If the number needs to be modified, you can select the number text box in one of the slides, OneKey 10 → Remove with one click → Go to the same position, delete the numbers on all pages with one click, and then follow the above method Just add the number again.
Rating:
- This method, let’s talk about the disadvantages first. The number cannot be updated in real time and needs to be deleted and re-added manually;
- Advantages< Yes, deleting and adding numbers can be done very quickly, and once completed can be used directly for screening and printing respectively.
If you do not consider updating the number in real time, the second method can even be faster than the first method.
In general, both methods have their own advantages and disadvantages, so use them carefully.
Articles are uploaded by users and are for non-commercial browsing only. Posted by: Lomu, please indicate the source: https://www.daogebangong.com/en/articles/detail/ru-he-cong-huan-deng-pian-di-3-ye-kai-shi-bian-hao-ne-zhe-li-fen-xiang-liang-ge-fang-fa.html
 支付宝扫一扫
评论列表(196条)
测试