Backlighting is a favorite type of light among photography enthusiasts and can produce unique visual effects. When shooting with backlight, you will encounter this phenomenon: when the light from a bright light source (such as the sun or artificial light) directly reaches the camera lens, some red light spots, ghosts, round spots, etc. will appear in the picture. Known as "lens flare", this effect creates a different color of light that greatly reduces image contrast; it can add a circular or semi-circular halo or "phantom" and can even have Strangely shaped translucent objects of various color intensities, thus affecting the picture effect. Although "lens flare" is unpopular in the eyes of many photographers, in some photographers' lenses it is used creatively to add an artistic effect to images. So do we use lens flare when shooting? We need to look in detail at the causes of lens flare, the factors that influence it, and then discuss ways to avoid or reduce its use. Let’s take a closer look below.

How to produce lens flare
Almost all but the simplest cameras use a lens composed of multiple "lens elements". Lens flare is caused by "non-image light" that does not pass directly along its intended path (refracts), but instead reflects multiple times internally on the lens element before finally reaching the film or digital sensor.
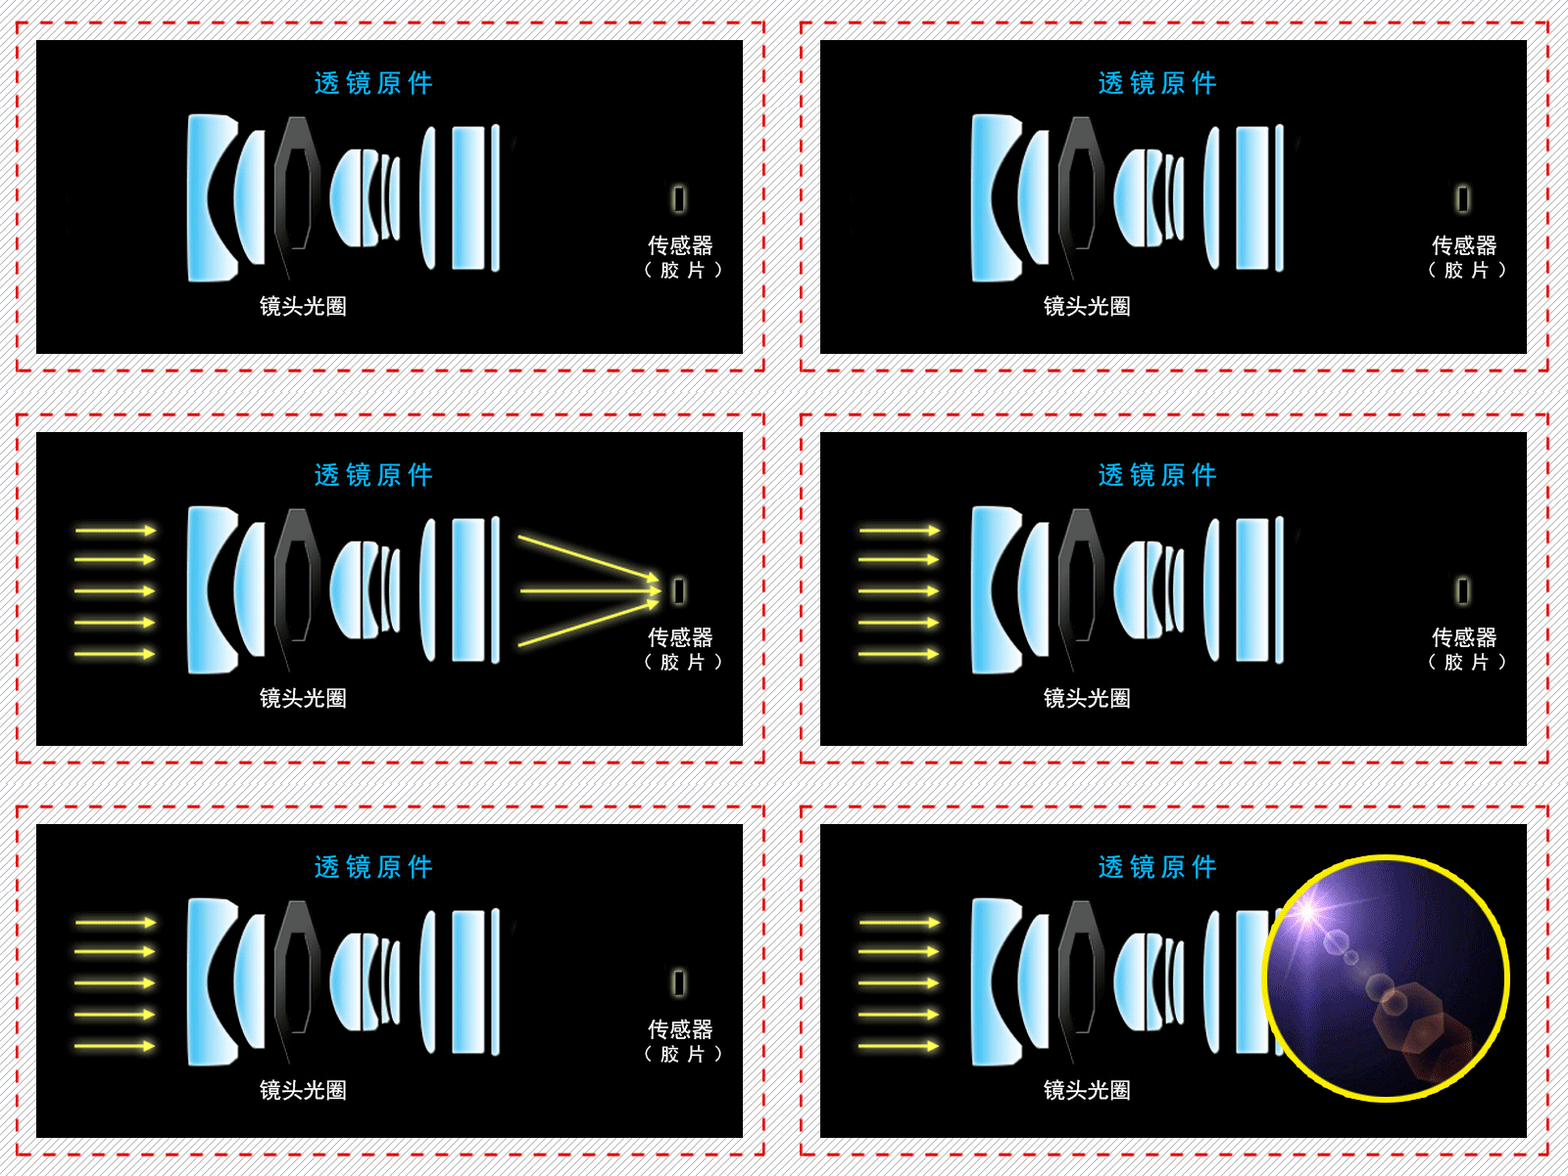
Lens flare is caused by internal reflections
Lenses usually contain some type of reflection-reducing coating with the goal of minimizing lens flare, but no lens currently can completely eliminate it. The light source will still reflect a small portion of the light, and it will show up as a lens flare in an area with an intensity comparable to the refracted light (created from the actual image). As shown above, light reflects off the inner edge (diaphragm) of the lens aperture, creating a polygonal lens flare.
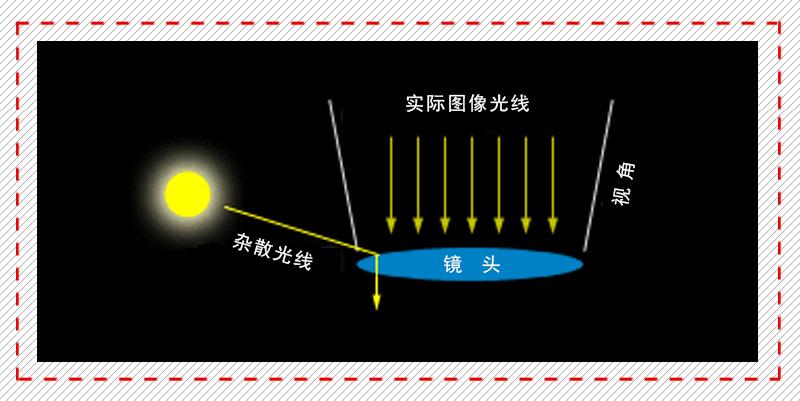
Stray light entering the lens
Although lens flare is technically caused by internal reflections, it requires a very strong light source to become noticeable (as opposed to refracted light). The light source that produces lens flare may be the sun, moon, or artificial light. Even if the photo itself does not contain a strong light source, stray light may still enter the lens if it hits the front element. Normally, light outside the viewing angle does not affect the final image, but if that light is reflected, it may travel along an unexpected path and reach the sensor (film).
Types of lens flare
1. Cover lens flare
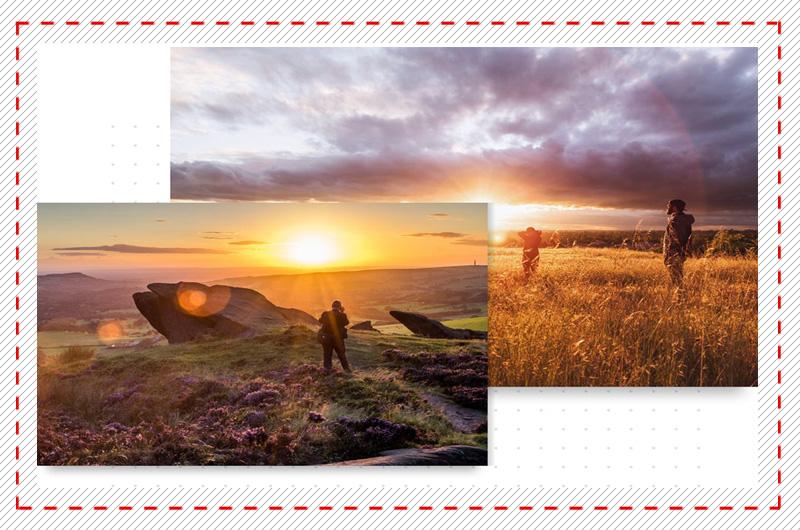
An obscured flare often occurs when a bright light source is outside the lens's angle of view (i.e. not in the image), but its light still reaches the front of the lens. This results in unclear and lack of contrast in the picture. High-quality lenses with multi-coated lenses reduce the occurrence of shadow halos.
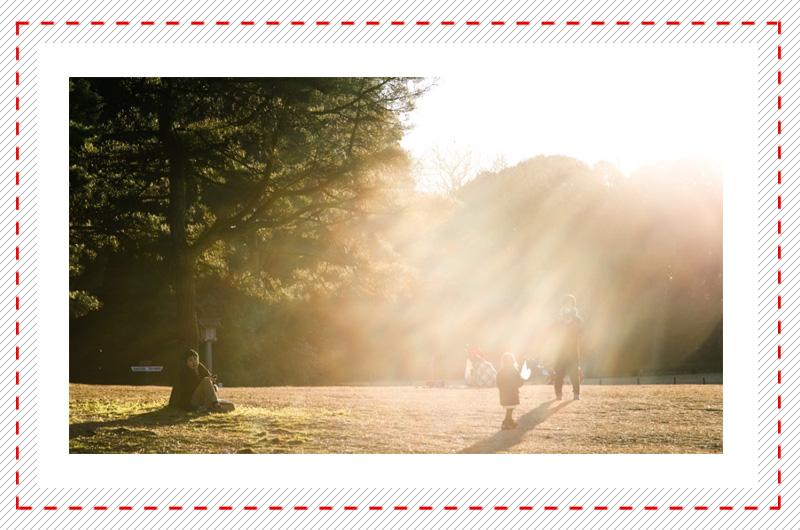
You can see from the image above that the sun is just above and to the right of the subject and outside of the image area, but the sun's rays still reach the lens and create a masking lens flare around the portrait on the right in the photo, resulting in reduced contrast.
Covering halos are mainly related to dust inside the lens, dirty front elements, low-quality lens filters, and failure to use multi-layer coating technology.
2. Ghosting Lens Flare
Unlike masking halos, which make images appear blurry and blurry, ghosting halos are spots of light similar to the shape of a lens aperture, caused by reflections from bright light sources. These spots of different colors and shapes usually appear in a straight line from the light source, and some can span the entire image, producing dozens of different ghost spots. The number of these spots is affected by the structure of the lens. Generally, the more complex the result, the more ghosting will appear in the image. For example, a 70-200mm zoom lens is composed of a dozen or more elements, so there will be more ghost lens flare.
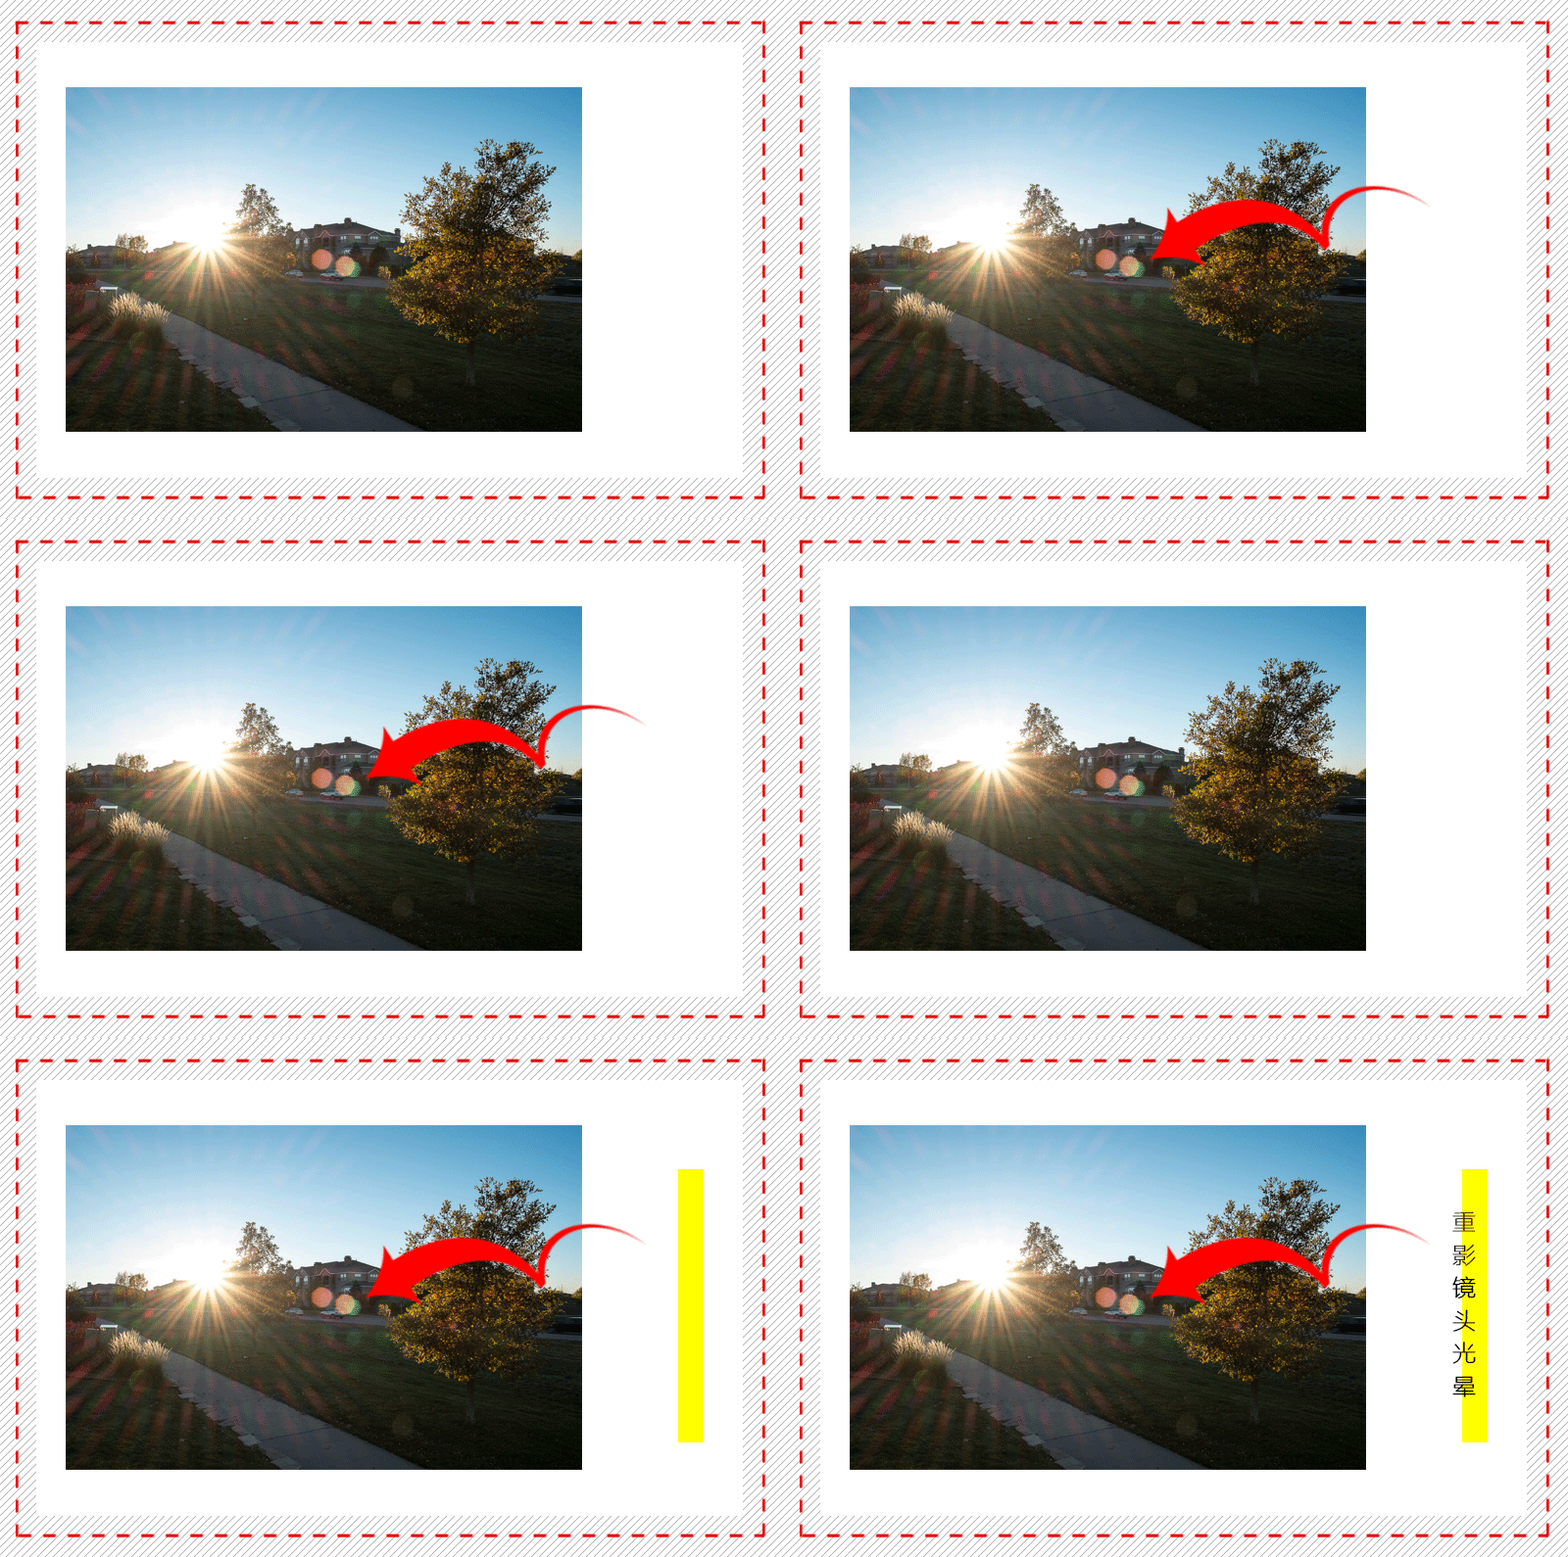
Additionally, when using a small aperture lens, the ghosting halo situation will be more obvious, while it is not visible at a wide aperture (such as f/1.4). So if you look at these polygonal spots, you can roughly tell the aperture size of the lens you're using.
3. Sensor red dot lens flare
Lens flare due to light reflection between the sensor and lens elements is called "red dot lens flare" and may also be called "sensor lens flare". Unlike lens flare, red dot lens flare is not only light reflected by the lens elements and aperture, but also light reflected from the imaging sensor to the lens and back to the imaging sensor. Unfortunately, newer mirrorless cameras with short flange distances seem to be particularly prone to this problem.
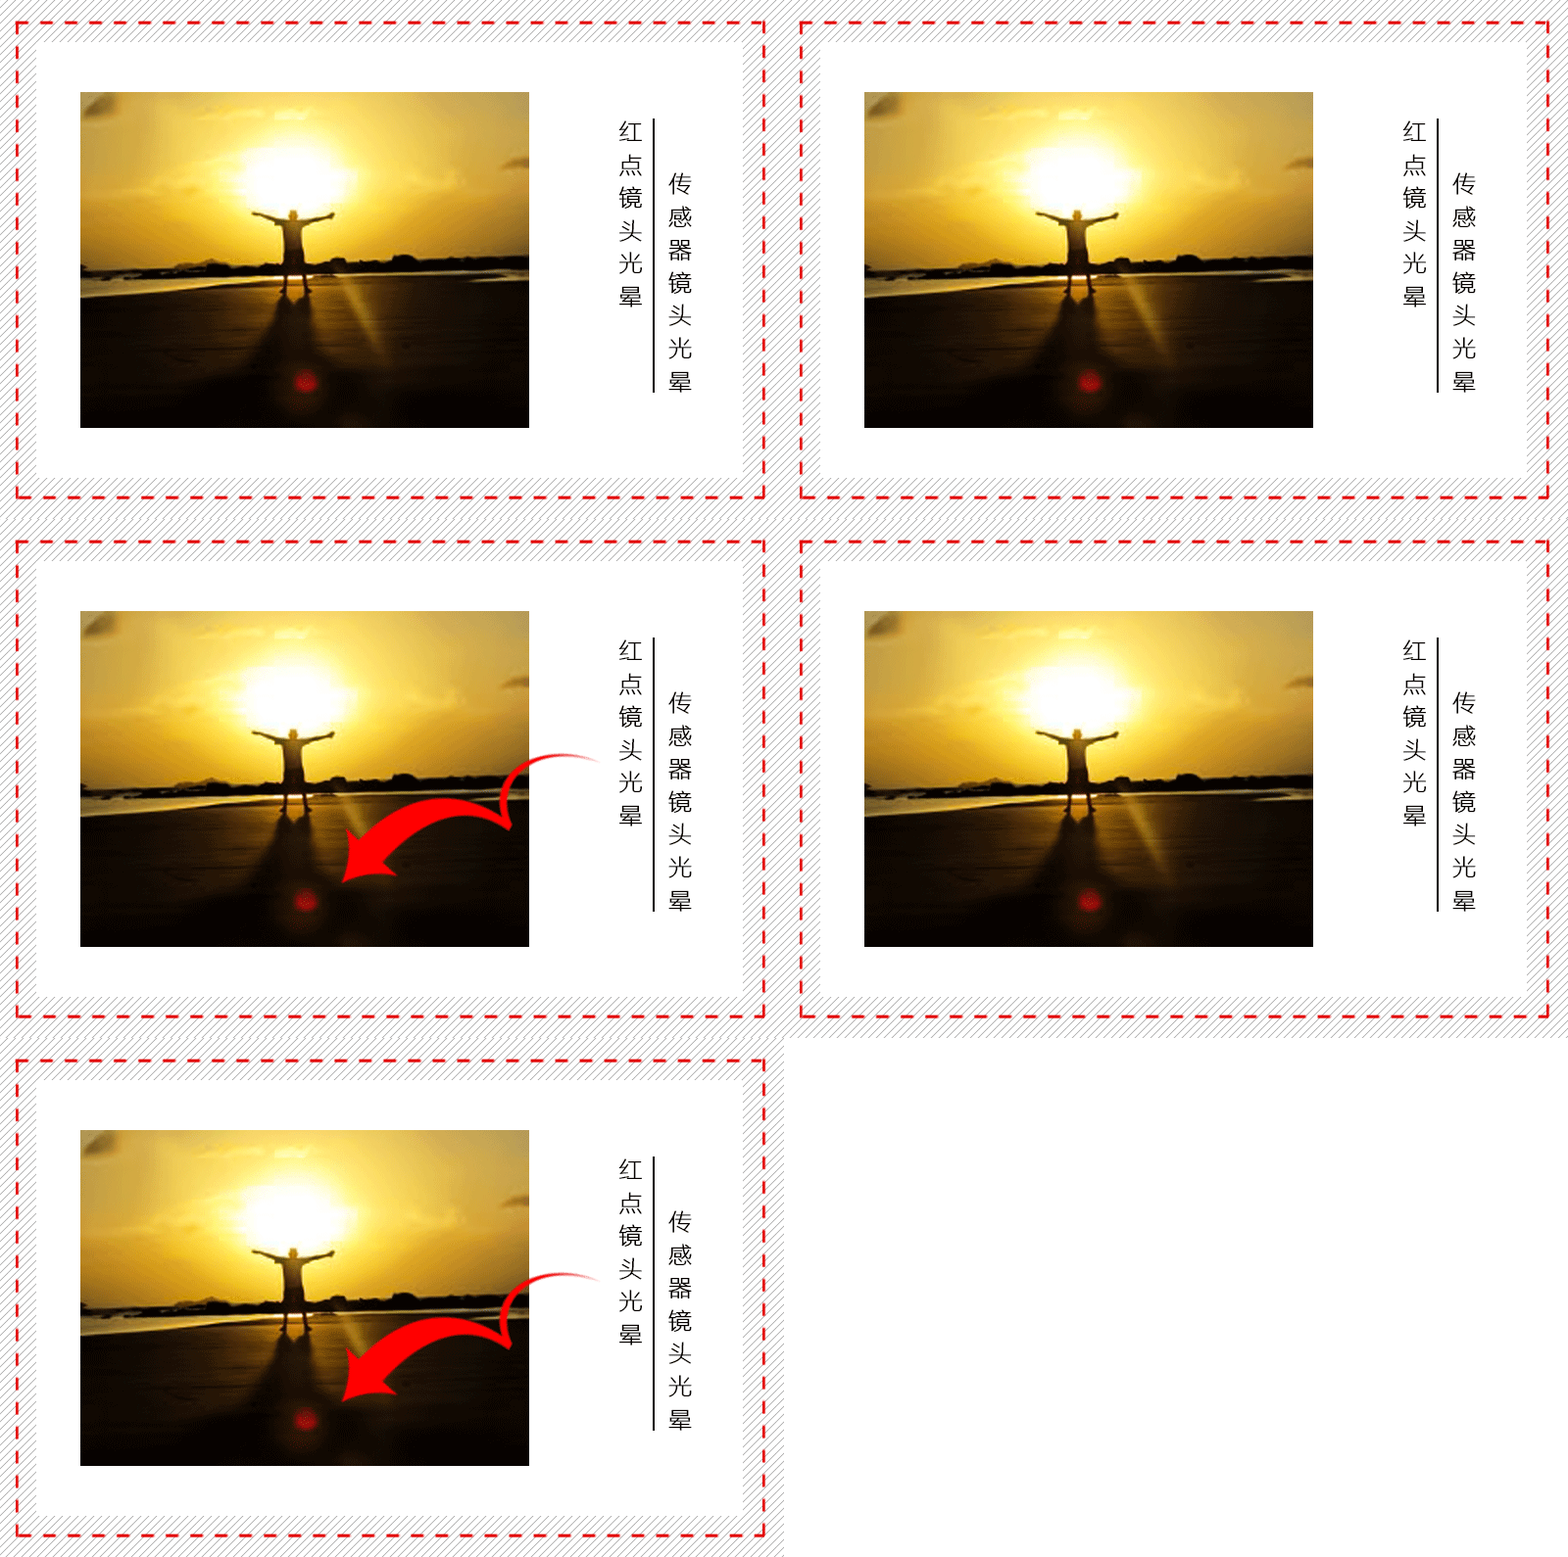
In addition to the polygonal halo of aperture, you can also see a bunch of red dots surrounding the sun, which are caused by the microlenses on the digital camera sensor being magnified in the image.
Factors affecting lens flare
Although most modern lenses use special multi-layer coating technology to reduce lens flare, even some of the most professional lenses can't completely eliminate lens flare. This is affected by the position of the light source in the image and the angle at which the light reaches the lens (and sensor, film), affecting how and how strongly lens flare appears in the image. Additionally, there are other factors that come into play. Let’s take a closer look:
Lens structure: The more complex the lens structure, the more halos will appear in the image.
Focal length effect: Wide-angle lenses handle halos well because the shorter the focal length, the smaller the light source appears. Telephoto lenses perform much worse in this regard, as they magnify elements of the frame, thus requiring longer lens hoods.
Lens Design: Lens design definitely affects lens flare. For example, Nikon's lenses with recessed front elements can greatly reduce lens flare and ghosting even without the use of expensive coating technology.
Multi-Coated: Multi-coated (MRC) lens elements can definitely have a huge impact on lens flare.
Filter pros and cons: Poor quality filters will produce more flare and ghosting in the image.
Lens Dust: All lenses accumulate dust, and internal dust can cause more lens flare.
Front element cleanliness: Fingerprints and other particles on the front element can also cause more lens flare.
How to avoid lens flare
If you don't want lens flare to appear in your images, there are some simple steps you can take to achieve this:
1. Use a hood
A good lens hood can eliminate lens flare caused by stray light outside the viewing angle. There is felt on the inner surface of the hood to prevent light reflection. Although using a lens hood may seem like a simple solution to eliminating halos, in reality most lens hoods are not long enough to block all stray light. Zoom lens hoods are also designed to block all stray light only at maximum focal length.
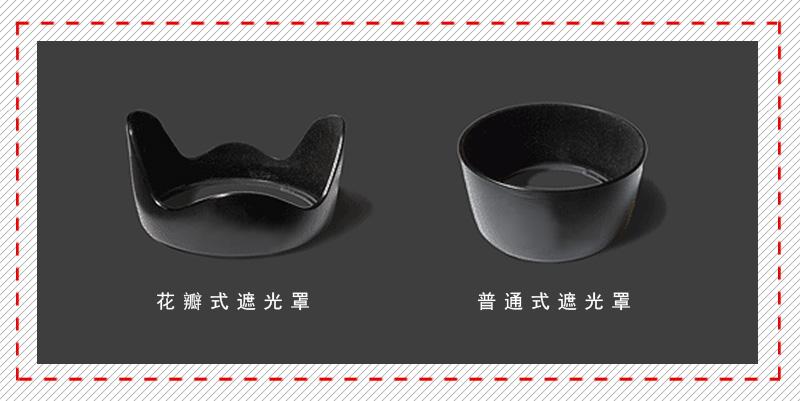
Petal hood Round (non-petal type) hood
Petal-shaped lens hoods generally provide better cancellation results than non-petal (round) types. This is because the petal-shaped lens hood takes into account the aspect ratio of your camera film or digital sensor, so the viewing angle in one direction is greater than the viewing angle in the other.

Despite all these measures, there is no perfect solution. Realistic lens hoods cannot completely prevent stray light because a "perfect" lens hood would have to extend all the way to the farthest object and closely follow the viewing angle. The larger the hood, the stronger its light-blocking ability. When using the hood, please do not block the actual image light.
2. Use your hands or other objects
Eliminate heavy lens flare by simply placing your hand over the lens to block sunlight. This is a very simple and very practical method!
3. Use high-quality lenses
High-quality, professional-grade lenses are expensive, but they feature state-of-the-art coatings that can greatly reduce or even eliminate lens flare issues. Modern high-end lenses use better anti-reflective coatings. Some older lenses made by Leica and Hasselblad do not contain any special coatings and therefore may produce noticeable lens flare even in soft light.
4. Use fixed focus lenses instead of zoom lenses
Because the structure of a prime lens is simpler than a zoom lens, there will definitely be fewer optical components. So less lens flare appears in the image. In addition to being more complex in structure, zoom lenses also have lens hoods that do not block stray light at all focal lengths. Therefore, zoom lenses have more internal surfaces that can reflect light, and more lens flare will occur.
5. Change the shooting angle
Changing the shooting angle will change the position of the light source in the lens, thereby eliminating lens flare.
Although you can use a lens hood or block the light with your hands or other objects, lens flare cannot be avoided by shooting directly toward the sun. In this case, either completely change the shooting angle or use high-quality lenses with multi-layer coatings.
Use lens flare to make your work dreamy and beautiful
Although lens flare can ruin the image, many photographers avoid it. However, as a picture effect, if used properly, it will change the dull atmosphere and give the work a cinematic visual effect and beautiful and romantic emotions. Especially in portrait and wedding photography, I am sure you must have seen images with lens flares of the bride and groom playing in the evening with a golden glow all around? How do you feel when you look at these photos? Doesn’t it look romantic and dreamy? Do you want to shoot something like this?
1. Why photography lens flare is needed
Lens flare is an art form: You can use lens flares to create unique effects that evoke drama in your photography. For example, using lens flares can enhance sunlight, light up a golden horizon, emphasize a sun-drenched look, add geometric patterns and beams of color. With lens flare, you can easily amplify the beauty of your photography and enhance your creativity.

Advanced photorealism: Lens flare can make your photos appear more realistic. They replicate the realistic effect of light entering and reflecting off the lens, so you can give your audience the feeling of being behind the camera. Lens flare adds beautiful light, bright spots and other naturally occurring stripe effects to the picture, sublimating realism and taking the audience's visual experience to a whole new level.
2. Tips for using lens flare
Change the angle to the sun: When taking a photo with lens flare, you can move the shooting position slightly to the left or right so that part of the target or object blocks the light. If the sun is directly behind your subject, the subject will become more attractive due to lens flare.
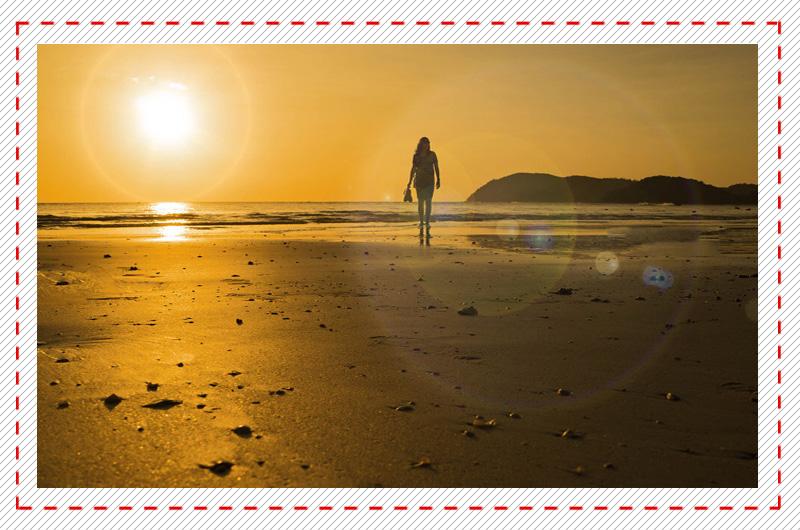
In the photo above, the sun is positioned to the left of the frame. In this way, the lens flare will extend across the portrait frame from the left to the right. Since the ring has a virtual attribute, it will not affect the status of the subject, but will set off and enhance the subject.
Shooting with a zoom lens without the hood: To highlight the lens flare effect, use a zoom lens and/or a wide-angle lens instead of a prime lens. Lens flare occurs when sunlight has to pass through lens elements. Zooms have more internal elements than primes and are better suited for shooting lens flares. Wide-angle lenses also have a larger viewing angle and can take in more light from the sides. Please remove the lens hood when shooting. The lens hood will block stray light and is not conducive to the formation of lens flare.
Shoot in manual mode: Do not use automatic mode when shooting lens flares. In auto mode, most cameras automatically meter the brightest areas of the frame so that other areas become very dark. If you don't want your subject to be dark, use manual mode, which gives you control over every factor.
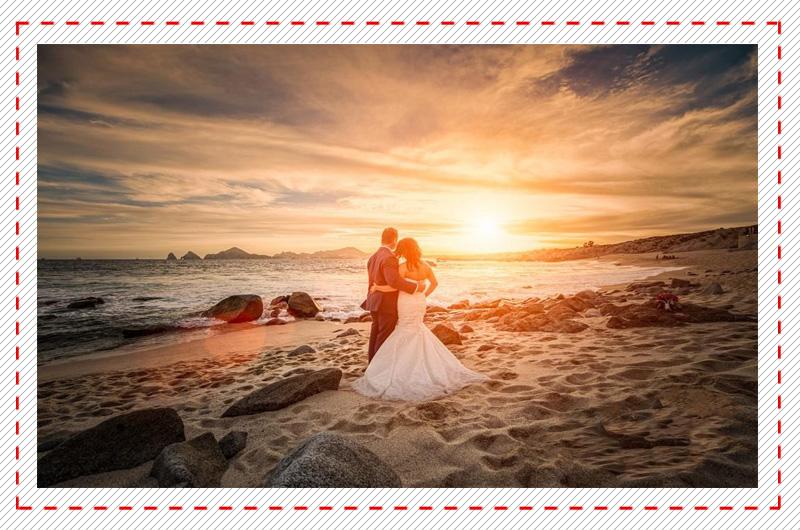
- Use spot metering to meter on the subject. I like to use a wide aperture because it lets in more light.
- The longer the shutter is open, the more light comes in. Therefore, slower shutter speeds create more lens flare. I usually hand-hold the camera and the minimum shutter speed is 1/60.
- A smaller aperture can make the spot image more vivid. If I want the halo to be sharper, I usually choose an aperture value of f/8 or larger.
- I put my hand on the side of the lens to block the sun when metering and focusing, and then moved my hand away to let more light into the lens before clicking the shutter.
- It is easy to overexpose when shooting backlit, so pay attention to the highlight indicator on the back of the camera and make sure that important parts of the subject are not overexposed and lose detail.
Shooting with a reflector: When shooting with backlight, use a reflector to bounce light from the front back to your subject. This will still keep the lens flare soft, but will make the subject much brighter. If you want the sunset to appear orange, use the silver side of the reflector.
Use plug-ins to easily achieve lens flare effects
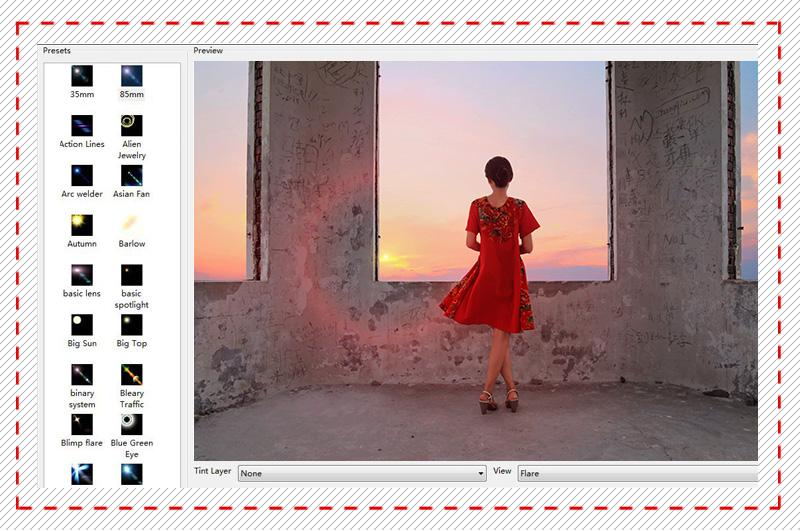
If you didn’t achieve the lens flare effect when shooting in the early stage, it doesn’t matter! It can also be easily achieved using post-processing software. In Photoshop software, you can add effects to the picture through "Filter, Rendering, Lens Flare" under the menu. However, the software's built-in effects are somewhat simple and may not meet your needs. You can also download the Knoll Light Factory halo filter. It has more than 100 cool and beautiful halo presets, which can provide you with exquisite lens flares, light sources and halo effects, making it very simple to add lens flare effects.
Conclusion
The use of lens flare, which has mixed reputations, mainly depends on your personal shooting wishes. You can try to avoid it when it is not needed. If you want to change the dull picture atmosphere and make the work beautiful and romantic, use lens flare is a good choice. Especially when shooting portraits or wedding photography, lens flare is of great use. Therefore, it is very important to master its usage skills so that you can take better charming effects and get praise from the subjects or users and the audience. Did the above sharing of lens flare knowledge and techniques inspire and help you? Or if you have photos with better lens flare effects, please share them with everyone in the discussion area!
Articles are uploaded by users and are for non-commercial browsing only. Posted by: Lomu, please indicate the source: https://www.daogebangong.com/en/articles/detail/rang-ren-bi-zhi-bu-ji-de-jing-tou-guang-yun-jing-she-ying-shi-qiao-miao-li-yong-li-ma-bian-de-wei-mei-lang-man.html

 支付宝扫一扫
评论列表(196条)
测试