:[Scientific Research Skill Improvement] PPT scientific drawing skills: Detailed explanation of scraping process flow chart production-PPT tutorial免费ppt模版下载-道格办公

[Scientific Research Skill Improvement] PPT scientific drawing skills: Detailed explanation of scraping process flow chart production

This tutorial requires PPT software, please make sure it is installed. The following are the steps to draw a schematic diagram of the scraping preparation process: Step 1: Open the PPT software and create a new blank slide. Step 2: Insert the basic shapes

Hello, everyone! Welcome everyone to pay attention to PPT scientific research drawing. Today I will continue to update PPT scientific research drawing tutorials for you in this short section. I hope you will support me a lot!
In this tutorial, we use PPT to draw a schematic diagram of the scraping preparation process. The reference picture is from Joule (Joule.2020, available online).
The third phase of the PPT scientific research drawing practical tutorial begins now:
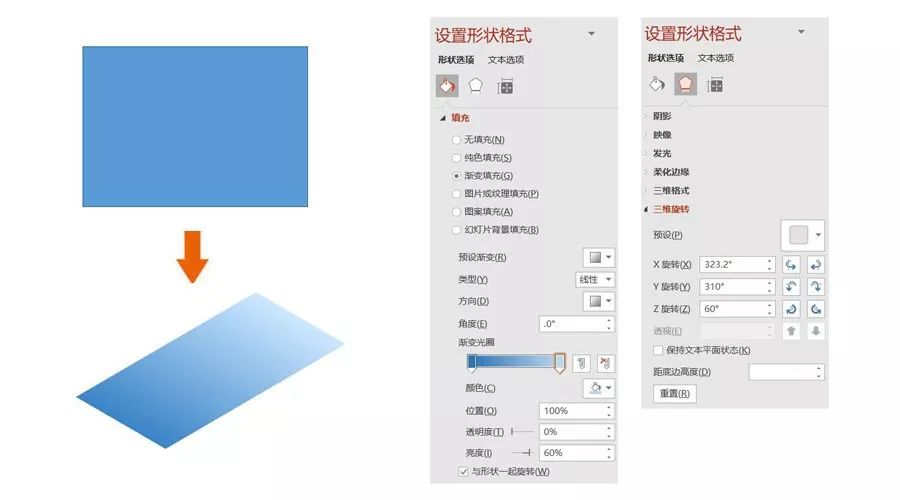
< strong>Step 1: DrawSubstrate. Insert a rectangle and set the size: height 5 cm, width 7 cm;
Set shape format: fill - gradient fill, type - linear, direction - linear to the right, detailed The parameters are shown in the figure below; lines - no lines; three-dimensional rotation: X rotation -323.2°, Y rotation -310°, Z rotation -60°.

Step 2: Paint the coating. Insert a rectangle, set the size: height 4.5 cm, width 6 cm;
Set shape format: fill - gradient fill, type - linear, direction - linear to the right, detailed The parameters are shown in the figure below; lines - no lines; three-dimensional rotation: X rotation -323.2°, Y rotation -310°, Z rotation -60°.

Step 3: Draw the Bladecoater. Insert a rectangle, set the size: height 0.8 cm, width 0.8 cm; insert a trapezoid, set the size: height 0.8 cm, width 0.8 cm, then adjust the base length appropriately; select the rectangle and trapezoid to perform Boolean operations to form a new Graphics;
Set shape format: fill - solid color fill - brown; line - no line; three-dimensional format: depth - automatic, material - metallic effect, light source - rough, specific parameters See the figure below for details; three-dimensional rotation: X rotation -320°, Y rotation -28°, Z rotation -0°.

Step 4: Draw N2Knife. Insert a rectangle, set the size: height 0.8 cm, width 0.8 cm; insert a trapezoid, set the size: height 0.8 cm, width 0.8 cm, then adjust the base length appropriately; select the rectangle and trapezoid, perform Boolean operations, combine and rotate 20 °;
Set shape format: fill - solid color fill - brown; line - no line; 3D format: depth - automatic, material - metallic effect, light source - rough, specific parameters See the figure below for details; three-dimensional rotation: X rotation -308°, Y rotation -20°, Z rotation -6.1°.

Step 5: Draw a fixed axis. Insert an ellipse and set the size: height 0.4 cm, width 0.4 cm;
Set the shape format: Fill - solid color fill - brown; Line - no line

Articles are uploaded by users and are for non-commercial browsing only. Posted by: Lomu, please indicate the source: https://www.daogebangong.com/en/articles/detail/ke-yan-ji-neng-ti-sheng-PPT-ke-xue-hui-tu-ji-qiao-xiang-jie-gua-tu-gong-yi-liu-cheng-tu-zhi-zuo.html

Like (810)
Reward 支付宝扫一扫 支付宝扫一扫
single-end

Related Suggestion