
Generally speaking, we think that adding effects to shapes is relatively "earthy".
This concept originated from the common PPTs on the Internet, which are designed to be fancy and have neither functionality nor aesthetics.
So much so that we often hear a voice saying "Don't add effects when making PPT, the more you add, the uglier it becomes!"
Is it really?
In fact, the powerpoint preset effect may be really unsightly and unfashionable, but it provides the most basic parameters for us to modify.
As long as you understand the basic composition and aesthetic goals of the effect, you can complete a great design through the settings of the effect!
The key is to know what effects PPT provides and how deep they can be.


Powerpoint has many built-in adjustable effects for shape elements, including six categories: shadow, reflection, glow, smooth edge, three-dimensional format, and three-dimensional rotation.
The above examples apply shadows, images, and three-dimensional effects respectively.
Below, Lao Hei will explain the options of these six functions in detail and give some practical suggestions.

One / Shadow
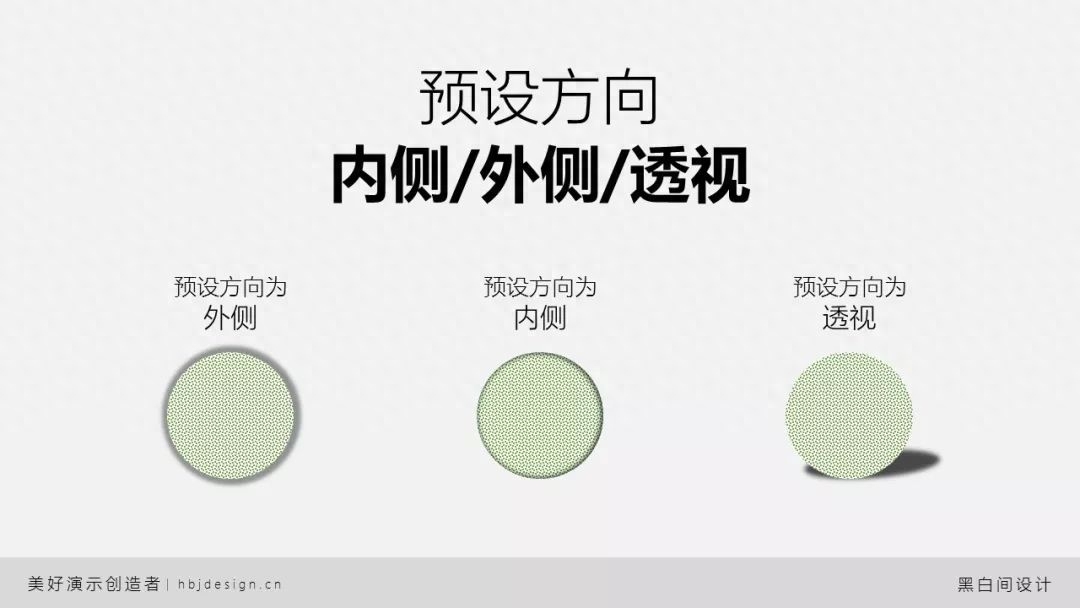
Among the preset effects of shadows, the projection directions are divided into three categories: medial, lateral and perspective.
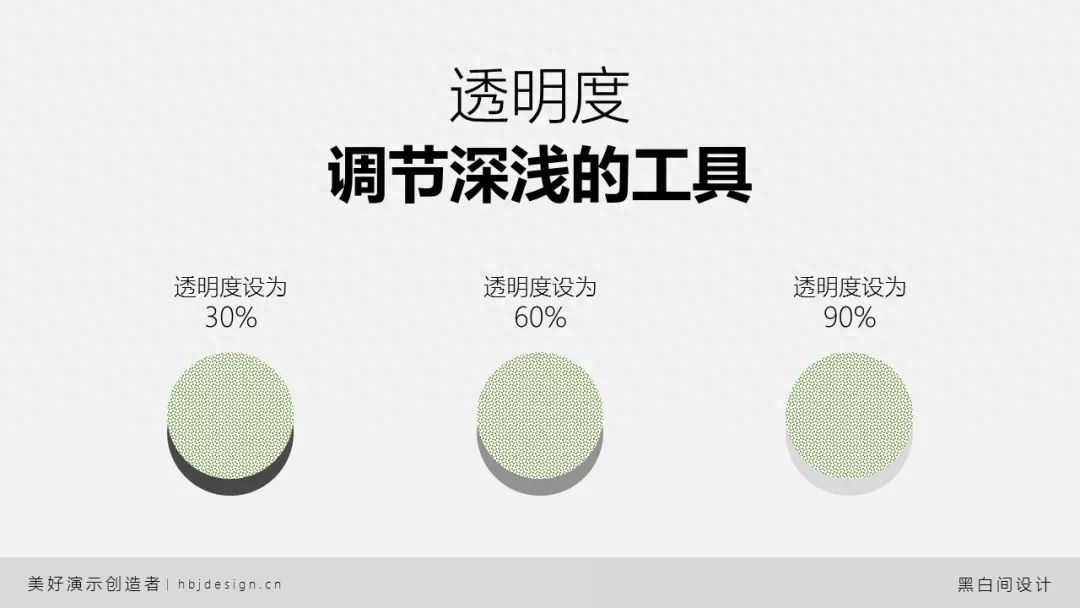
Adjustable parameters for shadow effects include color, transparency, size, blur, angle, and distance.

The default shadow is generally black. By adjusting [Transparency], the depth of black can be changed.
The unit of the [Size] parameter is percentage, which refers to the proportional relationship with the main body.

The [Blur] parameter can adjust the degree of virtuality and solidity of the shadow, and its unit is "pounds". "Pound" is a unit of length, 72 pounds equals 1 inch.
The larger the value of the blur parameter, the more obvious the blurring effect of the shadow edge; the smaller the value, the sharper the shadow edge.

[Angle] parameter, calibrate the relative angle between the subject and the shadow. The starting angle is the positive x-axis of the plane coordinates, and the angle increases clockwise.

[Distance] indicates the distance between shadow subjects.

Through the combination of parameters, various styles of shadows can be added to shapes or pictures.
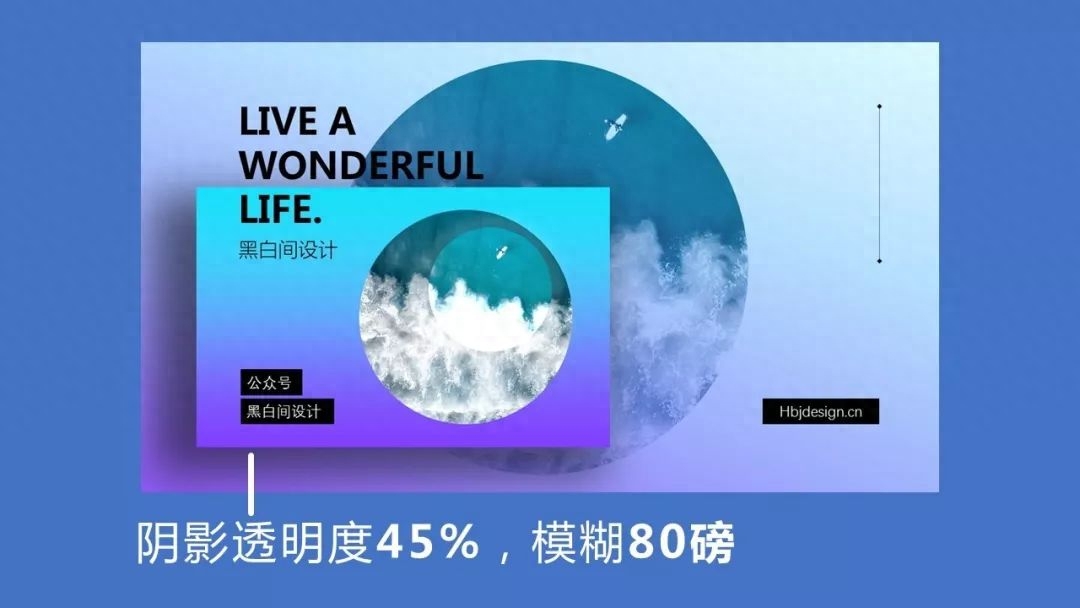
Take, for example, the most common form of diffuse shadow these days.

Diffuse shadows give people an intuitive feeling of lightness and seeming absence. Reflected in the parameter settings, the transparency is mainly high, and the blur value is high.
In addition, the shadow offset method that is slightly downward and shrunk in size is also commonly used. This shadow setting method is more in line with the perspective principle of near large and far small.
In the example below, [Transparency] is set to 30%, [Size] is set to 95%, and [Blur] is set to 24 points.

Changing the shadow offset direction to the inside can create a paper-cut-like layered feel.

Adjust the blur value of the shadow to 0 to create a layered graphic or text effect.

By removing the fill from the subject, the shadow can even serve as the theme of the design.

In short, parameters serve creativity. Powerpoint’s shadow parameter settings are sophisticated and powerful enough to help you realize a variety of design ideas.


II / Image
Reflection effects simulate reflections on smooth surfaces.

Adjustable parameters include transparency, size, blur, and distance, which are similar to the adjustable parameters of shadows, so they will not be described in detail.
Image effect is a double-edged sword in design applications. When used well, it can greatly enhance the layering of the design. When used poorly, it is not as simple and refreshing as a flat shape.
To a large extent, whether the image effect is beautiful depends on whether the background environment is suitable for the image effect.
For example, setting up an image on the lake is in line with our perception, and the whole picture is harmonious.

But setting up the image on land is a bit strange.
The image itself is an operation method to increase the three-dimensional effect. If the design style is originally flat, the image will be superfluous.
Therefore, even if the background image itself does not have a natural reflection surface like a lake, it can still create a three-dimensional perspective effect through color gradients or scene selection.


三 / luminous
The luminous effects of Powerpoint are all external luminous, which means adding a color gradient from dark to light outside the outline of the subject to simulate the light dissipation effect of the luminous body.
The glow effect has three adjustable parameters: color, size and transparency.
Compared with other effects, the glow effect in Powerpoint is a bit unsatisfactory, and the transition effect is not very natural.
So if you want to set up an outer glow effect, consider using a white outer shadow instead.

4 / Soften edges
Soft edges have only one adjustable parameter, size, which is also in points.
The larger the parameter setting, the blurrier the outline of the subject becomes. By setting the Soft Edge effect, we can make some elements blurry and others clear, thereby adding a sense of hierarchy.


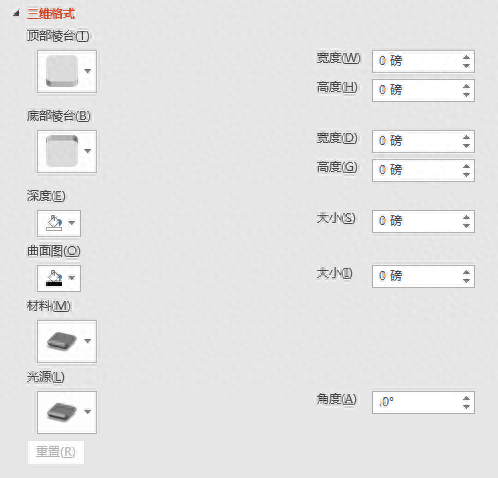
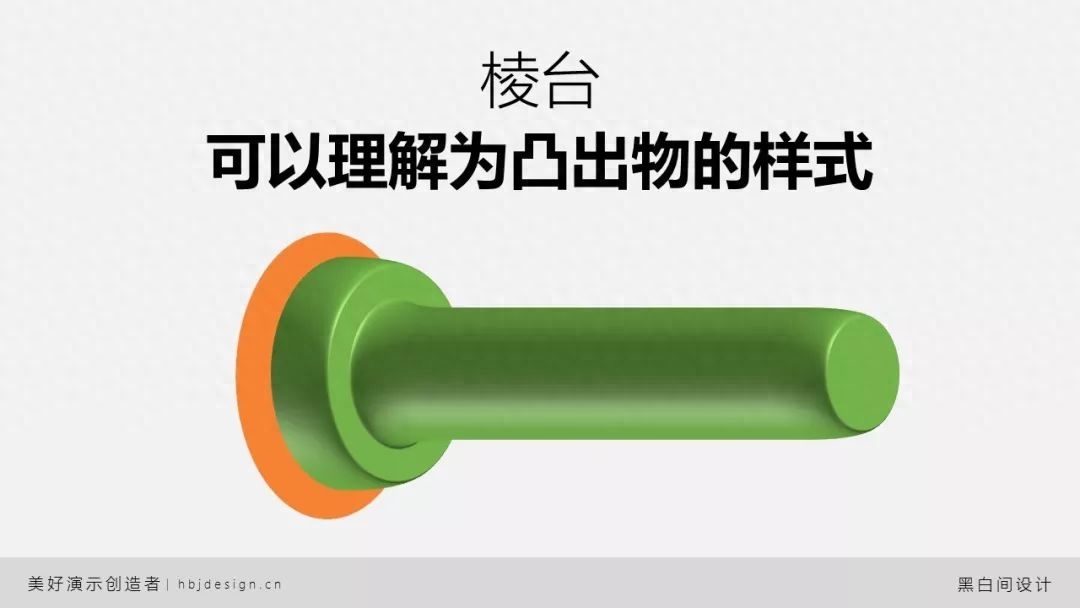
5/ 3D format
This effect, which is rarely used under normal circumstances, is actually very powerful.
It can generate three-dimensional objects based on plane shapes. Its adjustable parameters include bevel (style, width, height), depth, surface map, material and light source.
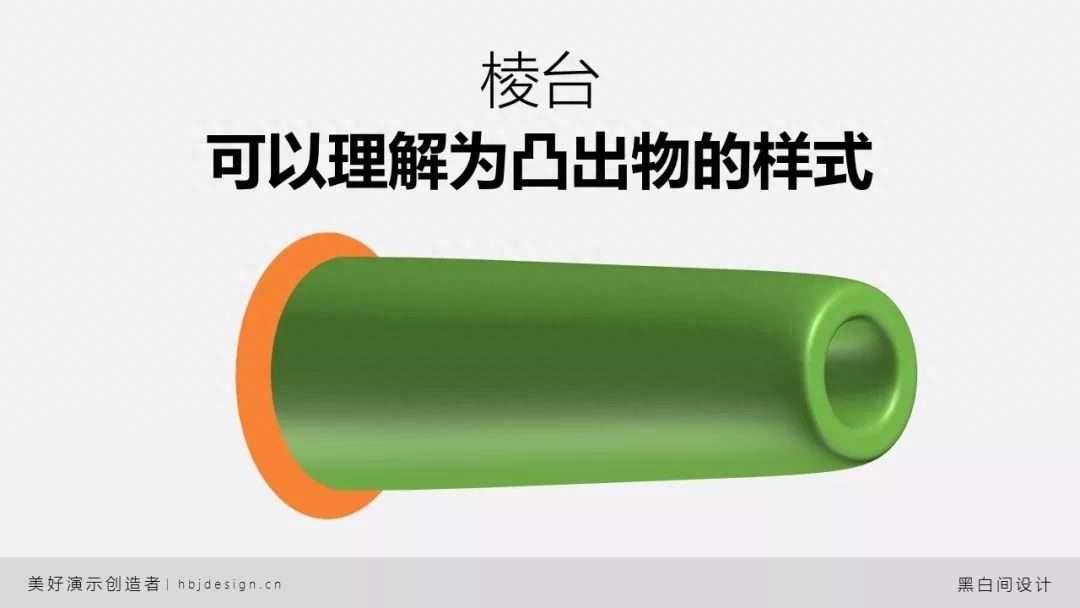
Prism can be understood as the form of increased volume when the shape changes from two-dimensional to three-dimensional.
Simply put, it’s the style of the bulge.

Controlling the height of the prism can make the protruding part shorter or longer; controlling the width can make the protruding part pointed or rounded.
The application of different preset styles can make the changes more diverse.
Assuming that the original shape is on the xy plane, the new z axis is [depth]. You can adjust its size, or give new colors to the new xz plane and yz plane.

The so-called [surface diagram] in Powerpoint is actually the ridges of a cube. Through this parameter setting, you can give the ridge a new color and width.

As for [Material] and [Light Source], the color, texture, transparency, smoothness, reflectivity and other properties of the object surface can be changed. Gives people a different look and feel of the material.
To give a few examples:
Choose the wireframe material to make the flat fill disappear, leaving only the lines.

Choose translucent materials so that you can see both outside and inside the three-dimensional space.

Choose flat materials to ignore the light and shadow effects calculated by the software and fill every plane with a pure and uniform color.

Lu/3D Rotation
Three-dimensional rotation usually needs to be used with a three-dimensional format. That is, after giving it three-dimensional attributes through a three-dimensional format, it can then be observed from different angles using three-dimensional rotation.
Three-dimensional rotation adjustable parameters include the rotation angles of the x, y, and z axes, as well as the intensity of perspective.

Only by combining 3D rotation with 3D format settings can you get better results.
To achieve the effect in the following example, you only need to set the three-dimensional [depth] of the text to 50 points, the three-dimensional rotation x-axis to 320°, and the y-axis to 45°.

By adjusting the rotation angle and preset modes, you can achieve a variety of 3D effects.


Return to the Memphis-style PPT example cited at the beginning of this section. Pay attention to these cubes. Do you think I drew them face by face and then aligned them?

In fact, you only need to draw a square, and then set the three-dimensional attributes and rotation angle.
Take the leftmost cube as an example. It is actually a square. It is set to a depth of 25 points, a surface black of 2 points, an x-axis rotation angle of 325°, a y-axis rotation of 8°, a z-axis rotation of 3°, and a perspective of 80°.

There is no need to memorize the values. You can preview them while modifying them, as long as they are visually appropriate.
Various effects can be freely combined according to style requirements. For example, combining three-dimensional rotation and imaging can achieve a card display effect.

The above is the sharing of this issue~
I feel so happy when I see someone like it~
black and white design studio
Committed to finding a balance between beauty and practicality
Make design easy

Articles are uploaded by users and are for non-commercial browsing only. Posted by: Lomu, please indicate the source: https://www.daogebangong.com/en/articles/detail/jian-yi-shou-cang-yi-pian-wen-zhang-kan-bian-suo-you-PPT-xing-zhuang-xiao-guo.html
 支付宝扫一扫
评论列表(196条)
测试