Mustang Design Academy
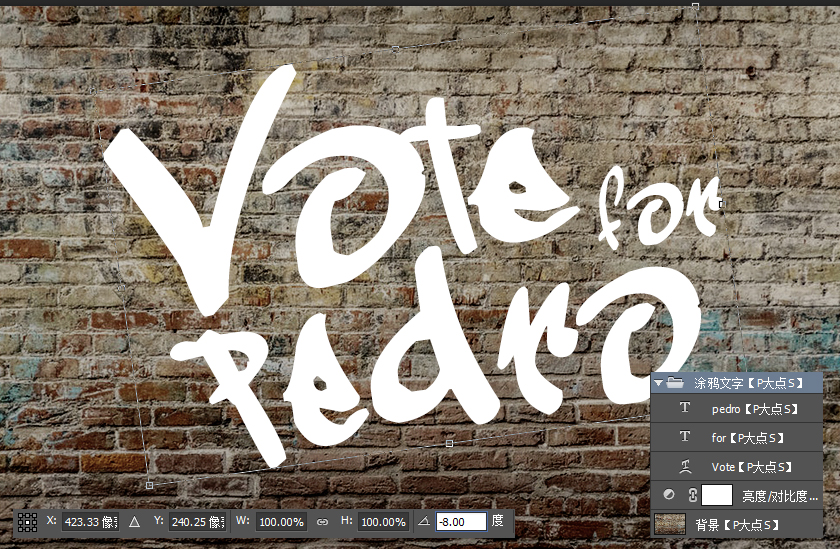
Look at the renderings first

1. Background creation
1. Open the brick wall material Brick-wall.jpg we provide, we will use this brick wall background to create this graffiti text effect. Open Brick-wall.jpg in PS, this picture is edited by Jan Stverak, the size has been adjusted, and we also provide an unedited original picture, roughly adjusted the brightness, color scale and Saturation, you can experiment, or if you want to try a different background, look up other backgrounds yourself.

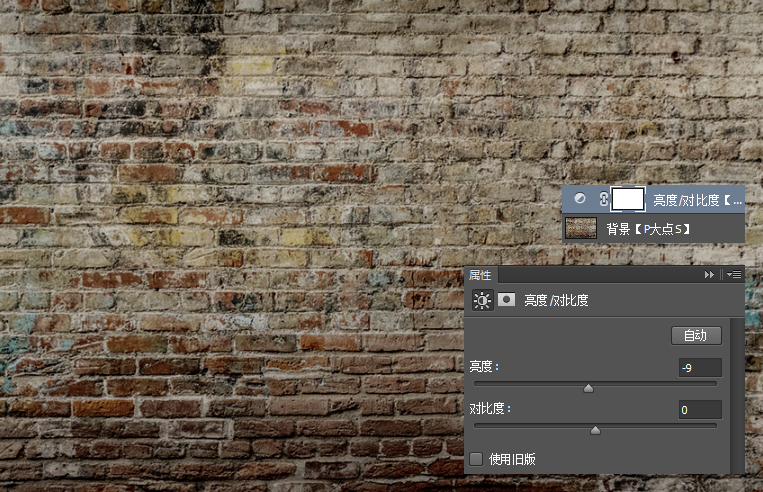
2. I created a Brightness/Contrast adjustment layer and lowered the brightness a bit.
Two, set the text
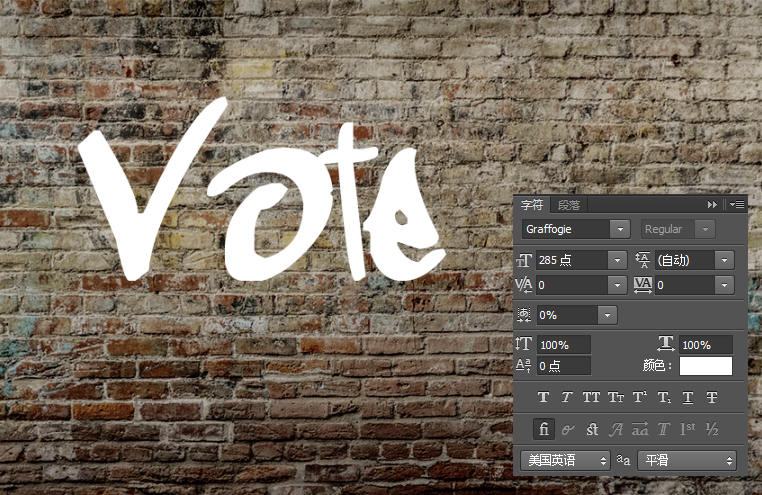
3. Select the text tool, input the text "Vote", set the font to Graffogie, and the size to 285 points.
4. Execute "Edit-Transform-Deform", set the deformation type to "Corolla", bend "21%", H: -29%, V: 22%, we get the following deformation results.
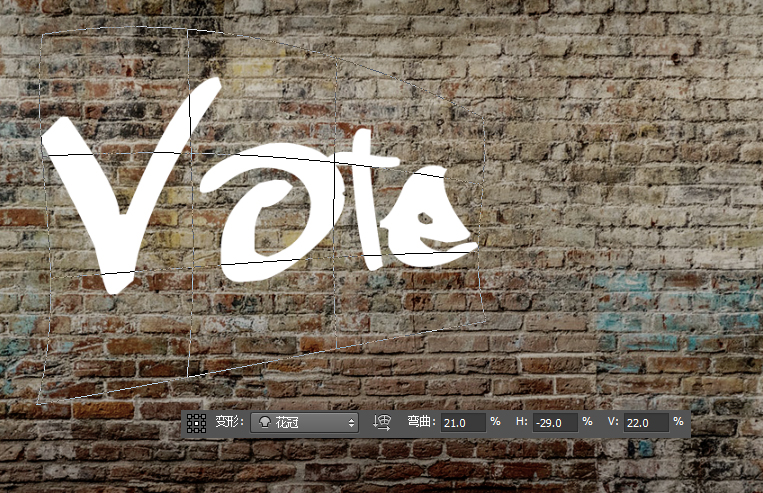
5. Judging from the deformation results, the distance between V and O feels larger than OTE, so choose to live in the V character, and adjust the kerning of the V character to "-75", this is a detail problem.

6. Next, we type the other two texts "for" and "Pedro", and set the font to Graffogie as well, the text size of "for" to 116 points, and the kerning to 75. "Pedro" text size is 255 points, kerning 75, one text layer.
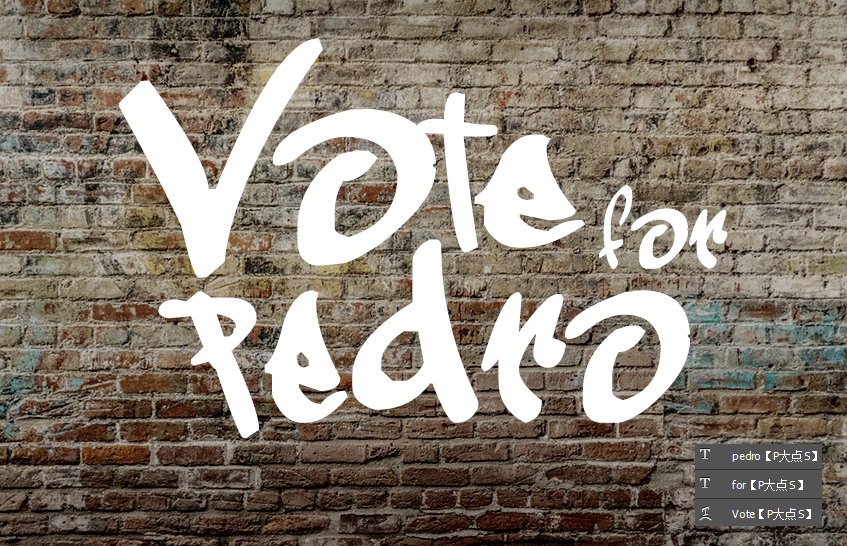
7. Select the three text layers, press CTRL+G to create a layer group, and rotate the layer group by -8°.
3. Create a graffiti effect
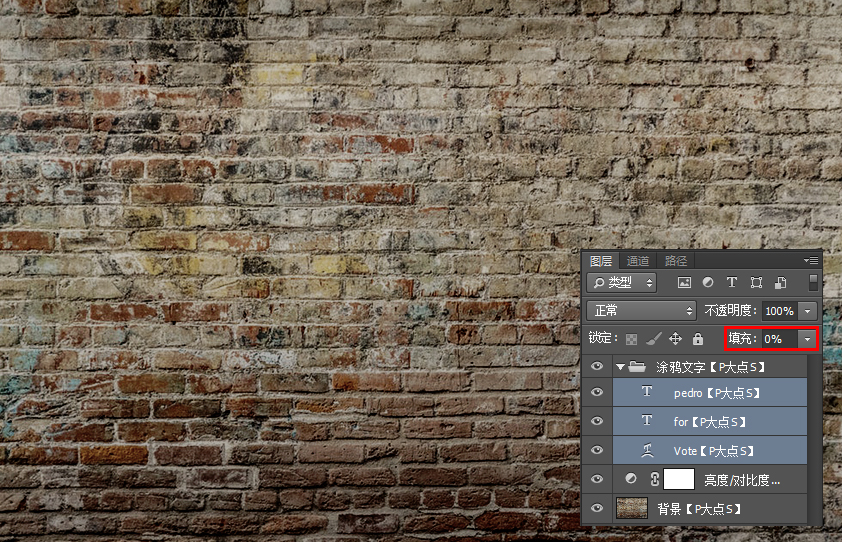
8. First, change the fill of the three text layers to 0. Now the text is not displayed, only the background is left. It doesn’t matter. Next, we will add layer styles to form a graffiti effect.
9. Next, we add layer styles to the Vote text layer. From the picture below, you can see that we have added a lot of styles.

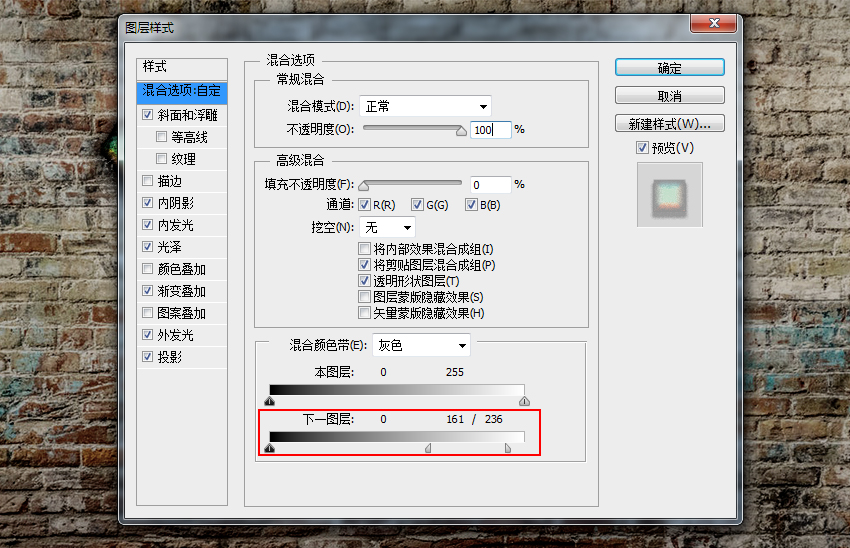
9.1. First, we set the blending option: Custom.
Blend color band: gray, in the lower blend band, set the next layer, Alt-click (mac users hold down the option key) on the white mark to split it, and then the left part Set it to 161 and set the right part to 236.
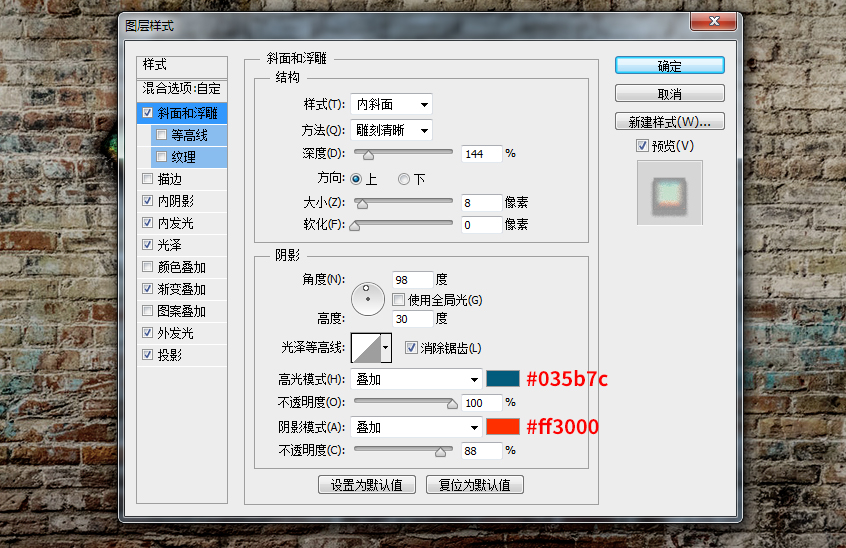
9.2. Next, we set the Bevel and Emboss.
Style: Inner Bevel, Method: Sculpt Clear, Depth: 144%, Direction: Up, Size: 8px, Soften: 0px
Angle: 98 degrees, Height: 30 degrees, Gloss Contour: Linear, check Anti-aliasing
Highlight Color: #035b7c, Highlight Mode: Overlay, Opacity: 100%
Shadow Color: #ff3000, Shadow Mode: Overlay, Opacity: 88%
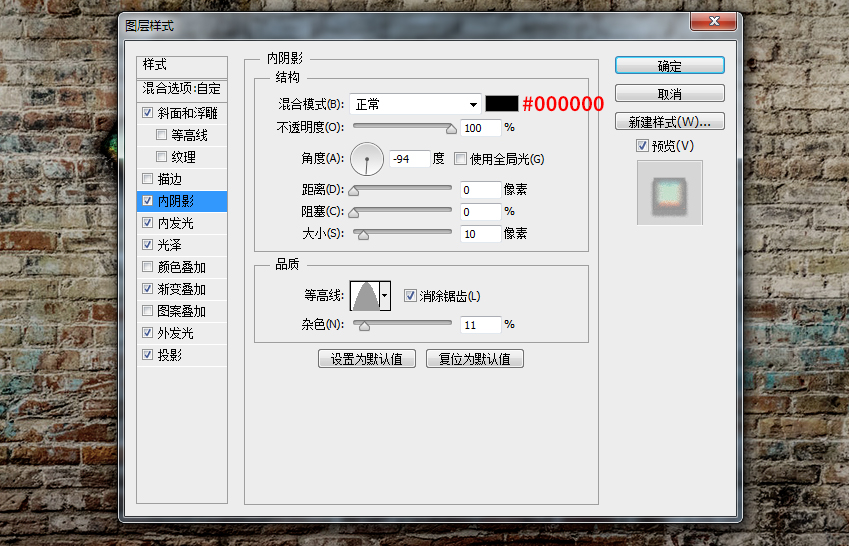
9.3. Next, we set the inner shadow.
Blend Mode: Normal, Color: Black #000000, Opacity 100%
Angle - 94 degrees, Distance: 0 px, Occlusion: 0%, Size: 10 px
Contour: Tapered, Anti-aliasing checked, Noise: 11%
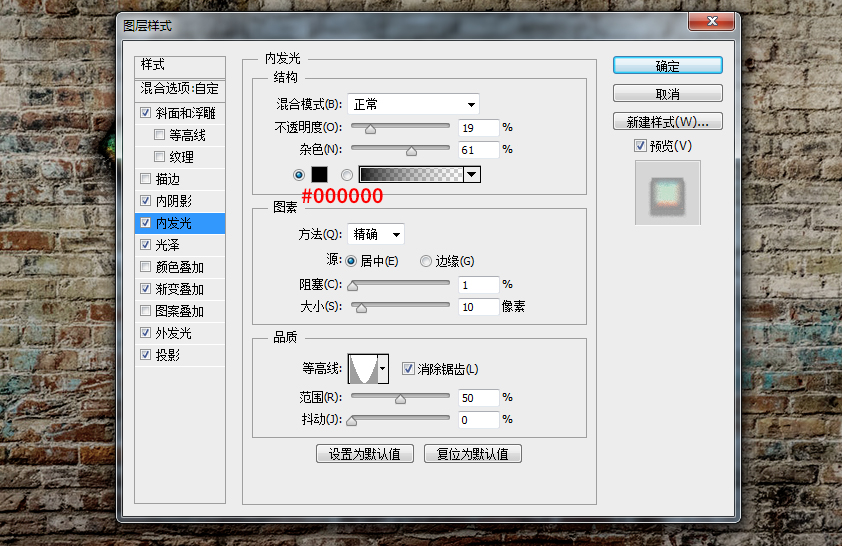
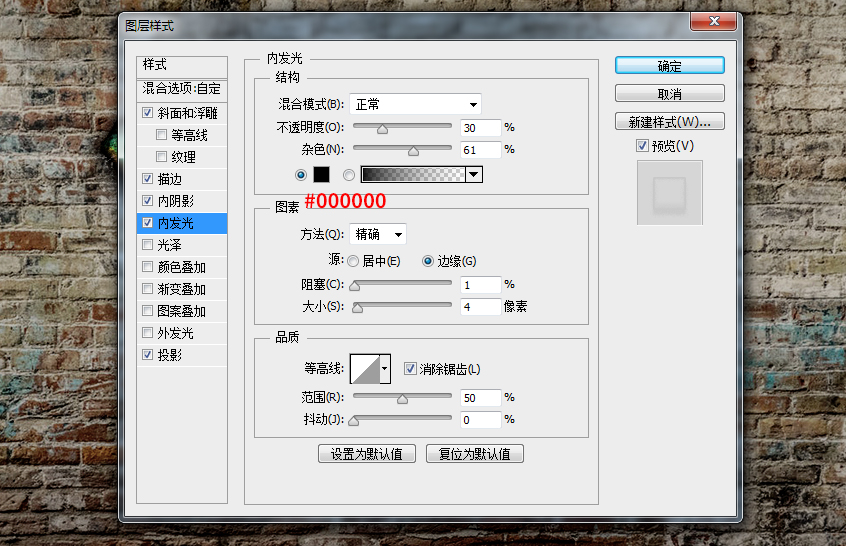
9.4, next, is inner light.
Blend Mode: Normal, Opacity: 19%, Noise: 61%, Color: Black #000000
Method: Exact, Source: Center, Occlusion: 1%, Size: 10px
Contour: Tapered - Inverted, Anti-aliasing checked, Range: 50%, Jitter: 0%
9.5. Next, is gloss.
Blend Mode: Overlay, Color: #64ec87, Opacity: 100%
Angle: 90 degrees, Distance: 19 px, Size: 24 px
Contour: semicircle, check anti-aliasing, check invert

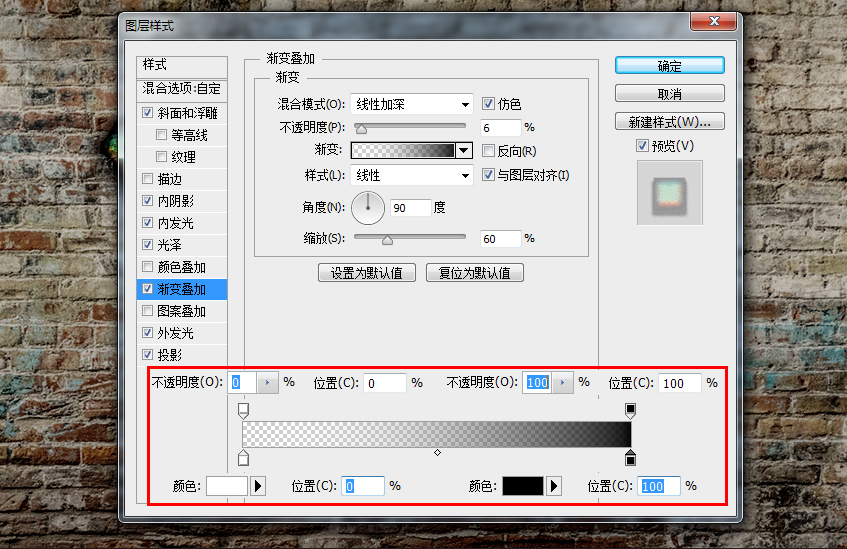
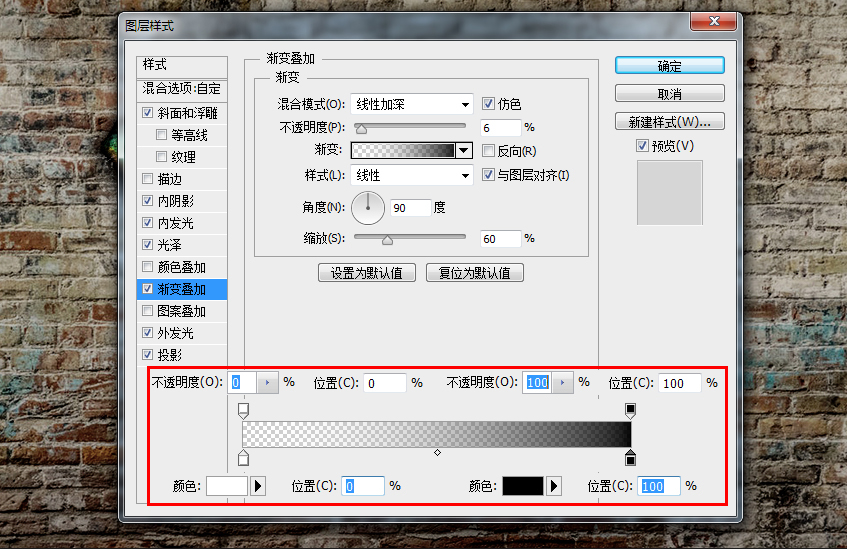
9.6. Next, we set up the Gradient Overlay.
Blend Mode: Linear Burn, Dither checked, Opacity: 6%
The gradient color is a gradient from white to black (see the figure below for specific parameters)
Style: Linear, check Align to layer, Angle: 90 degrees, Scale: 60%
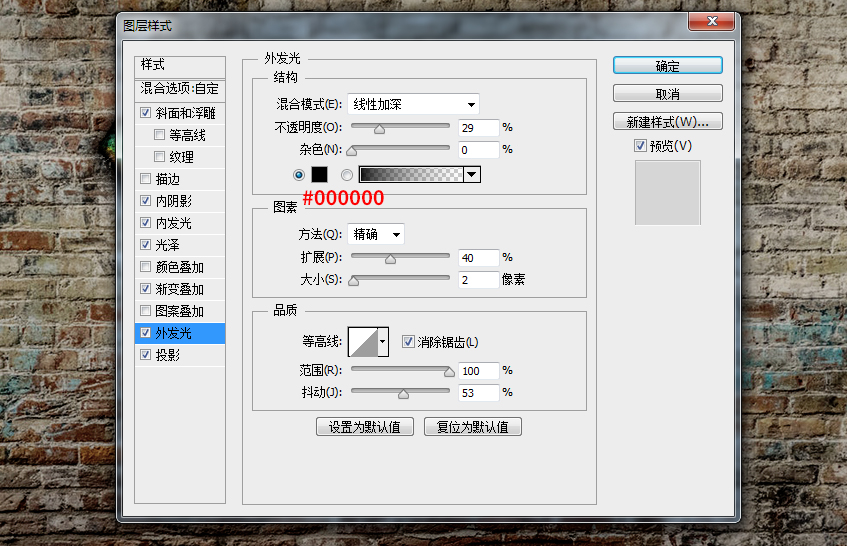
9.7. Next, we set the Outer Glow.
Blend Mode: Linear Burn, Opacity: 29%, Noise: 0%, Color: Black #000000
Method: Exact, Expand: 50%, Size: 3px
Contour: Linear, Anti-aliasing checked, Jitter: 53%

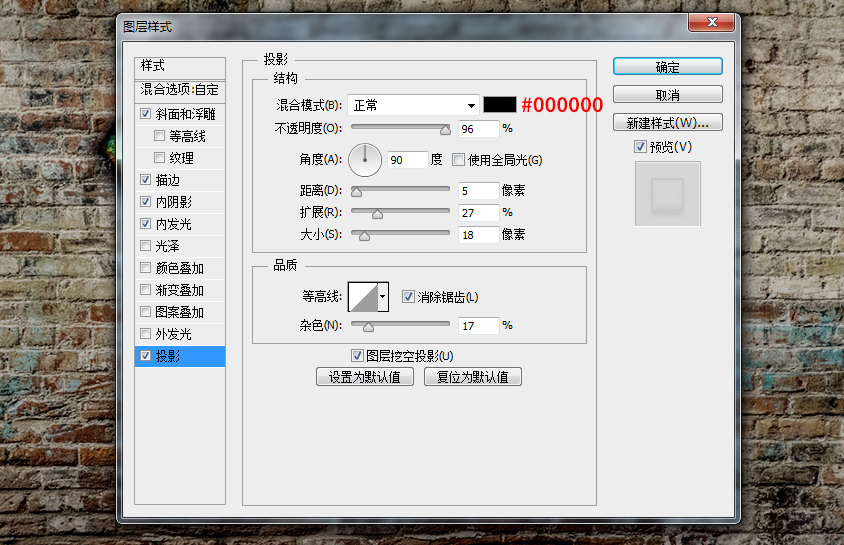
9.8. Finally, we set up the projection.
Blend Mode: Normal, Color: Black #000000, Opacity: 95%
Angle: 90 degrees, Distance: 5px, Scale: 39%, Size: 24px
Contour: Linear, Check Anti-aliasing, Noise: 10%

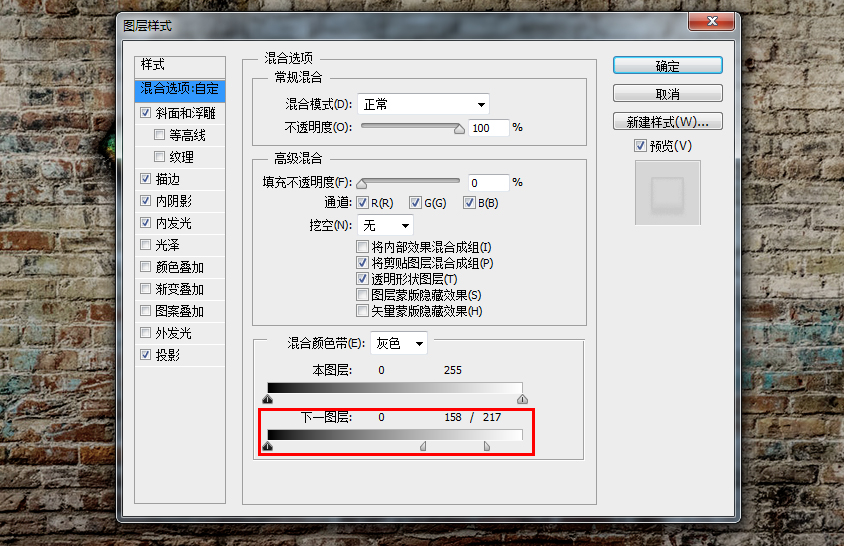
10. Next, we add a layer style to the for text layer, still adding a lot of styles, and the use of the mixed color band is also different.
10.1. First, we set the blending option: Custom.
Blend color band: gray, in the lower blend band, set the next layer, Alt-click (mac users hold down the option key) on the white mark to split it, and then the left part Set it to 158 and set the right part to 217.
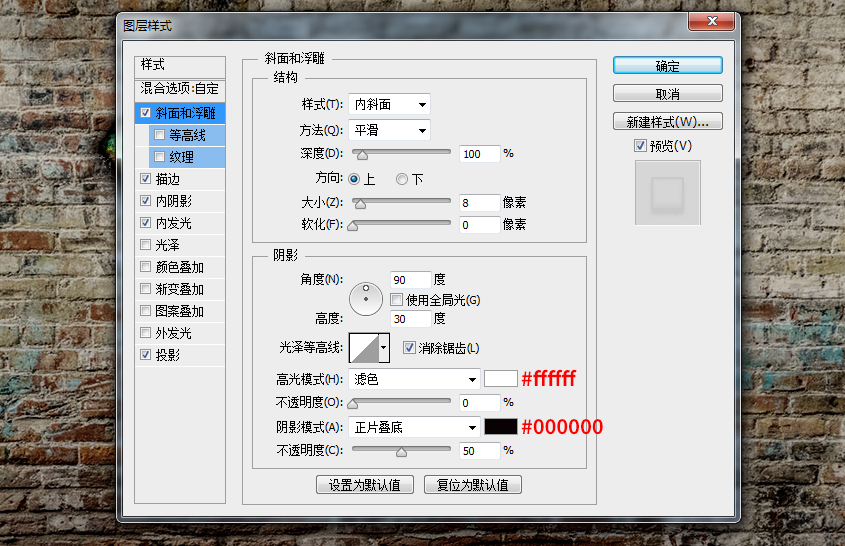
10.2. Next, we set the Bevel and Emboss.
Style: Inner Bevel, Method: Smooth, Depth: 100%
Orientation: Up, Size: 8px, Soften: 0px
Angle: 90 degrees, Height: 30 degrees
Glossy Contours: Linear, check Anti-aliasing
Highlight Color: White #ffffff, Highlight Mode: Screen (this doesn't matter, since our opacity will be set to 0), Opacity 0%
Shadow Color: Black #000000, Shadow Mode: Multiply, Opacity: 50%
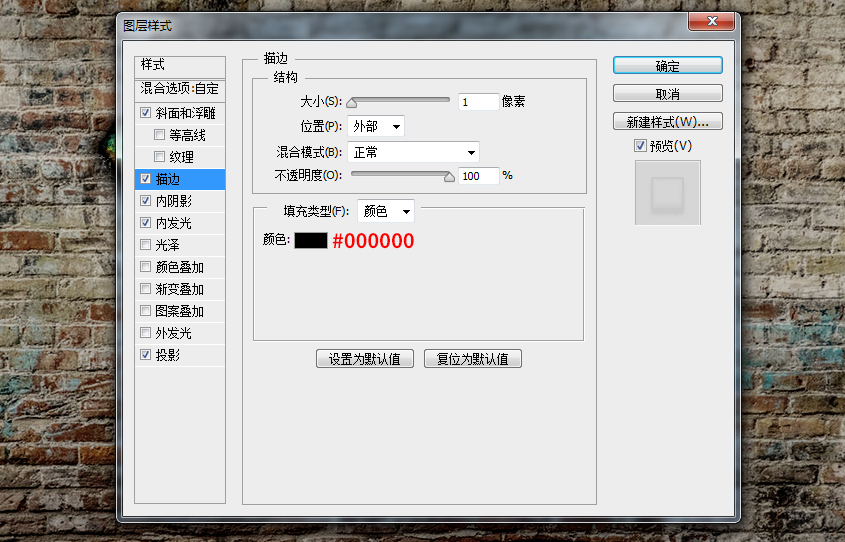
10.3. Set a stroke.
Size: 1px, Position: Outside, Blend Mode: Normal, Opacity: 100%
Fill Type: Color, Color: Black #000000
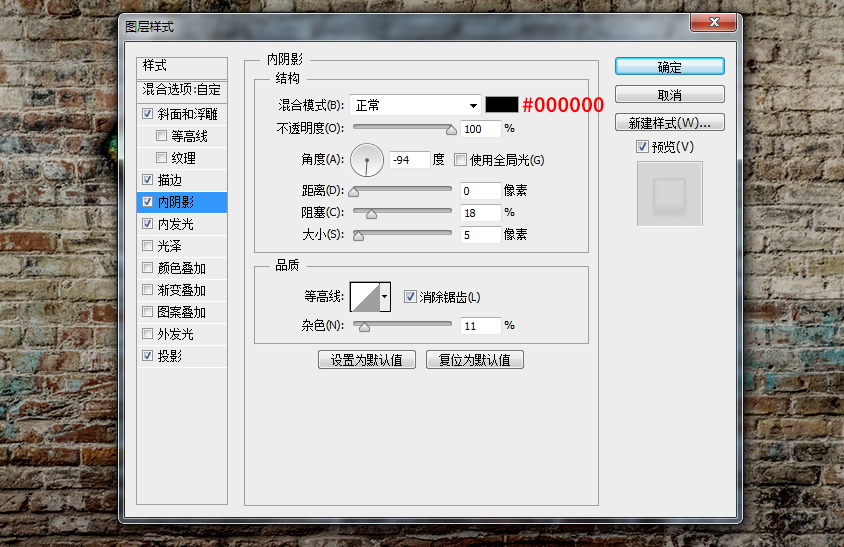
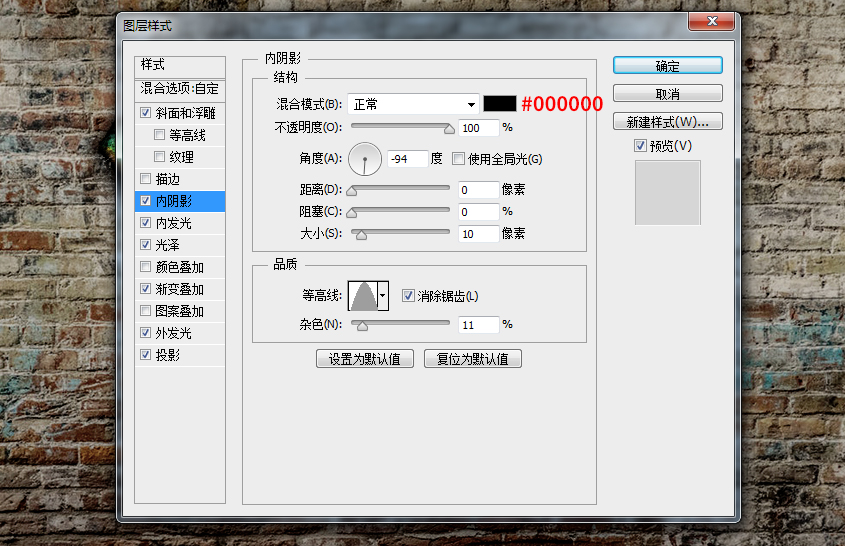
10.4, add an inner shadow.
Blend Mode: Normal, Color: Black #000000, Opacity: 100%
Angle: -94 degrees, Distance: 0 px, Occlusion: 18%, Size: 5 px
Contour: Linear, Anti-aliasing checked, Noise: 11%
10.5. Add an inner glow.
Blend Mode: Normal, Opacity: 30%, Noise: 61%, Color: Black #000000
method: exact, source: edge, occlusion: 1%, size: 4px
Contour: Linear, Anti-aliasing checked, Range: 50%, Jitter: 0%
10.6. Finally, we add a projection.
Blend Mode: Normal, Color: Black #000000, Opacity: 96%
Angle: 90 degrees, Distance: 5px, Scale: 27%, Size: 18px
Contour: Linear, Anti-aliasing checked, Noise: 17%
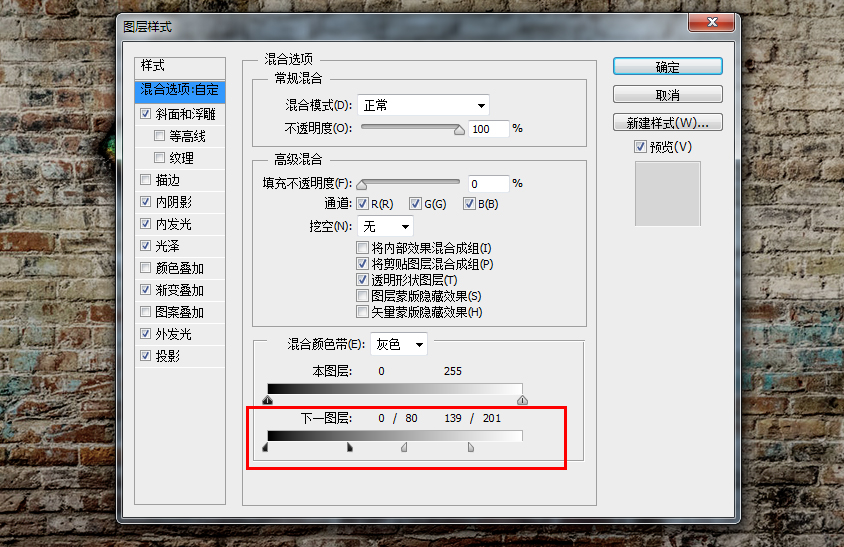
11. Next, we add layer styles to the pedro text layer, still adding a lot of styles, and the use of the mixed color band is also different.
11.1. First, we set the blending option: Custom.
Blend color band: gray, in the lower blend band, set the next layer, Alt-click (mac users hold down the Option key) on the black mark to split it, and then the right part Set to 80. Next, Alt-click (Option-click for mac users) on the white marker to split it, and set the left part to 139 and the right part to 201.
11.2. Now, we add a Bevel and Emboss.
Style: Inner Bevel, Method: Sculpt Clear, Depth: 144%, Direction: Up, Size: 8px, Soften: 0px
Angle: 98 degrees, Height: 30 degrees, Gloss Contour: Linear, check Anti-aliasing
Highlight Color: #1faee3, Highlight Mode: Overlay, Opacity: 100%
Shadow Color: #ce43db, Shadow Mode: Overlay, Opacity: 88%
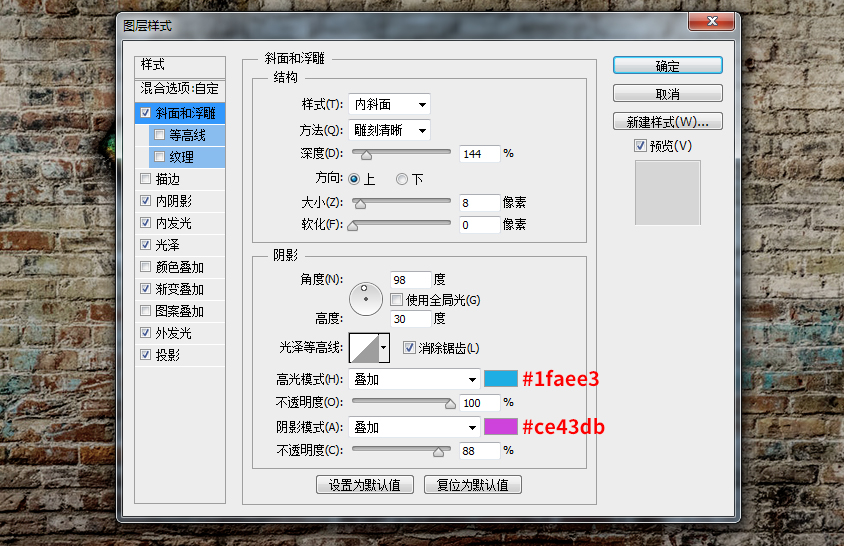
11.3. Add an inner shadow
Blend Mode: Normal, Color: Black #000000, Opacity: 100%
Angle: -94 degrees, Distance: 0 px, Occlusion: 0%, Size: 10 px
Contour: Tapered, Anti-aliasing checked, Noise: 11%
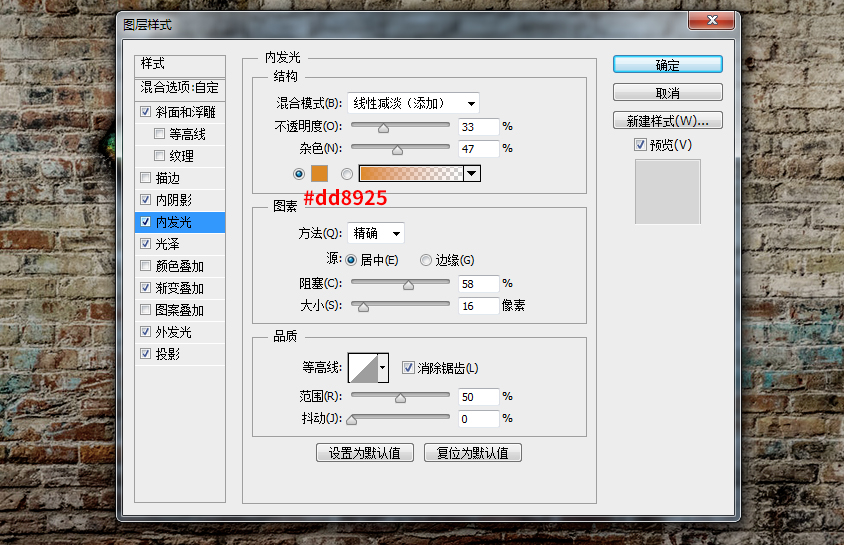
11.4. Add an Inner Glow
Blend Mode: Linear Dodge (Add), Opacity: 33%, Noise: 47%, Color: #dd8925
Method: Exact, Source: Center, Occlusion: 58%, Size: 16px
Contour: Linear, Anti-aliasing checked, Range: 50%, Jitter: 0%
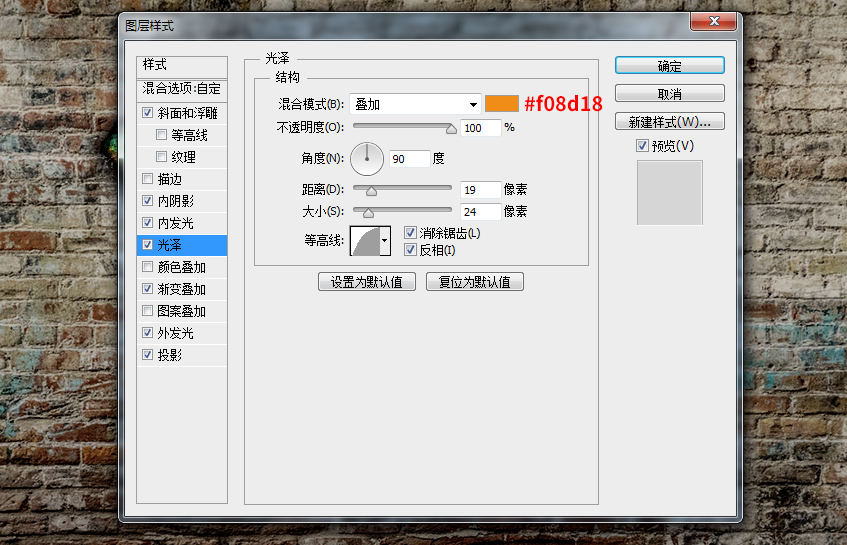
11.5, add a gloss
Blend Mode: Overlay, Color: #f08d18, Opacity 100%
Angle: 90 degrees, Distance: 19 px, Size: 24 px
Contour: semicircle, check anti-aliasing, check invert
11.6. Adding a Gradient Overlay
Blend Mode: Linear Burn, Dither checked, Opacity: 6%
The gradient color is a gradient from white to black (see the figure below for specific parameters)
Style: Linear, check Align to layer, Angle: 90 degrees, Scale: 60%
11.7. Add an Outer Glow
Blend Mode: Linear Burn, Opacity: 29%, Noise: 0%, Color: Black #000000
Method: Exact, Scale: 40%, Size: 2px
Contour: Linear, Anti-aliasing checked, Range: 100%, Jitter: 53%
11.8. Finally, add a projection
Blend Mode: Normal, Color: Black #000000, Opacity: 96%
Angle: 90 degrees, Distance: 5px, Scale: 39%, Size: 24px
Contour: Linear, Check Anti-aliasing, Noise: 10%

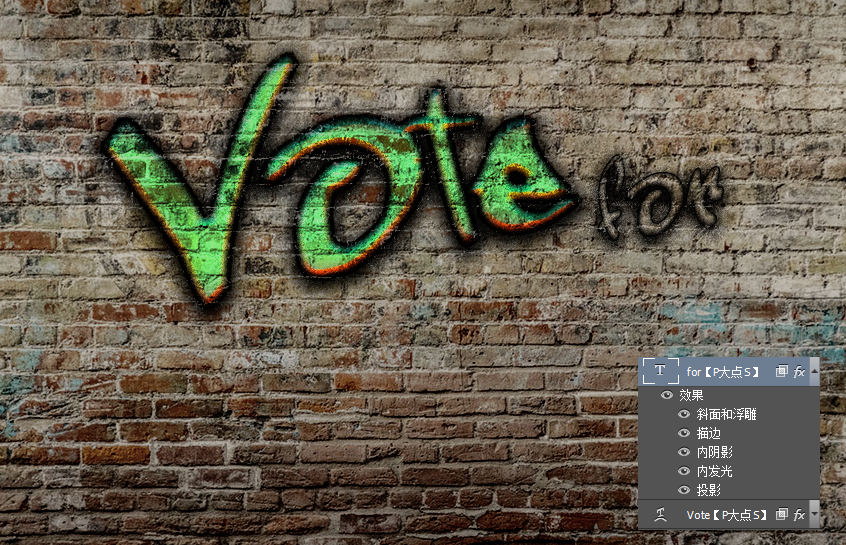
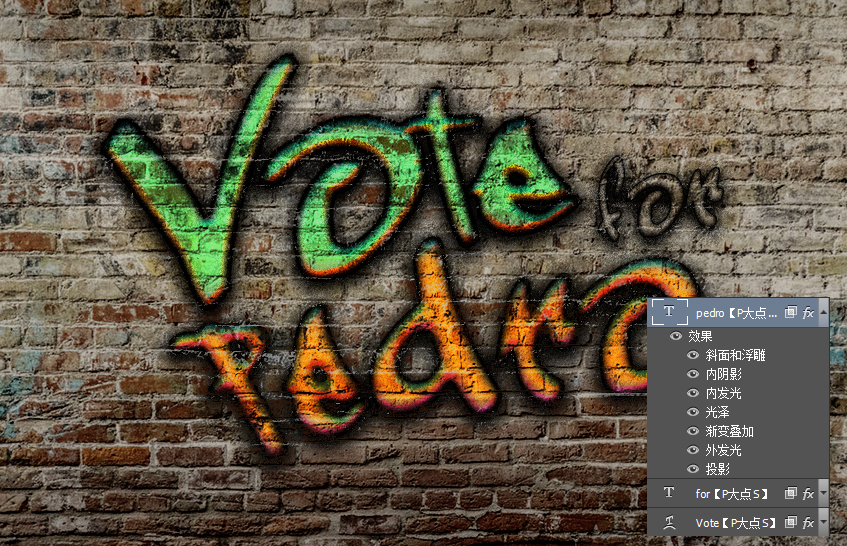
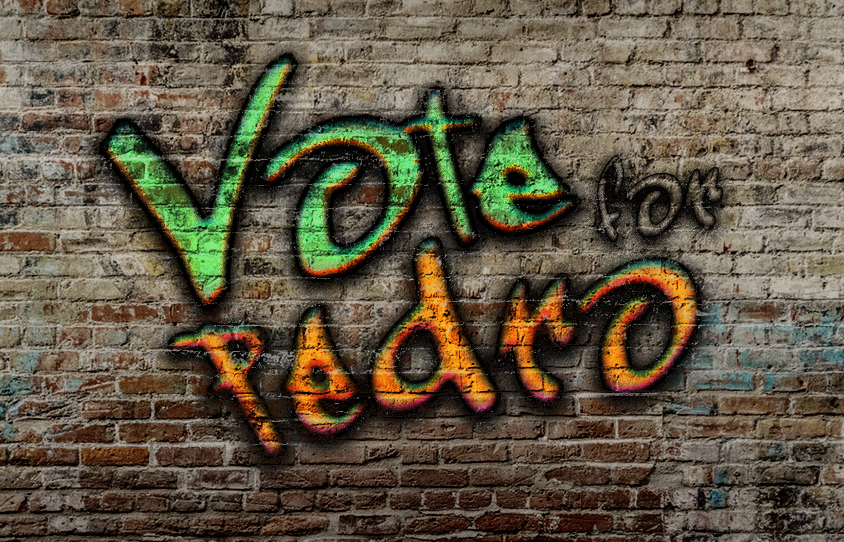
After setting the layer style, we finally get this effect. Is there any graffiti effect? Three different graffiti effect style settings, have you got it?
Author: PS Dadian
Articles are uploaded by users and are for non-commercial browsing only. Posted by: Lomu, please indicate the source: https://www.daogebangong.com/en/articles/detail/Wild%20Horse%20Design%20Font%20Design%20Tutorial%20%20Make%20Graffiti%20Artistic%20Words%20with%20PS%20Layer%20Styles.html
 支付宝扫一扫
评论列表(196条)
测试