Do you want to make fonts but don’t have time, or you are a computer novice and can’t operate? Leo's WeChat store is online, you can ask me to make fonts for you~
Forward this post in the circle of friends, the first 5 likes150 will get the opportunity of free acting~
100 likes50% off
50 likes30% off
If you want to get the Baidu Cloud Material of this tutorial for free, forward the push, collect 20 likes and send a screenshot to the backstage of the official account, you can get it~
Scan the applet code to enter the micro store~

All the files, source code and software used to make fonts have been uploaded to the network disk, and can also be downloaded from github (https://github.com/LeoAokma /Python3/tree/master/DIY%20Font). Forward this push and collect 20 likes to get it~
After the last time I came up with the idea of doing a font show, everyone has put a lot of enthusiasm into the idea of doing a font tutorial
So, I decided to make a tutorial to teach you how to make your own font
Font handwriting input
The first is to enter handwriting, download the GB2312font library form, and print it on A4 paper. In order to prevent the front and back sides of the input from affecting each other, it is recommended to single-sided printing, please do not modify the layout and content in word! The number of pages in this word is a bit too much, a total of 36 pages, so don't waste the paper after typing. It is recommended to mark the page number in the lower right corner of the typed file to prevent the order from being messed up (you need to know the page number for later processing)


After writing all the 36 copybooks, use a scanner to scan (it is best to use a scanner, only need to scan in black and white, if you have no conditions, use the software on your mobile phone to scan it , you need a clear original picture)
Rename the pictures in the order of page numbers to page numbers so that the program can read them automatically.
Program analysis and software installation
Next is the technical processing part~
I will share all the codes and files with you. If you don’t have time to do it, you can ask me to do it for you. Click the original link to see the link to the micro store (after all, orz needs to be manually adjusted after importing)
Download all the required files from the network disk link (see the beginning of the article, collect likes to get~)
ImageSplit.exe or run the ImageSplit.py code file with an interpreter.
Because this code uses a lot of libraries, so the exe produced is very large, and the entire folder is 700mb, so it is made into a compressed package.
After running, it is required to enter the first file path, please enter the folder where the scanned file is located. This folder can only contain scanned files, please do not contain other files and folders, and all image files need to be named in order of page number first!
The program will first cut the 36 scans into a table without margins, and then cut, the program will ask you whether you need to cut the margins of the picture, if you need to cut, please enter y, otherwise, enter n .

Note: The above cutting uses the Gaussian blur algorithm. In order to ensure that most of the pictures can be cut normally, the size of the Gaussian filter matrix is between 11-19. All Chinese characters on this page, please re-scan the picture, and be careful not to produce blurring, wrinkles, shadows and other factors that affect the algorithm. If you really can’t cut the picture, you can private me in the background, and I will help you get it~
After the selection is completed, the program will further cut the picture, and then fill in the save path, preferably creating a new folder.

After the program runs, the character lists will be cut into picture files with character units, and placed in the designated folder by the program.
Run the FontCreator9 installation package and follow the installation wizard to install the software. Then install the button wizard (installation package is not provided).
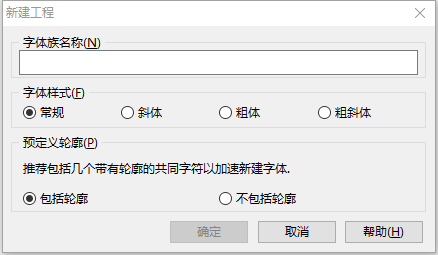
Open FontCreator, create a new font, the font family name is the name of the font, and set other options as shown in the figure below.
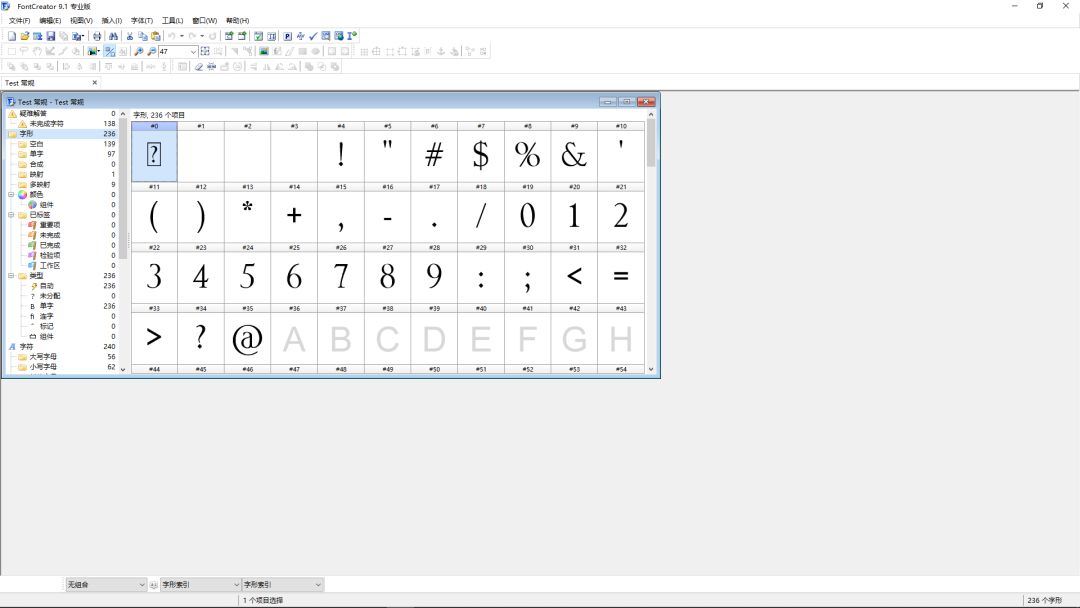
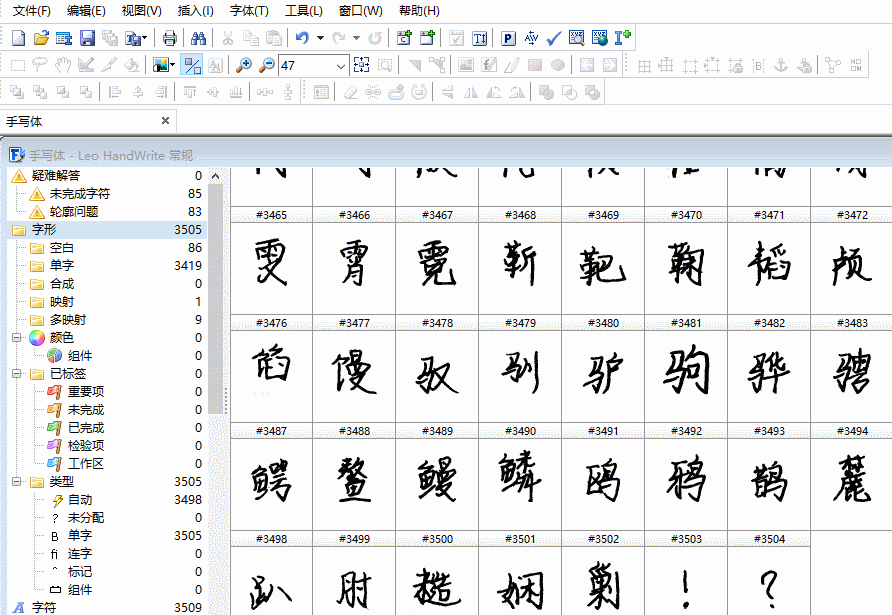
After clicking confirm, enter the main interface of the software, there is a font window in the middle, displaying the characters contained in the current font.

Double-click a character, you can see the vector map of the character, and you can edit it

In this window, there are 7 reference lines, which are the upper part of the window, the lower part of the window, the uppercase height, the lowercase height, the baseline, and the left and right axes.
The upper and lower parts of the window are the width of one line in the final display of the font, and the part beyond these two lines will not be displayed; the left and right axis is the maximum width of each character, which is variable and adjusted according to the width of the character. The lower part of the window, the baseline, and the height of the upper and lower case form "four lines and three grids", and the bottom of Western characters is generally aligned with the baseline. The height of Chinese characters is generally from the baseline to the height of the uppercase, and some strokes can pass through the baseline.
Manually add characters and edit
First, before editing characters, we need to find the corresponding characters. The default font generated by FontCreator software only contains English letters and some symbols, and does not contain Chinese characters. Therefore, we need to import Chinese characters first.
Look for the "C" icon in the icon toolbar above, or look for Insert - Insert Character in the menu bar.


After clicking, the following interface pops up, enter the character we need to add in the search character, take "Osmium" as an example, click Find Next, and the character is found.

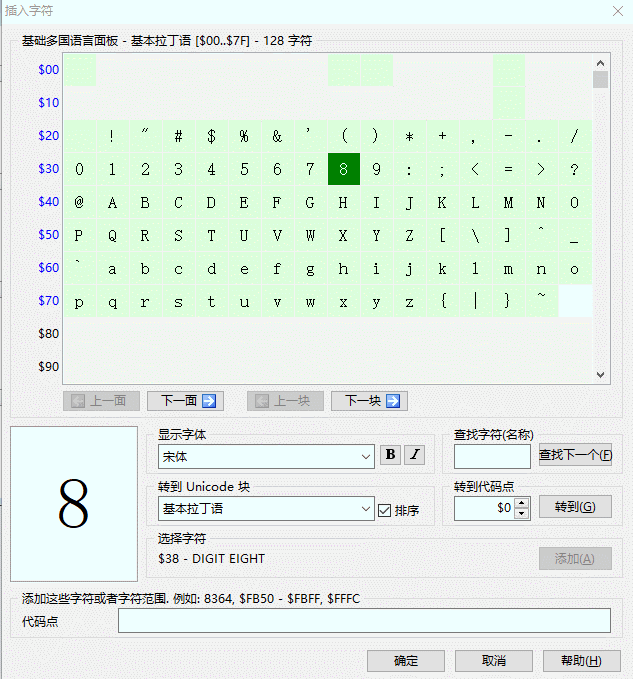
Added characters will display a green background, found but not added characters will display a dark blue background, and added characters will display a dark green background.

When the character is selected, the "Add" button below is displayed as ready to be pressed, press the button, and then click OK to add the character.

The added characters will be displayed in the main interface window, and there is no preview for Chinese characters, so in order to prevent it from being difficult to recognize and edit after adding multiple characters at one time, only add one at a timeone Chinese characters.
Right-click the character in the window, find the option to import images, click, find the picture file of the corresponding character, and double-click it.

After the glyph is imported, the character icon will display a preview of the character, double-click to open it, and adjust the font:
1. If there is a border around the text, it is the grid that has been scanned and cut, select it with the mouse and press Delete to delete the border.
2. Use the shortcut key Ctrl+A to select all the shapes in the glyph, drag to align the baseline, and adjust the size.
3. Drag the left and right axis to make the glyphs in the axis, and there is no need to keep too large distance between the axis and the font.

Batch import fonts with script
Only one word can be imported at a time, which makes the workload extremely large. With the help of the script of the button wizard, we can make this process faster and more efficient.
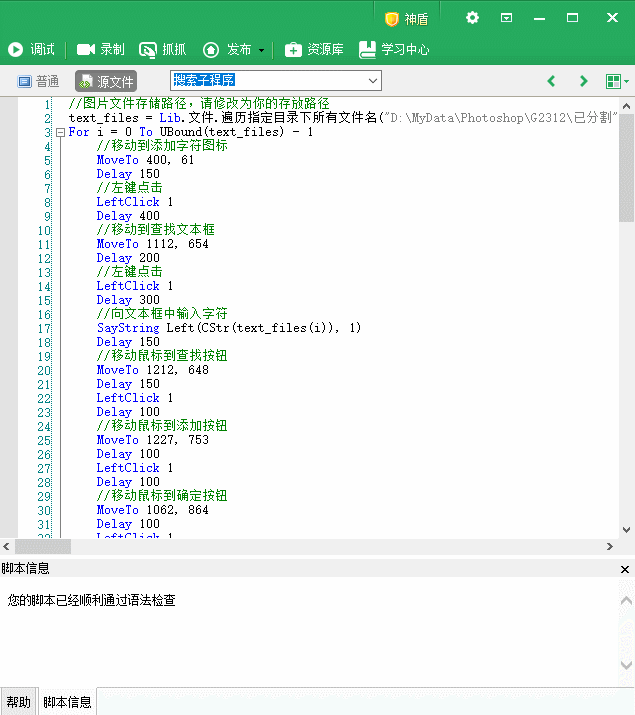
Open Key Wizard, create a new blank script, and copy the script on the network disk to the newly created script.

Back to the software interface, use the mouse to drag its right edge to the left, so that each line only displays one character, which is convenient for script processing later.
Since the display ratio and resolution of each device are different, the script of the button wizard cannot be simply copied and run directly, and some parameters need to be modified.
Check all the coordinates in the script, you can use the built-in "recording" in the key sprite to get the coordinate information (you don't need to save the recording, you only need to know the coordinates)
In addition, the file path for storing the scanned image also needs to be modified, and the path is modified to correspond to the path for storing the cut image.
After modifying the script, exit edit mode, click F10 to run, and wait
Because of the difference in computer running speed, all parts of the script that involve Delay need to be properly modified, otherwise the script may make an error and be interrupted midway. Better to be slow than to make mistakes.
After the program finishes running, all the characters are imported into FontCreator
Batch adjustments to glyphs
The position of the axis and font can also be adjusted in batches through the script that comes with the software: click Tools-Automatic Measurement in the menu bar, select the fixed axis function, the default distance is 20, click Next, and select all characters , pay attention to deselect the space (space), to prevent the space from occupying space.
If you need to align all glyphs in batches, click Tools-Glyph Transform in the menu bar, then find Outline-Position in the available properties, add it to the script bar on the right, and map it to the corner Or select Bottom Center in the middle, select Vertical for the range, set the parameter to "0", and click OK. (You can also select some glyphs for scripting, you need to change all of them to select in the transformation wizard)

The way to adjust the size of the text is the same as above, find the zoom, and adjust it in batches.
Continuous preview during adjustment
If you want to preview your own fonts during the production process, and adjust some characters in time, the best way is to preview, and adjust the margins and positions of the characters individually through the preview.
Find the penultimate icon (as shown in the figure) in the toolbar of FontCreator, which is "Test TTF/OTF", or select Font-Test TTF/OTF in the menu bar.


Export your fonts!
Once everything is done, it's time to export the fonts! Select File-Export Font-Export TTF/OTF font in the menu~
Enjoy Your Font!

Articles are uploaded by users and are for non-commercial browsing only. Posted by: Lomu, please indicate the source: https://www.daogebangong.com/en/articles/detail/Tutorial%20Homemade%20Handwriting%20Fonts.html
 支付宝扫一扫
评论列表(196条)
测试