The following article comes from Font Gang, author Liu Bingke

One word a day, grow together
Authorization transferred from: Font Gang ID: zitibang
Liu Bingke
A while ago, a WeChat friend told me about such a thing, I directly posted a screenshot, let’s take a look:

However, this is not an isolated case. I searched the previous WeChat chat records, and there are many similar situations, such as the following screenshots:


In this official font design tutorial, a few WeChat screenshots are abruptly inserted at the beginning, which seems not very serious, but through the chat content, everyone should be aware that this topic is already very, very serious. These screenshots are nothing else, I want to remind everyone again through the real cases around me:
Font library fonts cannot be used casually!
Actually, any designer with some experience will be very clear about this problem, so there is no need to talk about it, but there will always be many novices or students who are new to the design workplace, who do not understand this, and will unconsciously , making such mistakes, causing serious losses to oneself or the company.
In recent years, with the vigorous development of the font design industry, the relevant laws and regulations on the copyright protection of fonts have also become more and more perfect. If you buy a non-free font, then your behavior is equivalent to planting a time bomb for Party A, your company, and yourself. I don't know when, but with a bang, the lawyer's letter will come to you and explode at any time.
There are only two ways to avoid such mistakes:
One, buy font copyright.
Many people think that fonts are very expensive, and they really can’t afford them. Personally, I think this is a matter of awareness. To design a font, every stroke and every component needs to be carefully designed and adjusted. It is quite difficult to design. Font products The price is directly proportional to the human and financial resources of the font company. Just like what we often joke about, we can’t help people design logos for free. The font library condenses the brainpower and dedication of more designers. You have no reason to use it for free. The font library cannot be too cheap.
One more thing needs to be emphasized, this fee, logically speaking, needs to be paid by Party A. As a designer, Party A should make it clear that if the other party recognizes a certain typeface, he will pay for it, and if he is reluctant to pay If you don’t need money, you can only use free public welfare fonts.
Second, redesign the font.
The second method, of course, is to redesign the font, which is divided into two methods:
One, stroke by stroke, design a brand new font.
This method is difficult for novice designers. It may take several months or even longer to learn and practice before they can basically master the principles and skills of font design.
Second, modify the font of the font.
The so-called modification is actually a shortcut, that is, to transform and change according to the font of the font, and summarize the essence of it in one sentence:Borrow the font structure of the font, and erase the original style and style as much as possible feature, transforming its design into a completely different typeface. This method is much easier than the first method. As I write here, I think that many beginners have asked me questions in this form: "Your font, What kind of font did you use to change it?", they think that font design is to use a font to change characters, and my reply is often like this: "Don't use a font to change characters, try to design by yourself." This is what I have always advocated, because modifying the font library, on the one hand, will limit your creativity, make you lazy, and make you never learn to design fonts. Thoroughly, with only slight changes, it is also inevitable to escape the danger of infringement.
For today’s article, I’m going to slap myself hard. The content of the next tutorial is to teach you how to “change the font”, because I know very well that proper (toujiquqiao) modification of the font can make you Writing is faster and more efficient, and it can also avoid the risk of infringement.
Next, the tutorial officially begins, and I will use three different cases to demonstrate the method from multiple angles:
Case 1
The picture above shows the four words "I shape, I shape". First, I will demonstrate the wrong "modification" method, that is, the method that will still constitute infringement after "modification":

...
As you can see, in the above 6 "modification" methods, I put a clear red prohibition symbol, because this is not a real modification, these weak adjustments have no essential improvement for the original font itself, Therefore, it will still easily lead to infringement. Compared with these "small" adjustments, then we naturally get another opposite
Answer: Big change!
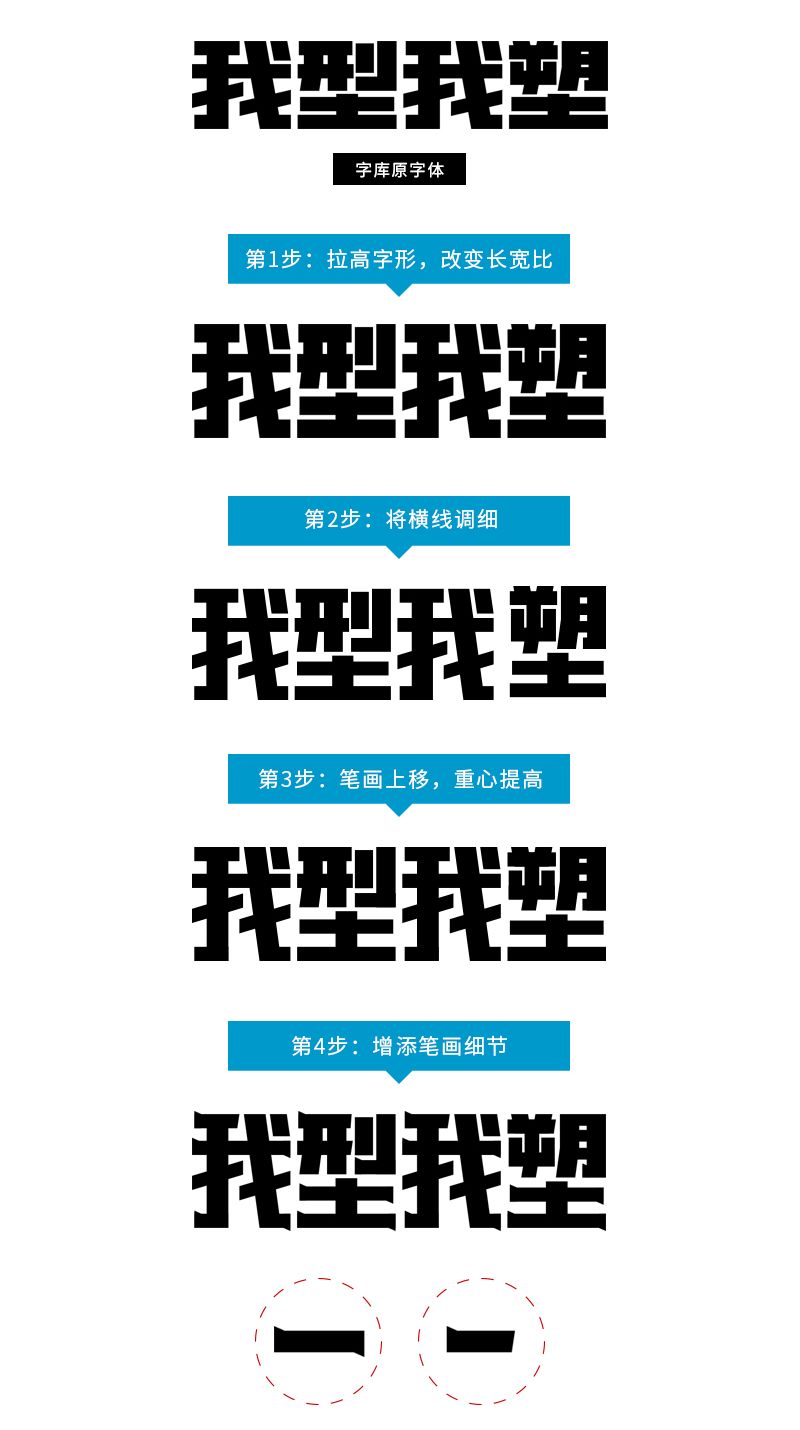
Next, I will share the so-called "big change" technique, or take these four words as an example:

In the modification of step 4, the focus is on the additive design of the left and right endpoints of the horizontal line strokes. Regarding this type of design technique, I have a more detailed design demonstration in a previous article. Interested friends, you can click to give you 150,000 font design methods.

is similar to step 4. The design of step 5 is mainly to highlight the uniqueness of the glyph, making it more creative and fresh, and it is easier to get rid of the shackles and framework of the original font.

After modifying to this step, it can come to an end, let's take a look at the comparison effect before and after:

The dynamic diagram of several steps will look more intuitive:
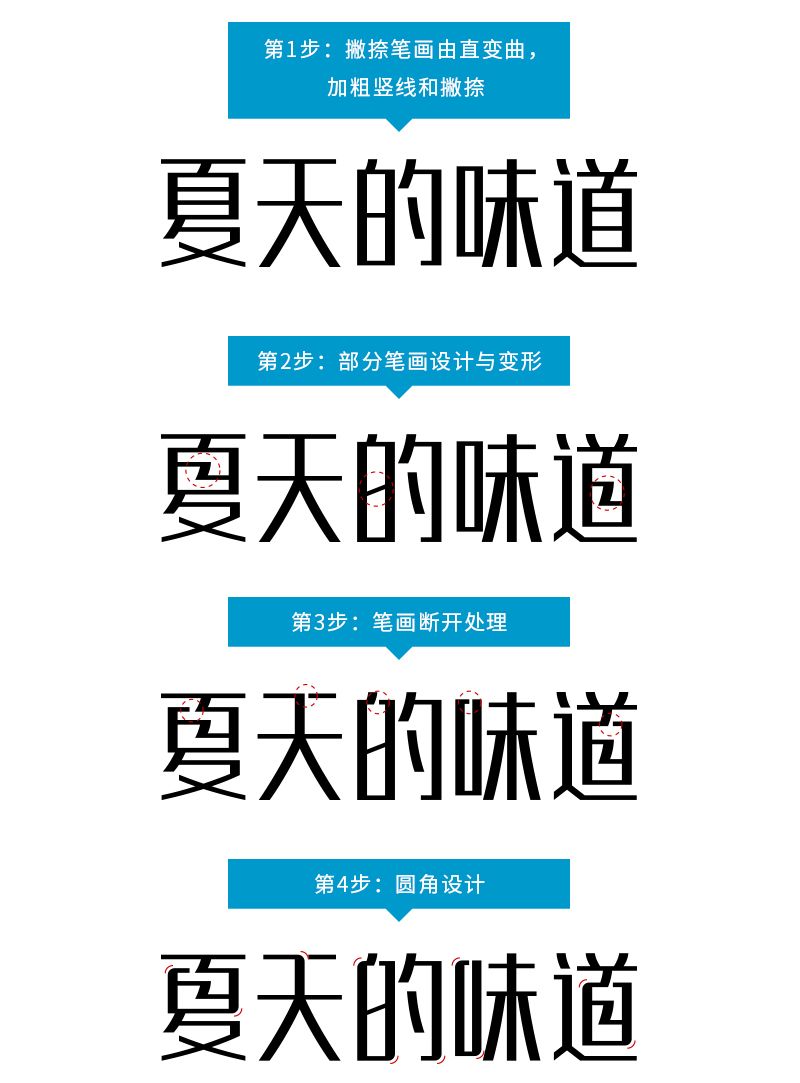
Case 2

The modification steps are as follows

In the modification of steps 2, 3, and 4 above, the design details of the original font have been changed from multiple angles, which will give the font a more significant sense of design, which is closer to the font designed by ourselves.

In step 5, according to the meaning of the font and the stroke environment, add appropriate graphic ideas. There are also many principles or skills here. If you handle it properly, your font will be more interesting and eye-catching. About this point , if you want to know more, you can click Graphic creativity in font design.
The modification is here, it is basically completed, let’s take a look at the comparison effect before and after:

Dynamic diagram of the entire modification step:
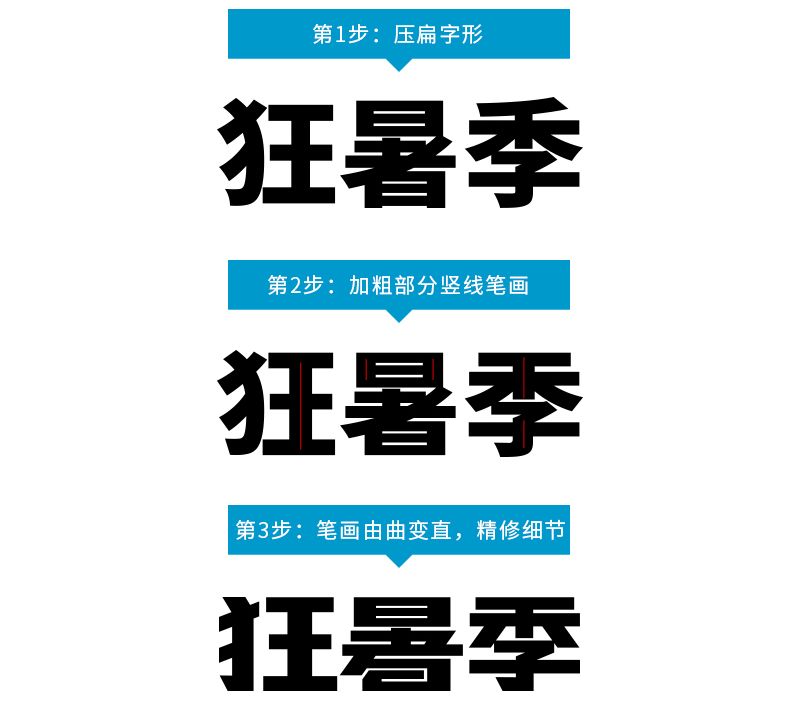
Case 3
The modification steps are as follows

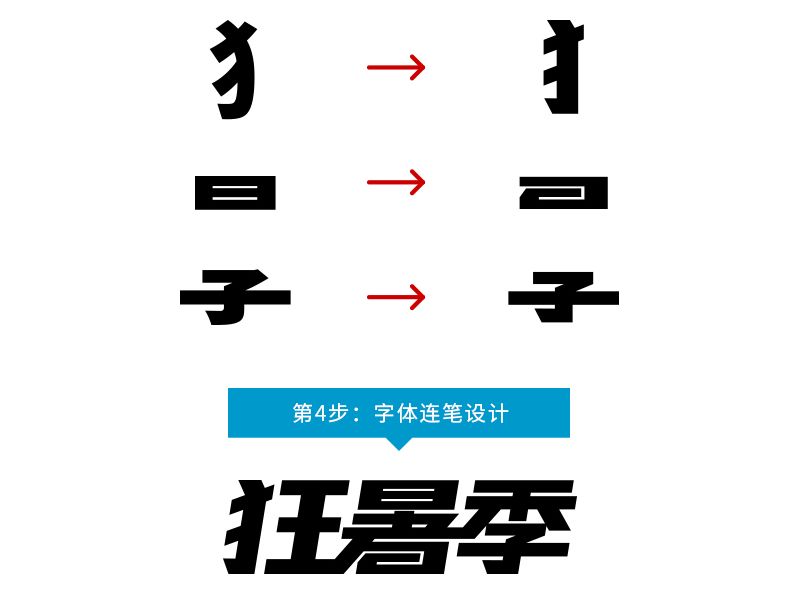
The modification of the third step is very close to the redesign. It is the most ruthless and most obvious step of the change. It has carried out "cosmetic transformation" on many strokes, such as the following details:

The continuous stroke design between characters is also one of the most popular and practical routines, which can make the font more integrated, coherent and imposing.

Changed here, it should be regarded as a successful completion of the task, let's take a look at the before and after comparison effect:

The dynamic diagram of the entire modification process is as follows:

Induction and summary
Above, the three different font modification cases have different themes, different selected fonts, and the methods of modifying the fonts are also different. When analyzing these differences in detail, there are also strong regularities. Next, I will summarize from two aspects: "big" and "small":

Large, that is, the macro aspect, mainly the following three points:1, modify the overall aspect ratio of the original font; 2, modify the thickness and width of the horizontal and vertical strokes in the original font; 3, modify the original The center of gravity of the font...
These are all major changes to the outline of the font, which are rough and straightforward.
In order to facilitate understanding, I have roughly drawn some schematic diagrams for the above three points:

Change the font ratio, as shown above, the original font has been flattened
 Change the stroke width, as shown in the picture above, the horizontal and vertical lines of the original font have become thinner
 Change the center of gravity of the font, as shown above
The center of gravity of the font in the original font is raised, and the font becomes tighter and looser
After making this modification to the font of the font library, it is equivalent to redesigning a person's skeleton, and completely reshaping the tall, short, fat and thin. In the first impression, there is already a clear image division with the fonts of the original font, but this is far from enough, and it is not so "insured". Carry out a more comprehensive and more subtle "facelift". Next, we pick up the "scalpel" to understand how to start from the "small".

Compared to "big" revisions, "small" revisions mean more subtle, more difficult, and better reflect your creativity and effort. In the three modification cases of the text, review and summarize, there are the following operations:
1, the straightness of the stroke changes, from curved to straight, or from straight to curved;
2, perform additive design at the end of the stroke, adding the personality of the details;
3, the continuous or broken stroke design of adjacent strokes makes the font change more;
4, apply a rounded corner (chamfer) design at the junction of the strokes;
5, the continuous stroke processing between characters makes independent fonts form coherent word groups;
6, the addition of graphic creativity, according to the word meaning environment and stroke environment, incorporate appropriate graphics...
I will draw some simple diagrams for the first 5 points above:
 1, as shown in the picture above, the strokes change from straight to curved
 2, as shown in the figure above, the detailed design of the left and right endpoints of the horizontal line
 3, as shown in the picture above, the broken pen or cut in the upper left corner of the character
 4, as shown in the picture above, the internal and external chamfering design of the upper left corner and the lower right corner of the word shape
5, as shown in the picture above, the "continuous stroke" design between the two characters before and after
I have to say a few more words when I write here. The above are pure example demonstrations. It must not be understood as only these kinds of modification methods. These are just common methods that are easy to think of and easy to implement. That's all, I hope that my example will not hinder you from generating new associations and ideas, and I also hope that you can break the routine and come up with more suitable and better-looking fonts.
Conclusion
This design tutorial on modifying fonts, to be honest, is a lazy way. I want to tell you how to make accurate and proper modifications by using existing font resources and "standing on other people's shoulders". Since it is a modification, and since it is based on the premise of using the font library, it should be as large as possible, and the modification should be "unrecognizable", and the mistake at the beginning of the article must not be committed. If you feel that you are not good at judging, after the modification, you can also ask colleagues and friends to help you compare before and after, whether your modification is really in place, and whether it is "just right".
Font library works are relatively mature and stable in terms of font structure and center of gravity. The method of modifying the font library is more suitable for beginners to use and experience, because when beginners learn fonts, font structure, center of gravity, etc. need a period of time It takes time to practice and settle down. Only when you practice to a certain stage can you become familiar with the road and avoid serious mistakes.
In my teaching experience in the past few years, most beginners will always stay at this stage for a long time. I can’t see any problems with the font homework I have done, but show it to me. First of all, it is the most elementary In this tutorial, the method of modifying the font library is equivalent to avoiding the steps of building basic strokes, which will let you directly omit the first step, and the whole The "design" process is much easier.
Some people may also say that the process of these modifications seems to be very troublesome. It is better to do it yourself. I hope so, because only by designing fonts by myself, these fonts can be truly Becoming your own "children" makes it even less likely that you will be exposed to the danger of infringement mentioned in the first place.
In short, this is a shortcut I provided, but if you choose to give up this shortcut, and start from scratch, and work hard to learn to create characters, this is the result I would like to see.
Finally, I wish you all a happy writing.
Written here, no more words, the tutorial is a bit long, I hope it can bring you some help or reminder, thank you for your patience in reading.
*Note: In the first two modification cases, the original fonts used were designed by me for this article, not real fonts. The third case of bold fonts usedFree open source font "Siyuan Heiti".
The harder you work, the luckier you get.
This is the right path of Pangmen.
Articles are uploaded by users and are for non-commercial browsing only. Posted by: Lomu, please indicate the source: https://www.daogebangong.com/en/articles/detail/This%20font%20tutorial%20will%20save%20you%20tens%20of%20thousands%20of%20losses%20in%20minutes.html
 支付宝扫一扫
评论列表(196条)
测试