This chapter will explain WPS by introducing a simple notification document production process Basic manipulation skills of text.
一
Format font
Setting the appropriate format for the characters in the document can make the document hierarchy clearer and the page layout more beautiful. The font format is mainly set from several aspects such as font, font size, font shape, and color. Most of the font format settings can be completed through the [Font] command group in the [Start] tab.
1 Format document body text
If you want to set the Chinese font of the main text to imitate Song_GB2312 and the Western font to Times New Roman in the document, the font size is Number three, you can first select all the paragraphs except the document title, and then you can directly set the font format in the opened [Floating Toolbar], as shown in Figure 1-23
. You can also set the font format under the [Home] tab.
Using an appropriate font format can make the document hierarchy clearer and easier to read. For example, in Figure 1-23, the text uses font size 3 imitating Song _GB2312, and the title uses font size 3 in bold.
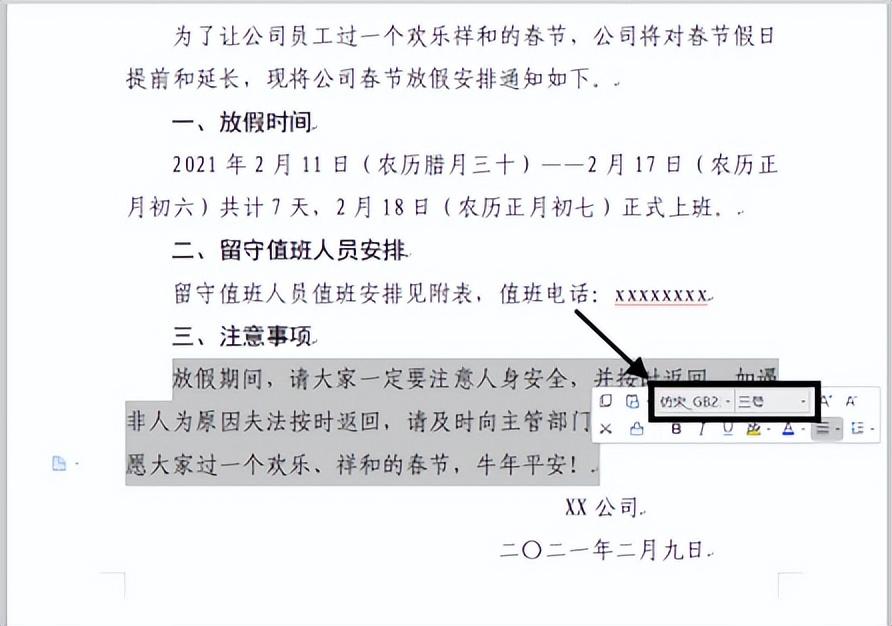
Figure 1-23 Set the font format through the floating toolbar
2 Set the default font format
In order to avoid resetting the font format every time a new document is created, you can use the commonly used Font formatting is set to the default format. For example, to set the default font size to No. 3, the Chinese font to imitate Song_GB2312, and the Western font to Times New Roman, the setting method is as follows.
In the [Home] tab, click the [Font] dialog box launch button to open [Font] dialog box. Switch to the [Font] tab, set the Chinese font to imitate Song _GB2312, set the Western font to Times New Roman, set the font to regular, and the font size to three. Then click the [Default] button, click the [OK] button in the prompt dialog box that opens, and click the [OK] button again to exit the [Font] dialog box. As shown in Figure 1-24.
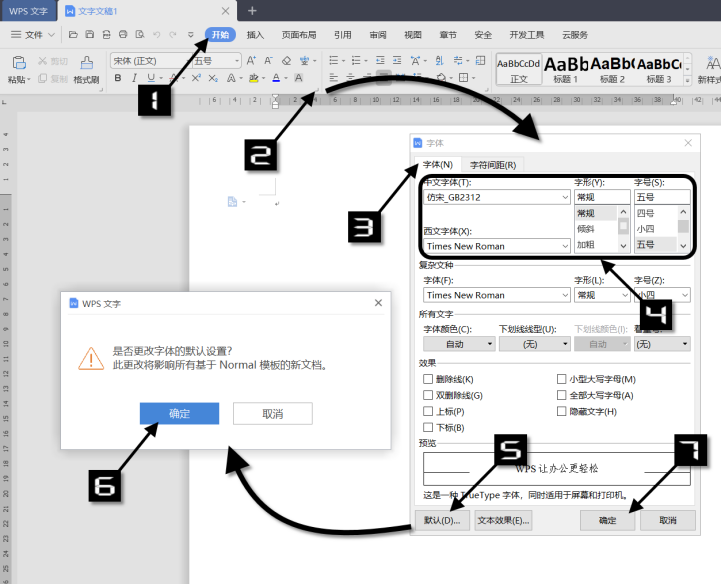
Figure 1-24 Set the default font format
3 Adjust the case of English characters
If you want to adjust the case of English characters in Chinese-English mixed or pure English documents, you can use the [Change Case] tool Batch adjustments.
Select the text to adjust capitalization, and then click the [Pinyin Guide] drop-down button in the [Home] tab, select [ After the Change Case] command, the [Change Case] dialog box will open, select the desired adjustment form, and click the [OK] button, as shown in Figure 1-25.
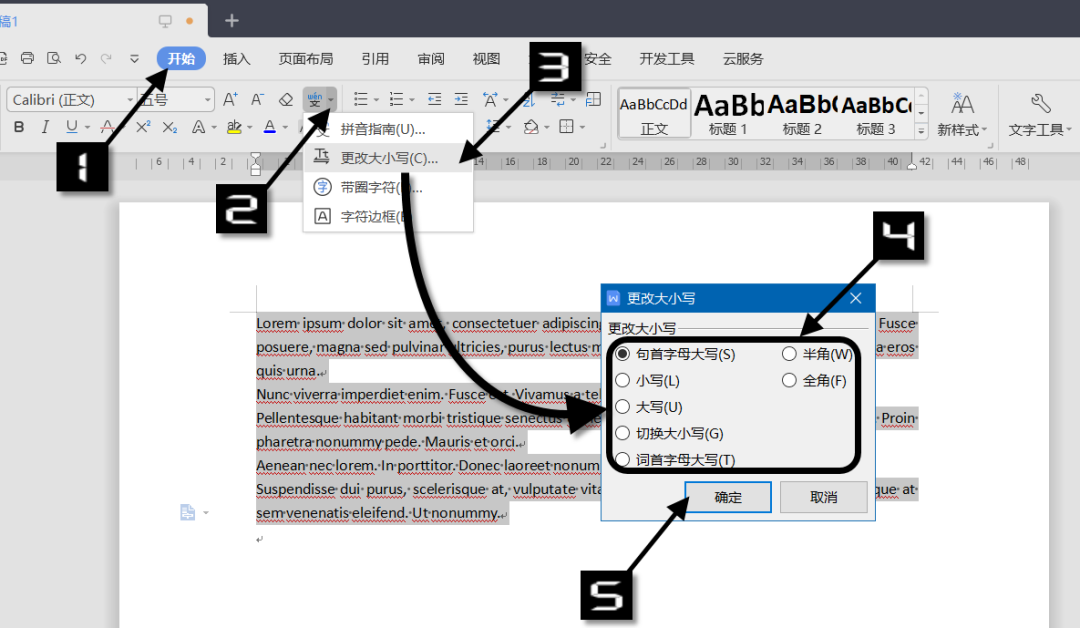
Figure 1-25 Adjust the case of English characters
4 Install new font
In the [Home] tab, click the drop-down button of the [Font] box, and you can see the currently available fonts in the drop-down list All fonts. The list is divided into three sections: Recently Used Fonts, Theme Fonts, and All Fonts. If there is no font you want to use in this font list, you need to install the font you want to use in the operating system first.
Take the Windows 10 operating system as an example, the default font installation directory of the system is "C:\Windows\Fonts". You can directly copy the prepared new font file to the Fonts folder, or you can directly right-click the new font file and select the [Install] command in the pop-up shortcut menu, as shown in Figure 1-26.
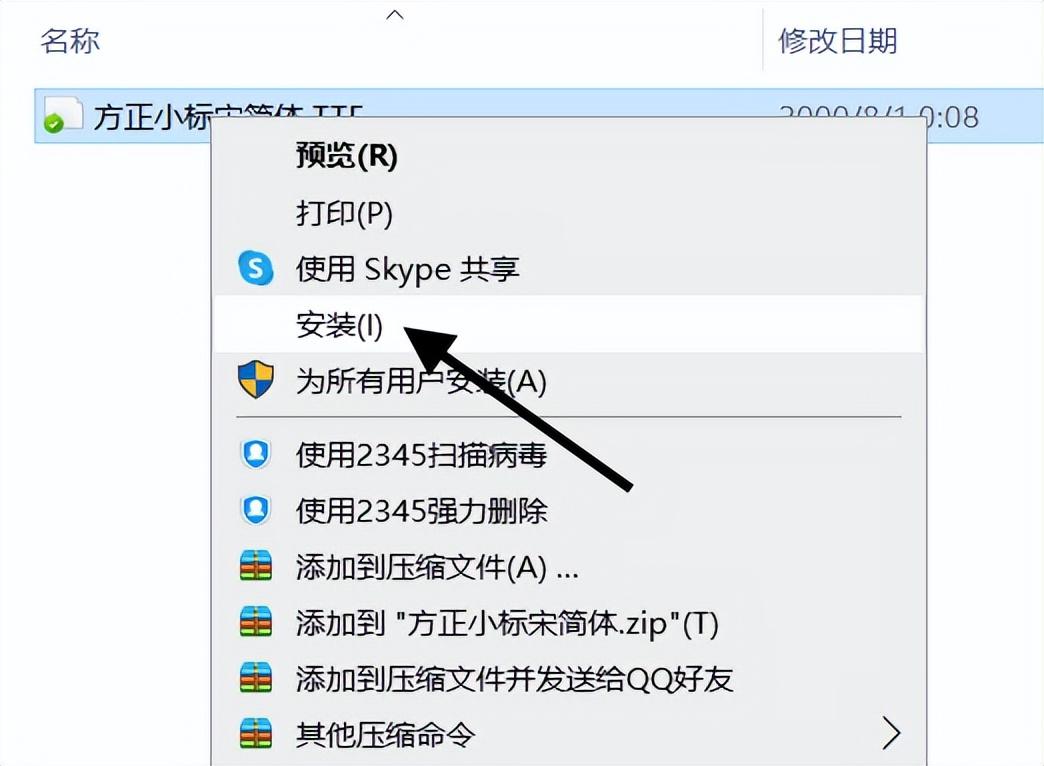
Figure 1-26 Installing new fonts
If the document is ultimately used commercially, fonts installed and used must be licensed.
5 Embed the font in the document
If a more personalized font is used in the document, the document may not be displayed properly when opened on other computers. In order to ensure the normal display of the document, the fonts used in the document can be embedded in the document. Click [File] → [Options] in turn, switch to [General and Save] in the opened [Options] dialog box, and then select [Embed fonts into files] [Embed only characters used in the document (suitable for reducing Small file size)] and [Do not embed common system fonts] three check boxes, as shown in Figure 1-27. Click the [OK] button to exit the dialog box and save the document.
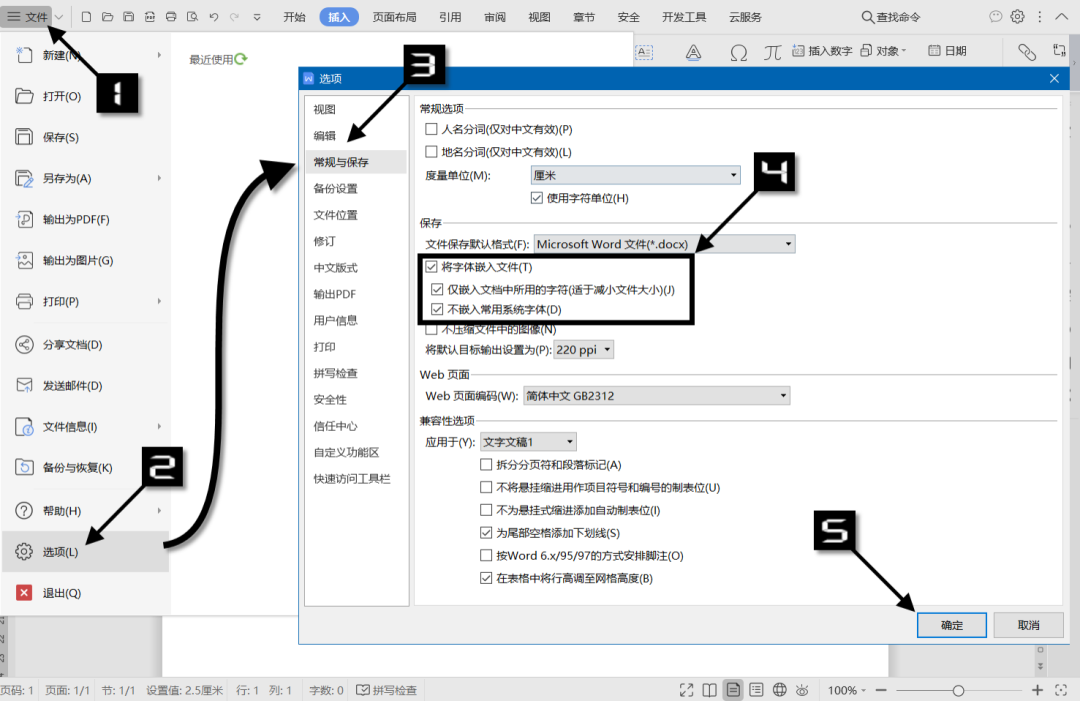
Figure 1-27 Embedding fonts in documents
Format paragraphs
A paragraph is the basic unit of WPS text layout, and the scope of the paragraph format is the entire paragraph . Therefore, when formatting a paragraph through the [Paragraph] dialog box, it is not necessary to select the entire paragraph, but to position the cursor anywhere in the paragraph. If you want to format multiple paragraphs at the same time, you need to select all the paragraphs at the same time.
1 Set the document title paragraph to center alignment
In WPS text, the default alignment of paragraphs is justified at both ends. To set the title in the document to be centered, you can Position the cursor anywhere in the title paragraph, and then click the [Align Center] button on the [Home] tab or press the <Ctrl+E> key combination, as shown in Figure 1-28.
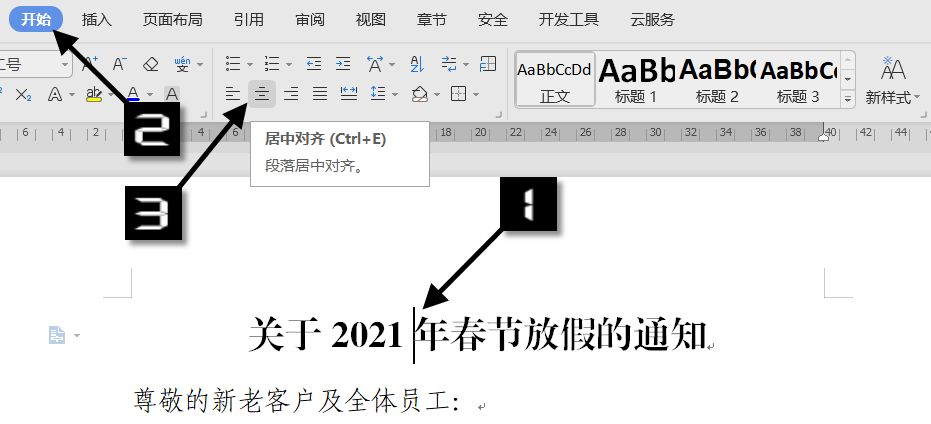
Figure 1-28 Set the document title paragraph to center alignment
5 alignments for 2 paragraphs
Paragraphs can be aligned in the horizontal direction, and different alignments determine the edge of the paragraph appearance and orientation. Under the [Home] tab, there are 5 horizontal alignment setting buttons. From left to right, they are left alignment, center alignment, right alignment, both ends alignment and scattered alignment, and both ends alignment is the default alignment method of paragraphs. In addition, clicking the start button of the [Paragraph] dialog box will open the [Paragraph] dialog box, where you can also set the alignment of the paragraph, as shown in Figure 1-29.
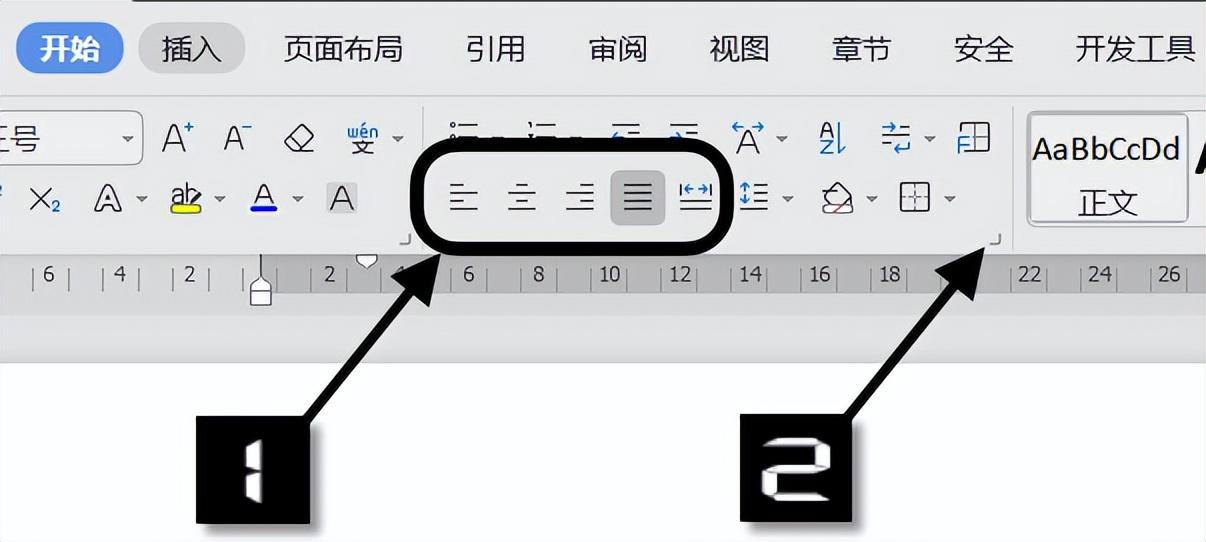
Figure 1-29 Five alignments of paragraphs
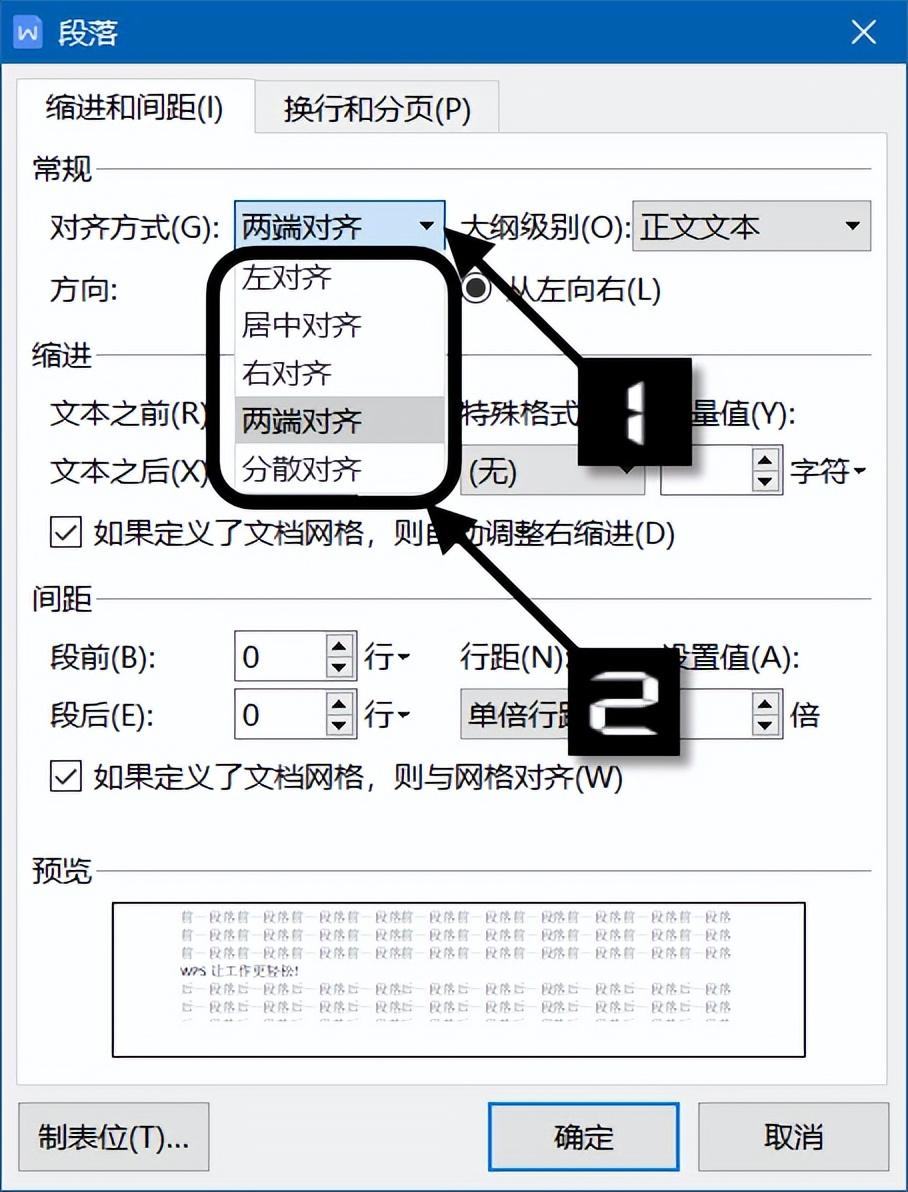
Figure 1-30 Set the alignment through the [Paragraph] dialog
WPS text also provides corresponding shortcut keys to facilitate users to quickly set the alignment of paragraphs, as shown in Table 1-1.
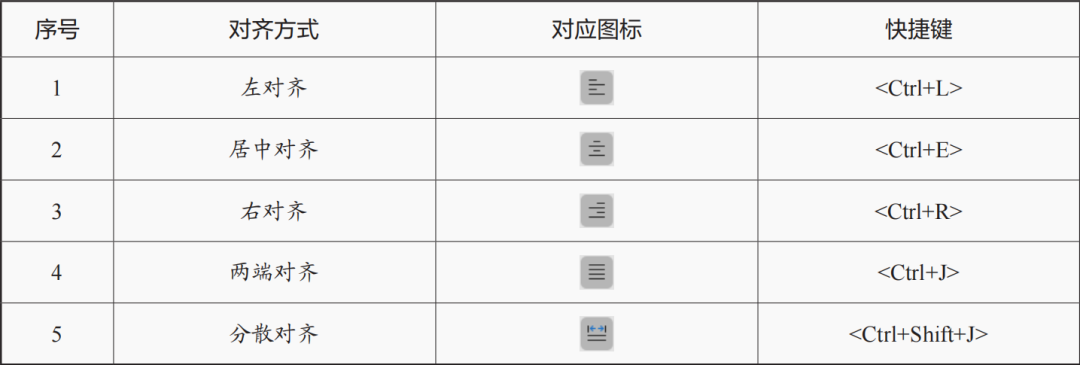
Table 1-1 Alignment shortcut keys for WPS text
3 Set first line indent 2 characters for body paragraph
To set the first line indent 2 characters for all text paragraphs, you can select all text After the paragraph, click the [Paragraph] dialog box start button on the [Home] tab to open the [Paragraph] dialog box, switch to the [Indentation and Spacing] tab, click the [Special Format] drop-down button, in the drop-down menu After selecting 【First Line Indentation】 (2 characters by default), click the 【OK】button, as shown in Figure 1-31.

Figure 1-31 Set the first line indent for the body paragraph
4 ways to indent 4 paragraphs
In addition to the first line indent, paragraphs also have hanging indents and text indents Indentation and indentation after the text are three indentation methods, and the effect comparison is shown in Table 1-2.
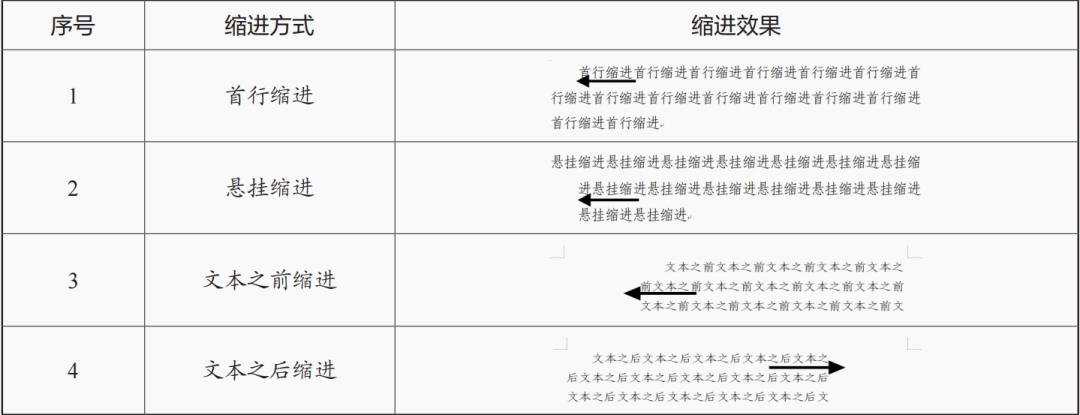
Table 1-2 Comparison of paragraph indentation effects
first line indent: Refers to the first line in a paragraph from left to right Indent a certain distance, except for the first line, all other lines remain unchanged. Paragraphs in Chinese documents are generally set to indent the first line with 2 characters
Hanging indent: Refers to the line in the paragraph except the first line Indent a certain distance from left to right, the first line remains unchanged. Hanging indents are often used in paragraphs that use bulleted or numbered lists
Indentation before text: Refers to the left end of the entire paragraph from the left side of the page to the right Side indent a certain distance
Indentation after text: Refers to the right end of the entire paragraph from the right side of the page to the left Side indent a certain distance
To change the unit of measurement for paragraph indentation, you can go to the [Paragraph] dialog box Click the unit drop-down button on the right side of the measurement value text box to select the specified measurement unit, as shown in Figure 1-32.
In addition, if there is no precise requirement for the indentation of the text, you can also pass Drag the [Indent] slider on the horizontal ruler to adjust the paragraph indent. If the WPS text does not display the ruler, you can select the [Ruler] check box in the [View] tab, as shown in Figure 1-33.
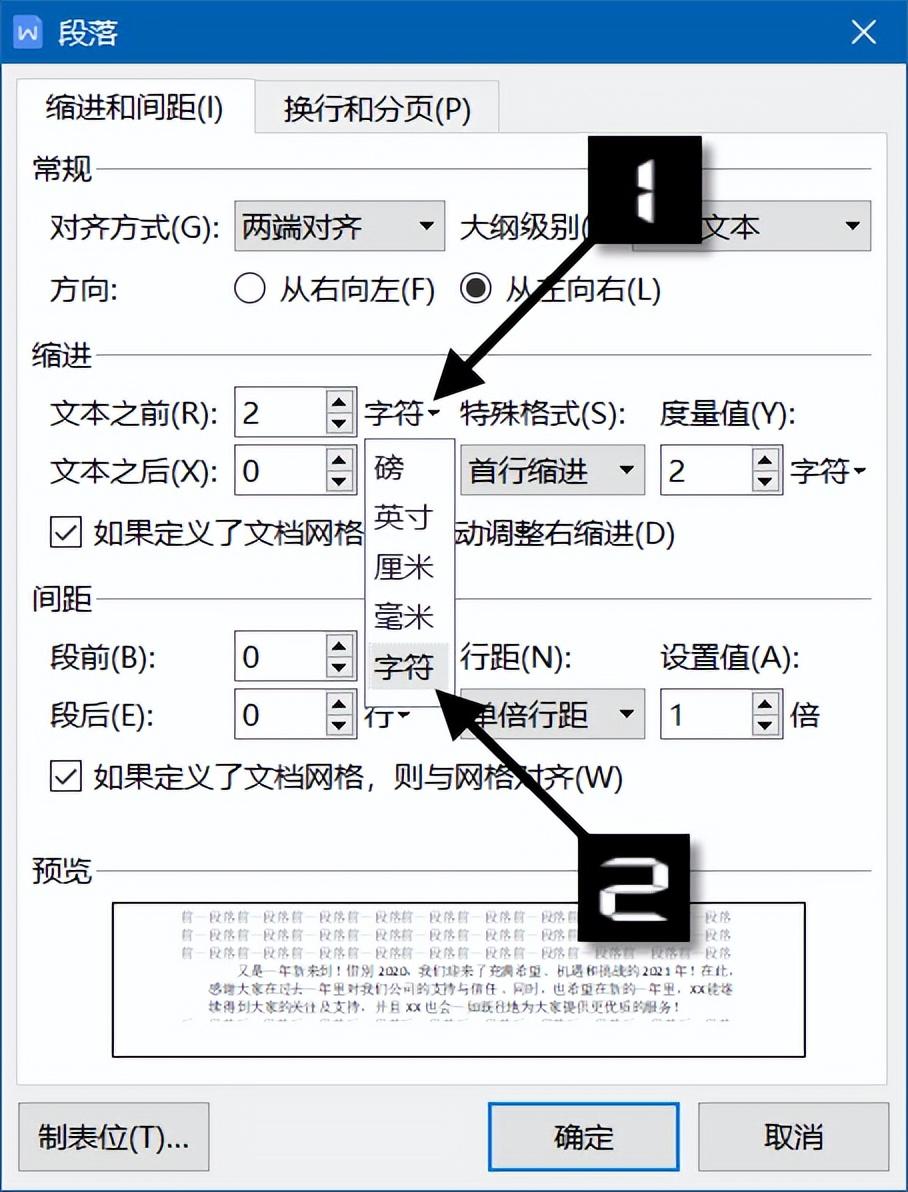
Figure 1-32 Adjust the unit of measure for paragraph indent
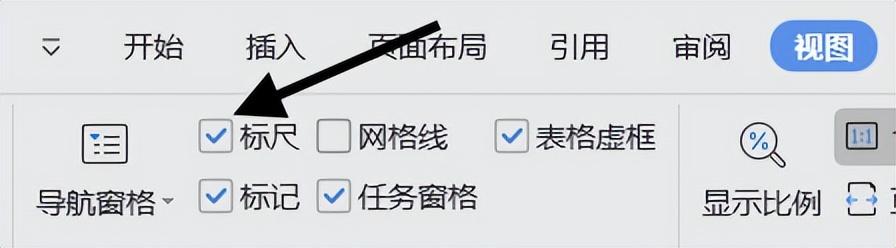
Figure 1-33 Display 【Ruler】
There are 4 indent sliders in the horizontal ruler, corresponding to 4 of the paragraph There are two kinds of indentation methods, as shown in Figure 1-34: ①first line indentation, ②hanging indentation, ③left indentation, ④right indentation. To set an indent for a paragraph, you can position the cursor in the paragraph, and then directly use the mouse to drag the indent slider on the horizontal ruler to adjust the indent position.
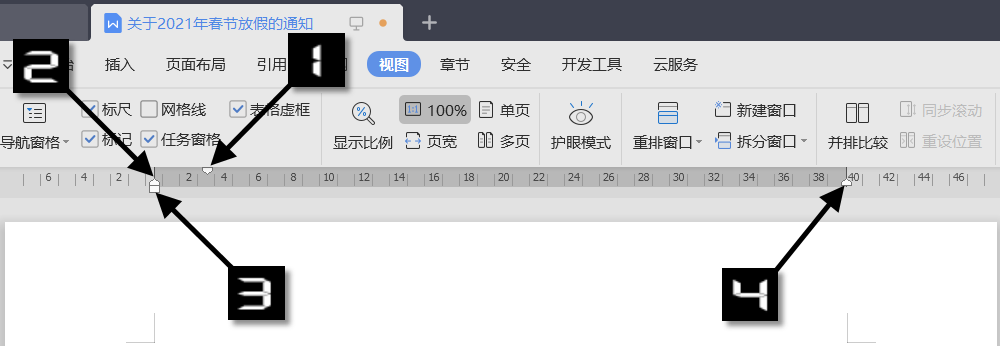
Figure 1-34 Indent slider in horizontal ruler
5 Paragraph line spacing and paragraph spacing control
Line spacing is the distance between lines in a paragraph, the default paragraph line spacing of WPS text It is single-spaced, and its height is determined by the font size, and the line spacing is different for different font sizes. The commonly used multiple line spacings are 1.5 times line spacing, 2 times line spacing and multiple line spacing.
To set the body paragraph line spacing of the document to 1.5 times the line spacing, the operation steps are as follows. First select all the text paragraphs, and then in the [Paragraph] command group of the [Home] tab, click the [Line Spacing] drop-down arrow, and select 1.5 times the line spacing in the drop-down list, as shown in Figure 1-35.

Figure 1-35 Set 1.5 times line spacing for body paragraphs
If you want to set the line spacing more precisely, for example, you want to specify the line spacing of the paragraph as a fixed value 22 points, you can select the paragraph to be set, click the [Paragraph] dialog box start button in the [Home] tab, open the [Paragraph] dialog box, and click the [Line Spacing] drop-down button under the [Indentation and Spacing] tab Select [Fixed Value] in the list, then enter "22" in the [Setting Value] text box, and click the [OK] button, as shown in Figure 1-36.
In addition to setting the line spacing in the paragraph, you can also set [before paragraph] and 【After paragraph】Space controls the distance between paragraphs, making the paragraph hierarchy of the document clearer. Figure 1-37 shows the paragraph layout effect after setting the heading paragraph's leading margin to 1 line and paragraph trailing margin to 0 lines.
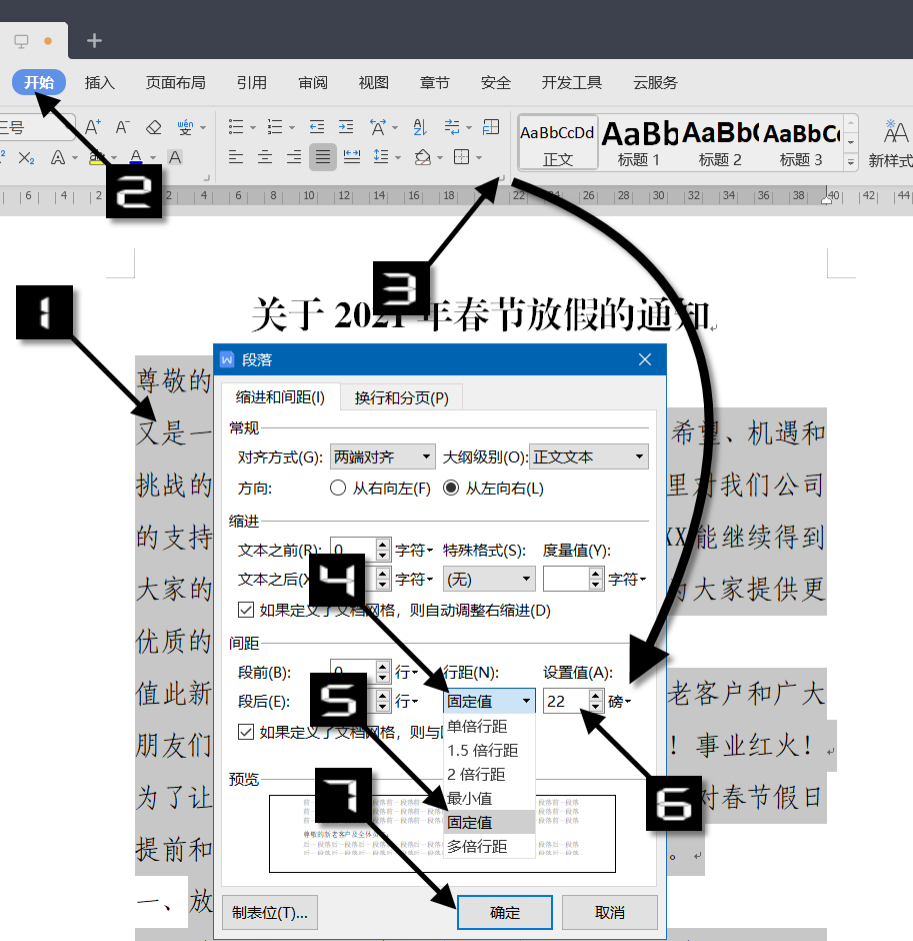
Figure 1-36 Set the paragraph line spacing to a fixed value
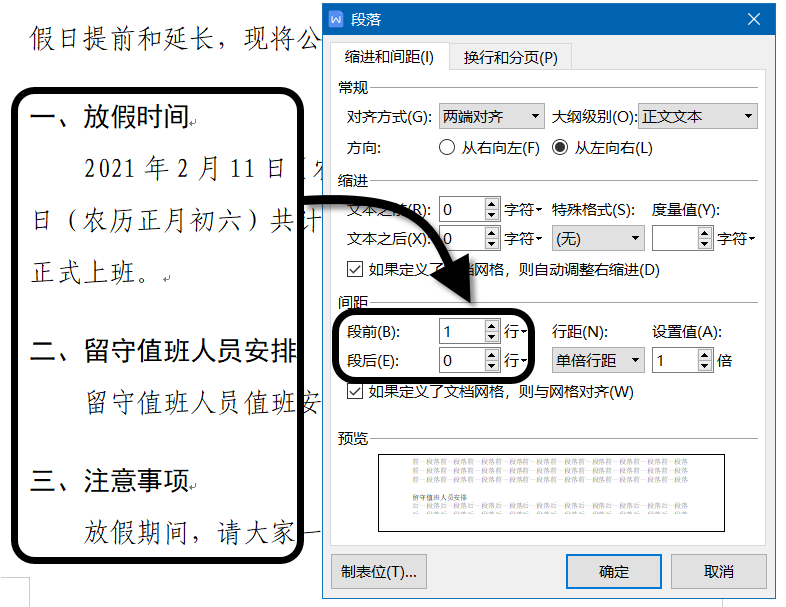
Figure 1-37 Paragraph spacing control
6 Convenient paragraph layout function
When the cursor is in a paragraph, a [ Paragraph Layout] button. If the button is not displayed, you can click the [Show/Hide Edit Mark] drop-down button in the [Home] tab, and select the [Show/Hide Paragraph Layout Button] command in the pop-up menu, as shown in Figure 1-38. Click this button to activate the paragraph layout function of WPS text, you can directly set the indentation and line spacing of the paragraph by dragging the mouse, and support multiple paragraphs to operate at the same time, making the paragraph layout more convenient.
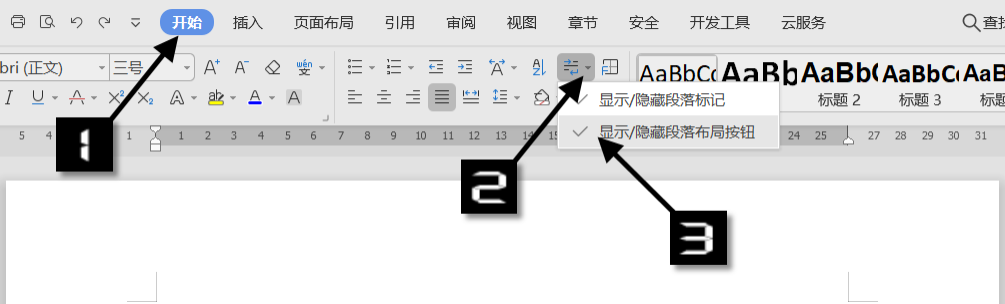
Figure 1-38 Display [Paragraph Layout] button
In [Paragraph Layout] mode, 7 small icons will appear around the paragraph, As shown in Figure 1-39, the icons ①~⑥ are respectively: ① first line indent; ② hanging indent; ③ left indent; ④ space after paragraph; ⑤ right indent; ⑥ space before paragraph. Click and hold down the left mouse button on the icon to see the text prompt, and drag directly to adjust the corresponding format. Click the icon ⑦ to exit 【Paragraph Layout】mode.

Figure 1-39 Convenient paragraph layout function
Double-click or press the key directly on the blank space of the page to exit [Paragraph Layout] mode.
7 Paragraph paging control
During document typesetting, a title may appear on the previous page , and the body paragraphs under the title are on the next page, affecting the reading experience, as shown in Figure 1-40.
In order to ensure that the title paragraph and the body paragraph to which it belongs are on the same page, the title can be Paragraph settings [same page as next paragraph], setting method: position the cursor in the title paragraph, open the [Paragraph] dialog box, switch to the [Line Break and Page Break] tab, select [Same Page as Next Paragraph] in the [Page Break] option Check the box and click the [OK] button, as shown in Figure 1-41.
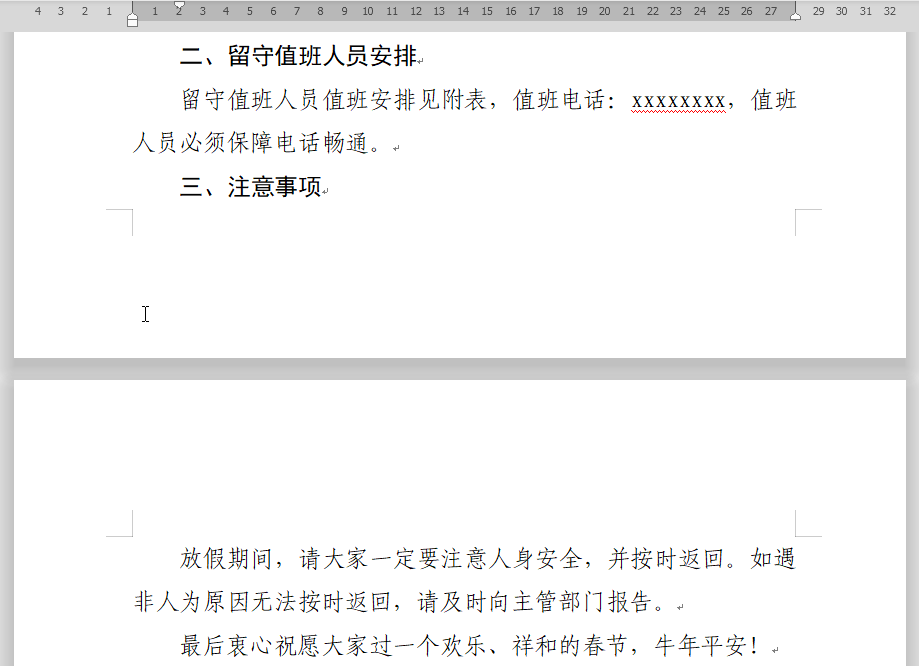
Figure 1-40 The title and the paragraph it belongs to are not on the same page
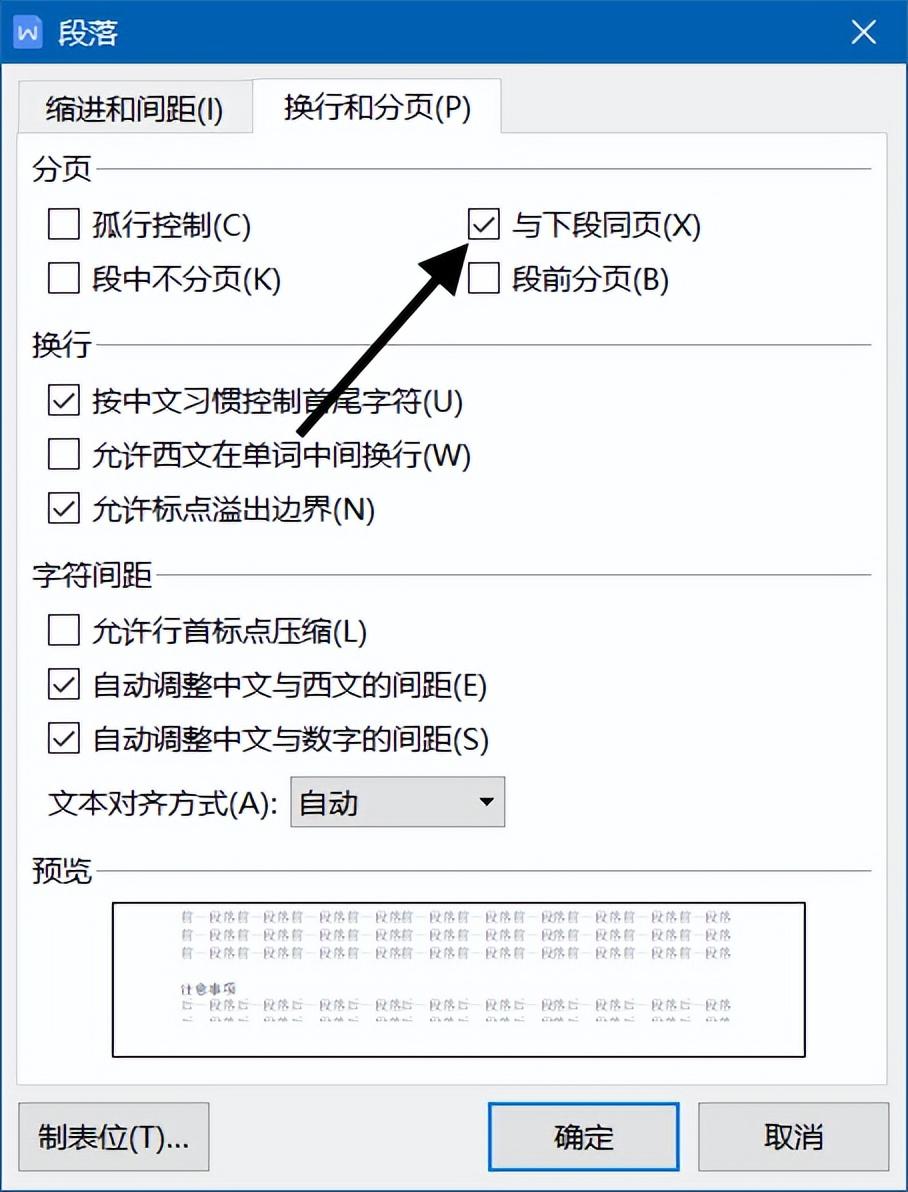
Figure 1-41 Set the title and text on the same page
In addition, if you do not want the first line of the paragraph to appear at the end of the page, or the last line to appear at the top of the page, especially if there are only a few characters, you can select [Orphaned Line Control] checkbox. If you don't want the paragraphs in the document to be displayed in pages, and each paragraph is completely displayed on a certain page, you can select the [No page break in paragraph] check box, and WPS text will automatically adjust the paragraphs according to the page break option.
Using the knowledge points mentioned in the previous chapters, you can complete the typesetting of a simple notification document. The typesetting effect is shown in Figure 1-42.
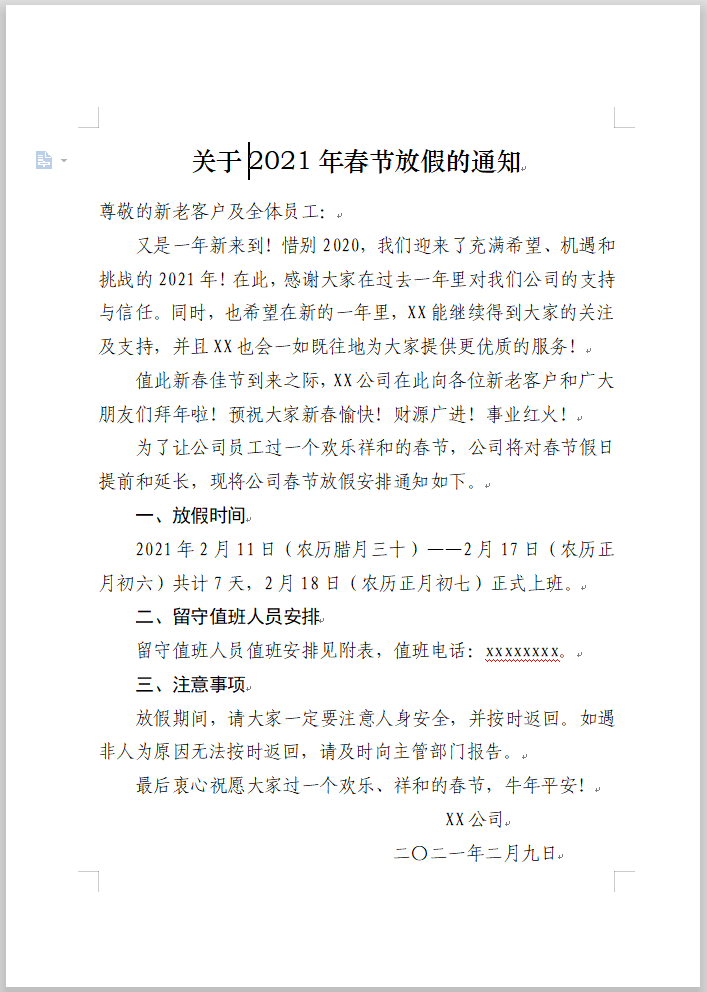
Figure 1-42 Notification document layout effect
Articles are uploaded by users and are for non-commercial browsing only. Posted by: Lomu, please indicate the source: https://www.daogebangong.com/en/articles/detail/Set%20document%20font%20paragraph%20format.html
 支付宝扫一扫
评论列表(196条)
测试