
What I’m sharing today is using this method to create text effects. The production method mainly uses layer styles, filters and layer mask creation. The method is very simple and can be used to create text effects based on horror movie themes. It is very practical.
Let’s take a look at the effect first:

STEP1: Create background and text layers
(1) Create a new document of 800*600px, color mode is RGB, and resolution is 72ppi. Background color value #{{101010:0}}.

(2) Create text using font Terminal and set the size to 160px, align the background horizontally and vertically.

(3) Rename the text layer to Text 01, right-click it and select Convert to Smart Object;

STEP2: How to apply layer style
(1) Double-click the "Text 01" layer to apply the following layer style:
Uncheck the G and B channels in Advanced Mixing of the Blending Options and select the Outer Glow style (Screen, Opacity 50%, Color #ffffff, Size 10%).

(2) Copy Text 01, change the name to "Text 02", double-click the layer and cancel the R channel in the Advanced Mixing of the Blending Options.

STEP3: How to create glitch effects
(1) Select the Move tool, fine-tune the Text 01 and Text 02 layers to display red and blue colors in opposite directions, and get the results you like (the text 02 selected in this article moves 5px to the right).

(2) Copy the Text 01 and Text 02 layers; create a new layer, name it "Effect 01", and then press the ctrl-alt-shift-E (Mac: Option-Command-Shift-E) key to create All layer stamps can be converted to smart objects with the right mouse button.
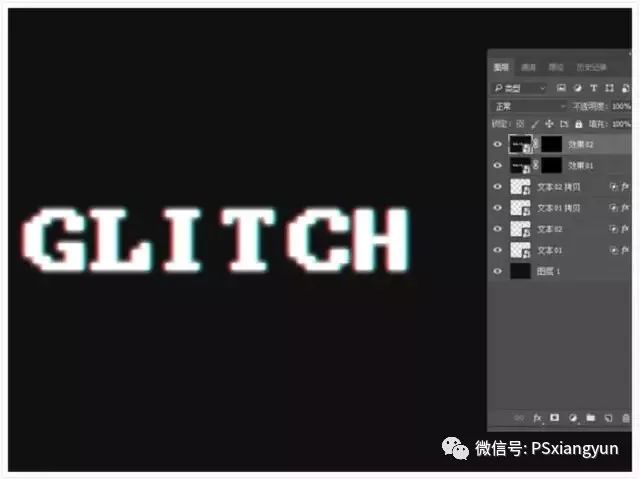
(3) Select the "Effect 01" layer, hold down the alt key, and click "Add Vector Mask" at the bottom of the layer; copy the "Effect 01" layer and rename "Effect 02".

(4) Select the Rectangular Marquee Tool and create some random selections containing parts of the text, making sure to extend the options outside the left and right sides of the text. Keep enough vertical space between the selections, we will create more selections between them; select the thumbnail of the Effect 01 layer mask and fill it with white, press Ctrl-D (Command-D) to deselect it.

Articles are uploaded by users and are for non-commercial browsing only. Posted by: Lomu, please indicate the source: https://www.daogebangong.com/en/articles/detail/Photoshop-jiao-cheng-da-zao-gu-zhang-yi-shu-feng-ge-de-zi-ti-she-ji.html
 支付宝扫一扫
评论列表(196条)
测试