The following article comes from the excellent ppt tutorial, author Daxiong Dongjun

Share PPT graphic tutorials, video tutorials and other efficient office software tutorials every day.
WeChat scan code to watch a full set of Excel, Word, PPT videos

 When products or characters need to be displayed in PPT design, few people will use dynamic effects such as animation or smooth switching.
I made a PPT for the "Mercedes-Benz Mustang" product display in ", that's what I should do! The leaders said "wonderful" after reading it! " introduces the use of image cropping + smooth switching to display products. Today, I will introduce a new dynamic PPT method, which combines the text description of the product (character) with the product (character) image itself Get up, and add corresponding animations or smooth switching effects for dynamic interpretation, making the information display of PPT more vivid and interesting.

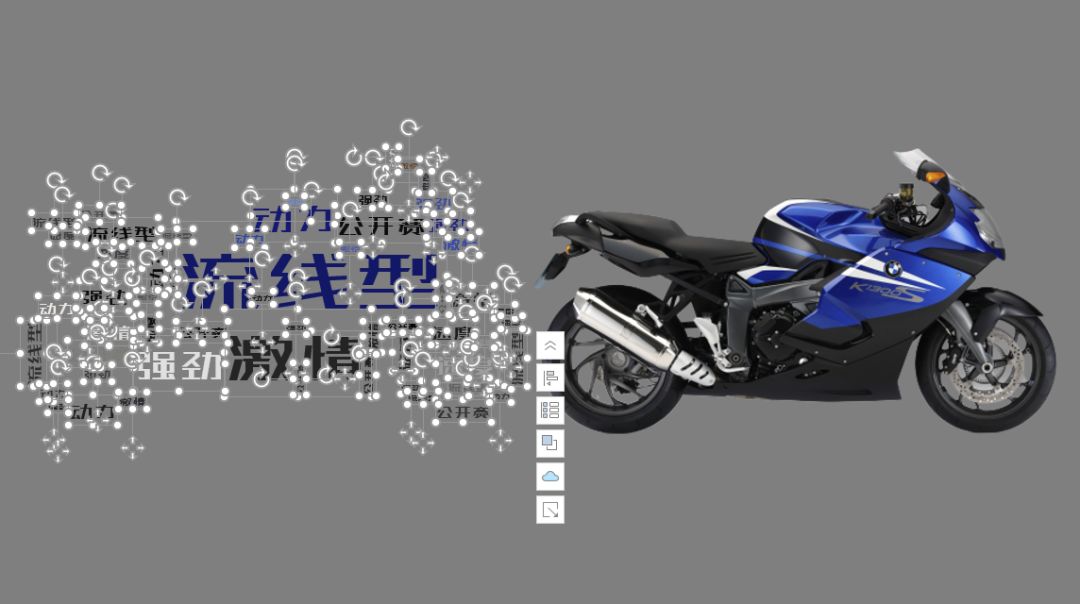
Impression 1: Comprehensive application of word cloud + animation settings

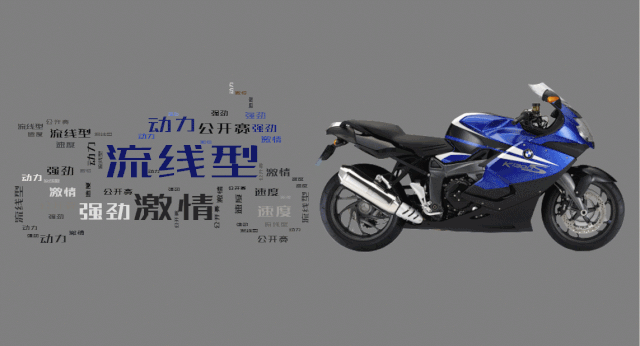
Impression 2: Word cloud + smooth switching + animation comprehensive application
Let's go into the production tutorial.
Preliminary preparation
1. Pocket animation plug-in (can be downloaded from the official website)
2.Office2019/365 (only rendering 2 needs smoothing effect, rendering 1 can be any version of Office, including WPS)
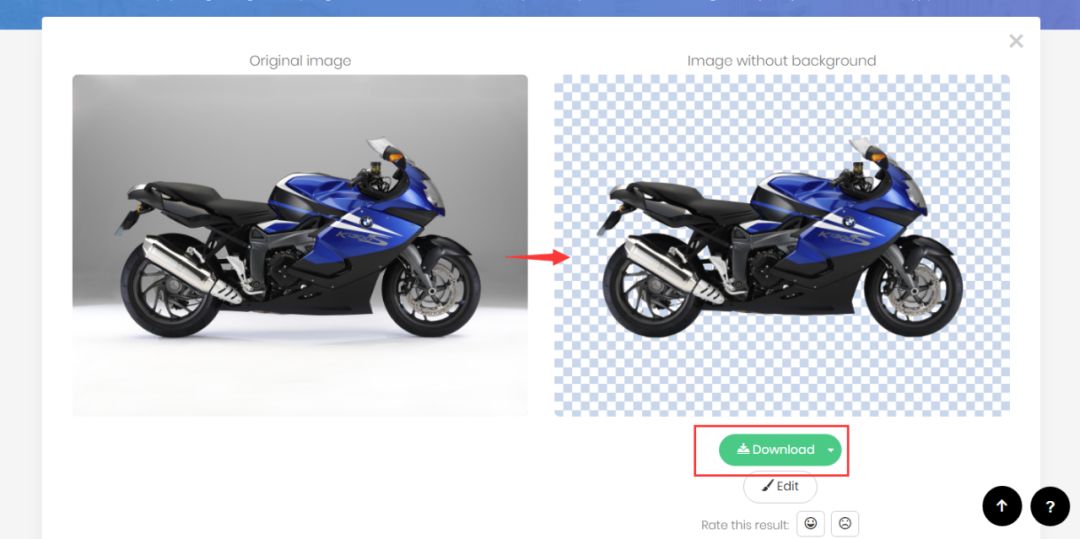
3. A PNG picture, if you want to use a PNG picture, Daxiong is here to give you an online cutout artifact: remove
Artifact URL: https://www.remove.bg/
The method of use is very simple, the operation is as follows:
First, open the website and click Upload Image.
Then, the website will automatically cut out the picture to get the picture below, and then click Download directly to complete the download.
Part 1: Making Tutorial of Effect Picture 1
Step 1:
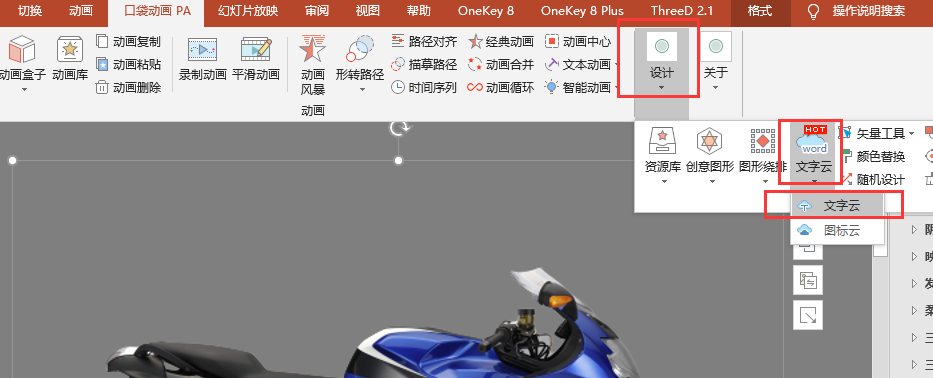
Click to insert a PNG picture (or use the above-mentioned cutout artifact to cut out the JPG picture), insert it into the PPT and click "Pocket Animation Plugin" - "Design" - "Word Cloud" - "Word Cloud Button" .
Step Two:
The word cloud window pops up at this time, we first move the window to one side, select the picture with the left mouse button, and then click the button in the word cloud window (select the object in the slide or the slide page as the cloud background ), the position is shown in the figure:
In this way, we set the cloud shape of the word cloud to be made to the shape of the PNG image we inserted.
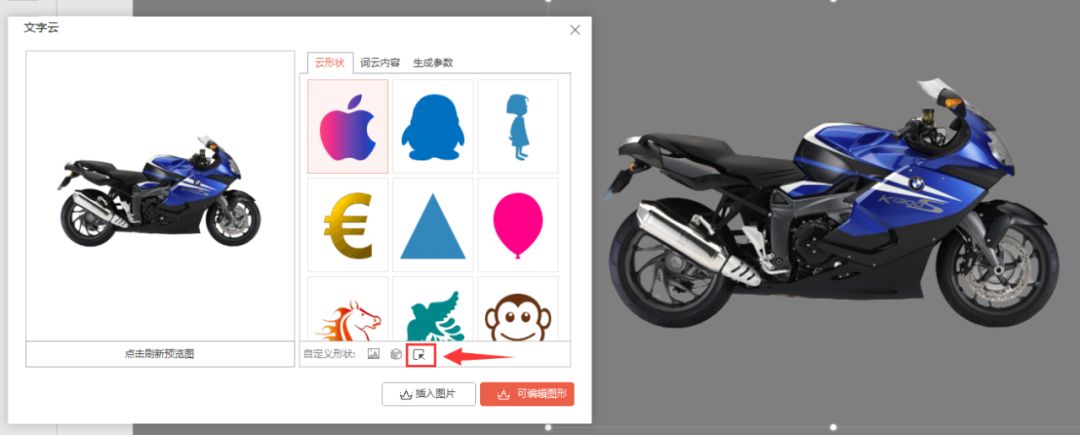
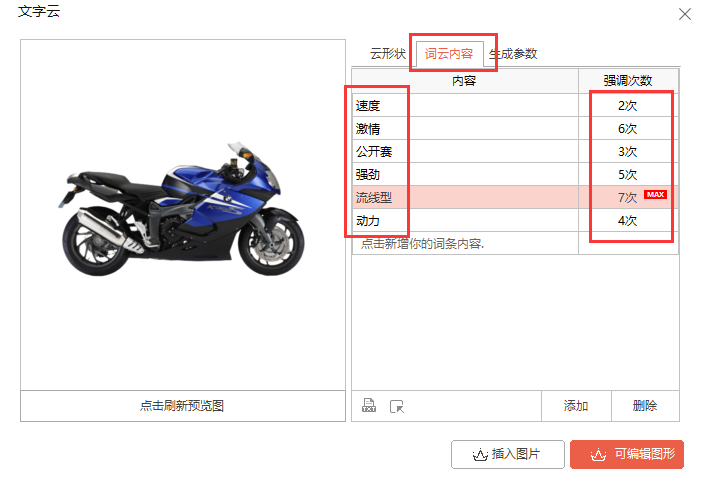
Step 3:
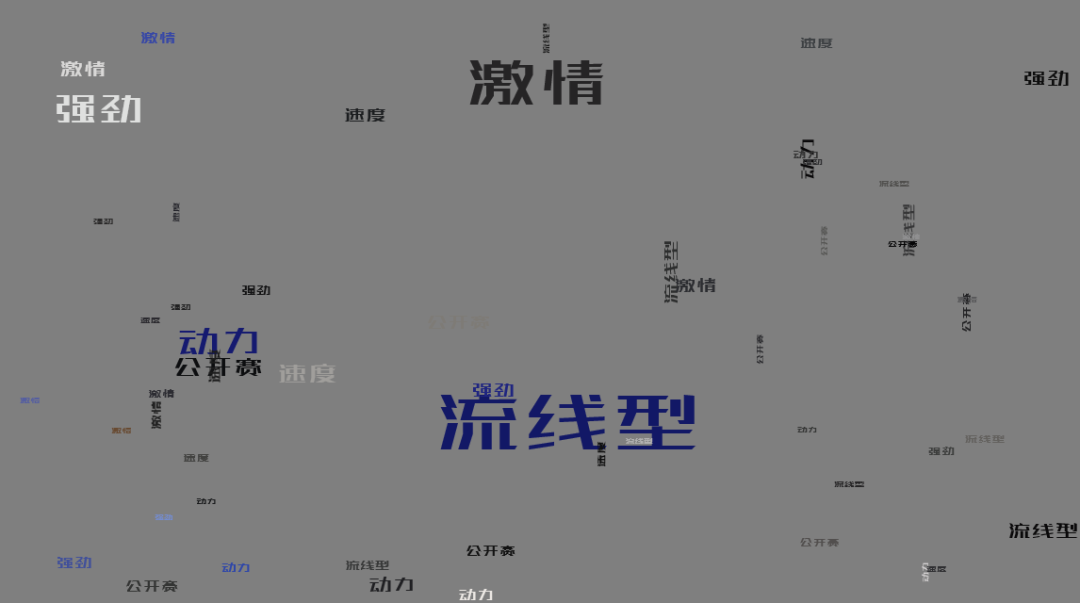
Click "word cloud content", we can enter the text describing the product in this window (language refinement), the number should be more than 6, the number of emphasis on the right can be set arbitrarily, the number of emphasis here is the word cloud If you want to highlight a certain word in the word cloud, such as the word streamline, then we need to set the emphasis frequency of the word streamline higher here.
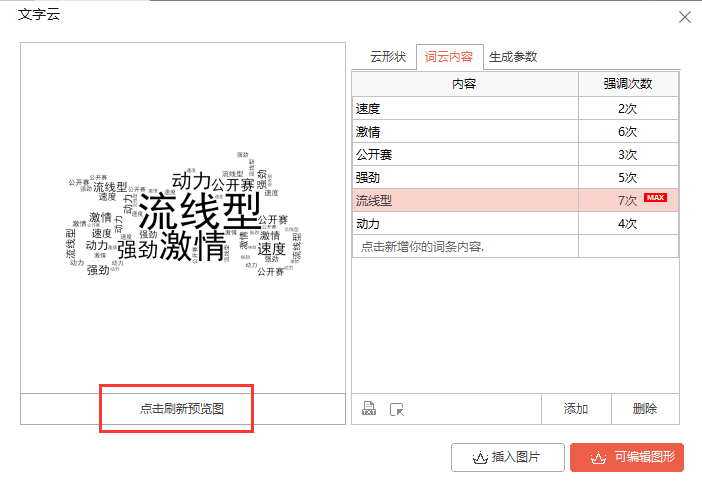
Step 4:
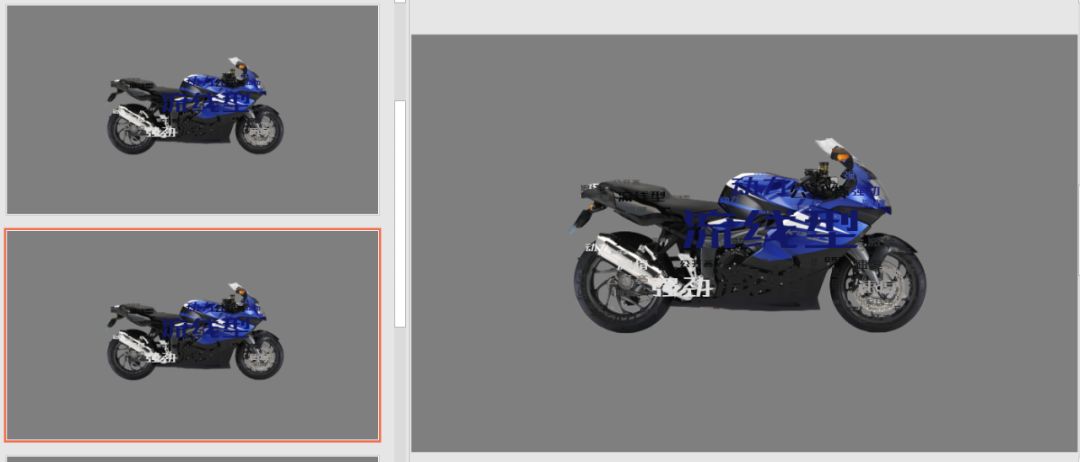
After setting the word cloud content and emphasis times, click "click to refresh preview image" under the picture on the left side of the window to view the effect image generated at this time. If you are not satisfied with the current effect, you can continue to click this button to view the next one Randomly generated preview images until you are satisfied.
Step Five:
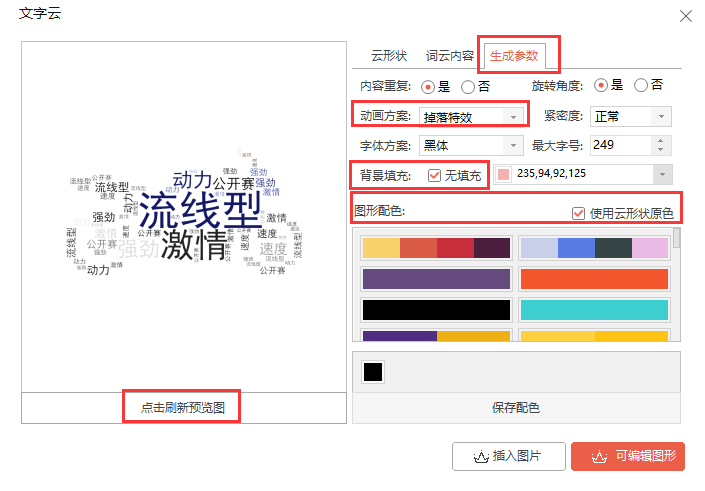
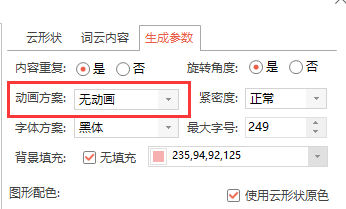
After the above steps are set, let's click Generate Parameters.
Here are 5 key points to note:
(1) Animation scheme: Contains multiple animation options, which can be freely selected. Here we take "drop special effects" as an example;
(2)Background fill: Make sure to check the option here to ensure that the generated word cloud is transparent;
(3)Graphic color matching: You can choose the color scheme that comes with it below, or you can choose to use the primary color of the cloud shape. Using the color of the cloud shape means that the generated word cloud corresponds to the original image The color of the region is consistent. For example, the front of the car is blue, and the text corresponding to the front part of the generated word cloud is also blue. We choose to use the color of the cloud shape here;
(4) After setting, click to refresh the preview image to view the generated effect (the animation effect cannot be viewed, only the color, tightness, etc.);
(5) Other parameters can be used as default, no need to change, we can set the font scheme uniformly after closing the word cloud window (because there are too few font schemes in the word cloud window).
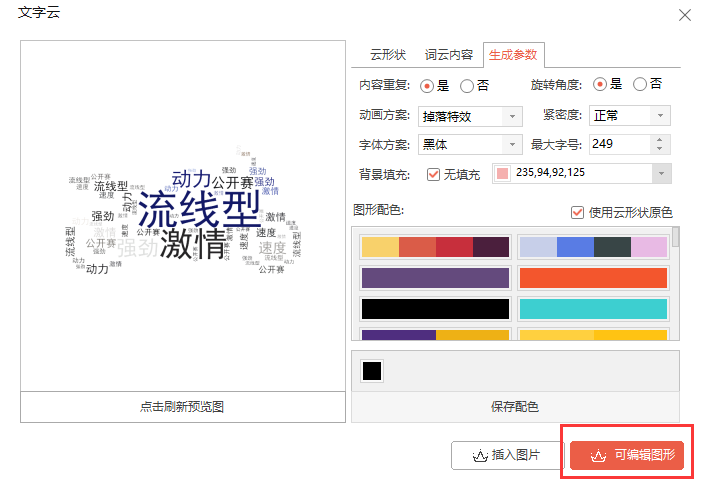
Step Six:
After the above parameters are set, click to refresh the preview image to confirm that it is correct, and then click "Editable Graphics" in the lower right corner of the window. Note that you must click "Editable Graphics" instead of "Insert Picture", so that the generated word cloud will be more accurate. There will be animation effects and room to edit again.

Step Seven:
After obtaining the complete editable word cloud content, we can select all the text to change the font as needed. Here we take "Zhanku high-end black" as an example.
Step Eight:
Play a slideshow to view animation effects.
Step Nine:
Select all the word cloud content, drag it to the position of the PNG image to completely overlap and place it, then select all the word cloud content and PNG image and move them to the middle of the canvas.
Step ten:
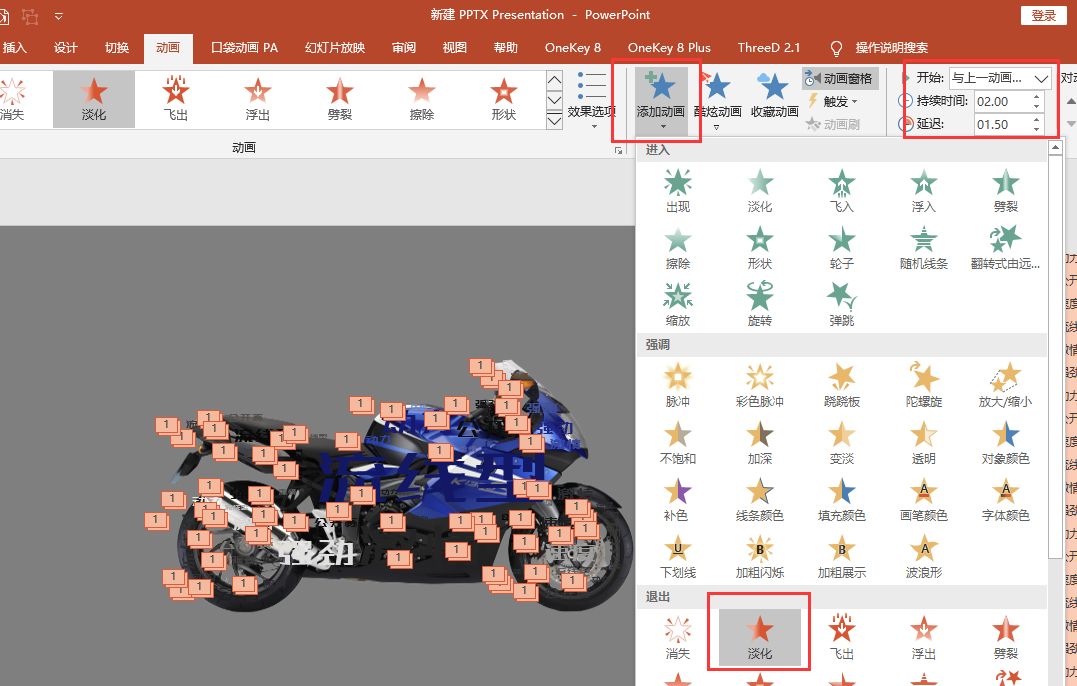
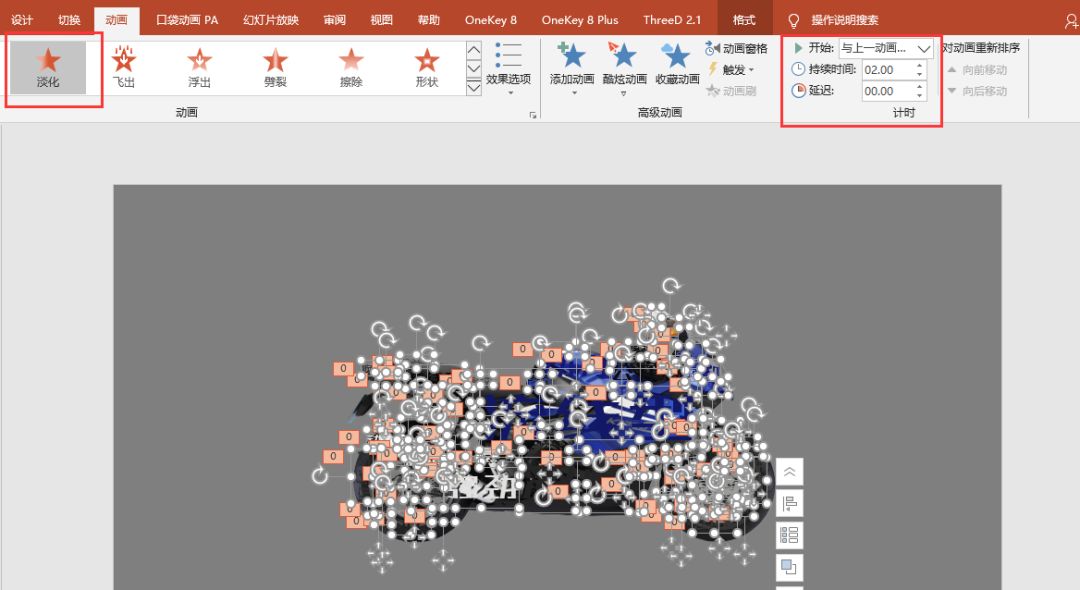
Ctrl+A to select all, then hold down Ctrl and click on the PNG image. After selecting all the text, click "Animation" - "Add Animation" - select "Exit" in the animation to start "Simultaneously with the previous animation", the duration is 2 seconds, and the delay time is 1.5 seconds.
Step eleven:
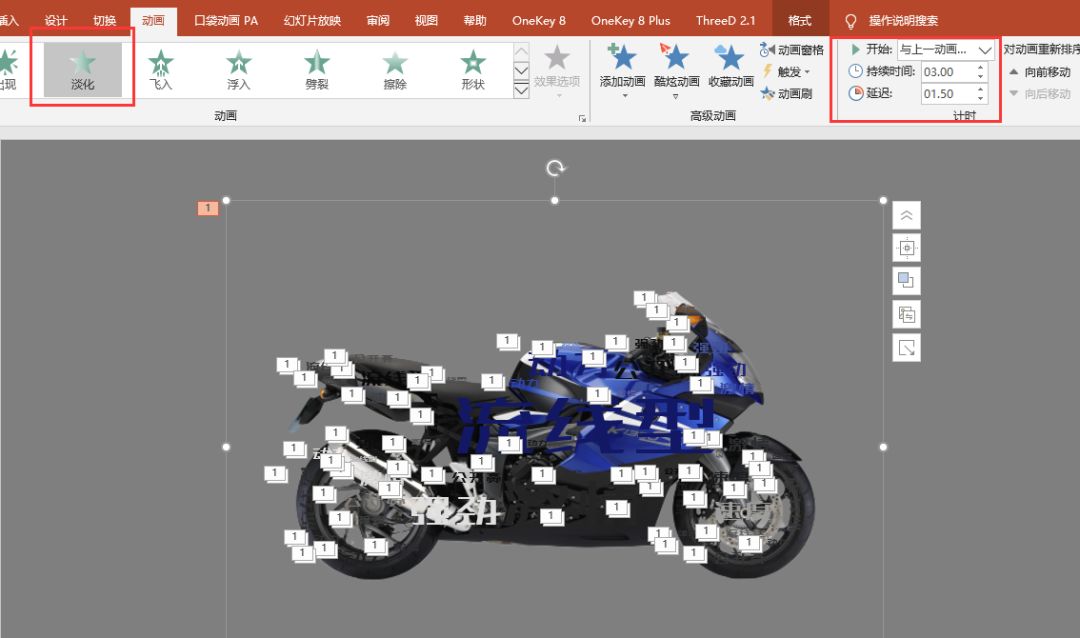
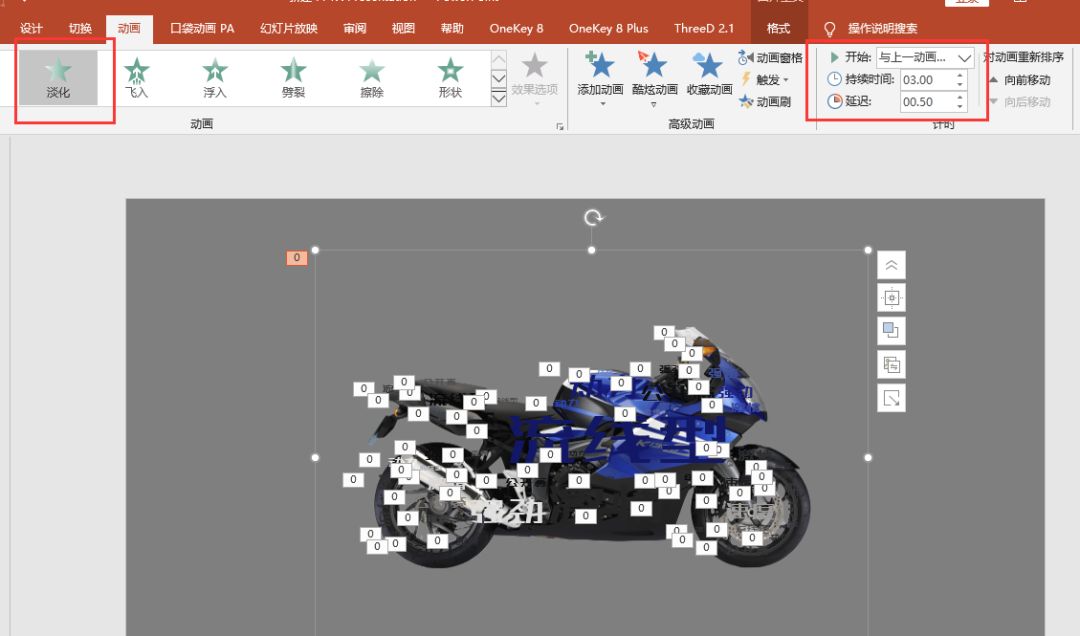
Select the PNG image individually, click "Fade" in the "Animation"-"Enter" animation, the start is "simultaneous with the previous animation", the duration is 3 seconds, and the delay is 1.5 seconds.
This step completes the comprehensive rendering of the combination of word cloud and animation settings:
Part Two: Making Tutorial of Effect Picture 2
After learning how to make the effect picture 1, the production of the effect picture 2 will be much easier
The first four steps of rendering 2 and rendering 1 are the same, and we will start to explain directly from the fifth step.
Step Five:
In the "Generation Parameters" pane of the word cloud window, set the "Animation Scheme" to "No Animation", and the other parameters are the same as those in Figure 1, and then click "Editable Graphics" to generate a word cloud.
Step Six:
Still the same as the effect picture 1, place the word cloud and the PNG image overlappingly in the center of the canvas, and copy the current slide to get two identical slides.
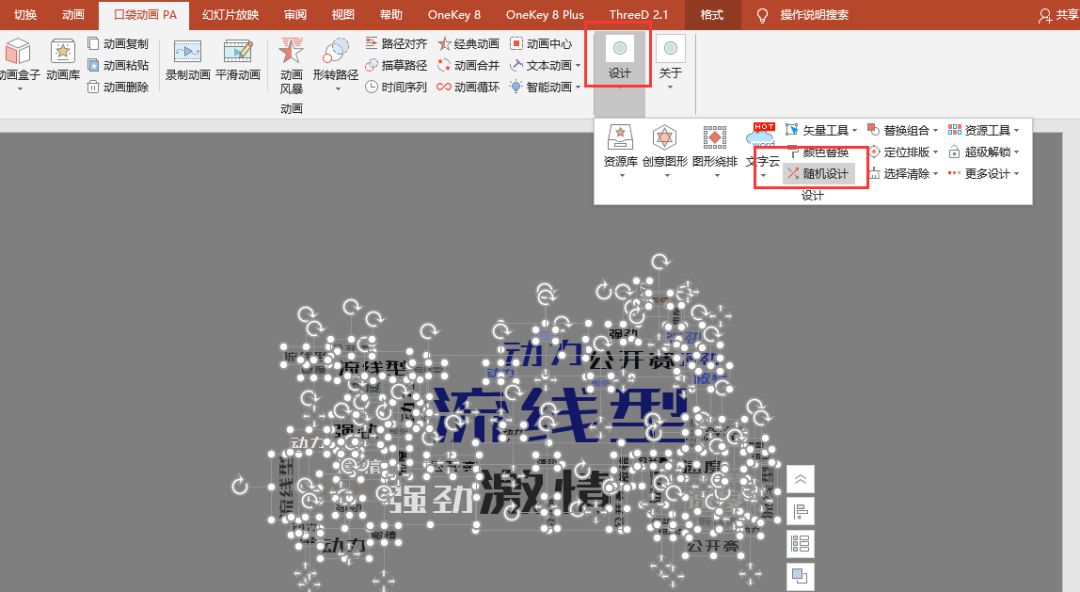
Step Seven:
Delete the PNG image in the first slide, then select all the text, and execute "Pocket Animation" - "Design" - "Random Design.
Step Eight:
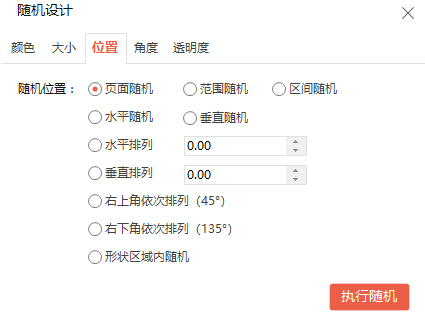
In the pop-up "" random design window, switch to the "Position" pane, select "Page Random" for "Random Position".

After random execution, the following image will be obtained:
Step Nine:
Manually moves all text outside the canvas.
This step completes the setting of the first slide in the effect picture 2.
Step ten:
Switch to the second slide, select all text, add "fade" in "exit" animation, start as "simultaneous with previous animation", duration 2 seconds, no delay.

Step eleven:
In the second slide, with the PNG selected, add a "Fade" in the "Enter" animation, starting at "Simultaneously with previous animation", with a duration of 3 seconds and a delay of 0.5 seconds.
Step 12:
Adds a smooth transition to the second slide for 2 seconds.

Final renderings available at screening:
That’s all for this issue of word cloud animation gameplay, see you next issue~
For more PPT tutorials, please pay attention to the official account of PPT tutorials under Bubuwo Education:
Articles are uploaded by users and are for non-commercial browsing only. Posted by: Lomu, please indicate the source: https://www.daogebangong.com/en/articles/detail/PPT%20tutorial%202%20minutes%20to%20learn%20super%20practical%20word%20cloud%20animation%20eyeopening.html
 支付宝扫一扫
评论列表(196条)
测试