There are many people who want to see it, and many people need it. So I will continue to work hard and share more valuable content with you. At the same time, if you have any questions about PPT that you want to know, please leave a message in the comment
(If you think this part is boring, you can skip it directly)Still on the topic of "thanks":First of all, thank you all for your love of my article. After seeing your comments, I understand that even writing these basic tutorials is not easy. Still makes sense. Secondly, I would like to thank Yu Feng and who have given valuable suggestions to my articles so far Classmate Futaki. In the early stage of writing, the typesetting of the article still has a lot of flaws. Thanks to Yufeng for his suggestion, let the next few articles, read It's a little more comfortable. Then there is Mr. Futaki. I haven’t known him for a long time, but he has helped me a lot. The knowledge points of the last article are indeed many and complicated. I encountered many logic problems during the writing process. After publishing, Ermu gave me a lot of suggestions on logic and layout, and I gained a lot. Compared with the previous one, this article is also a basic article, but the number of knowledge points is more than that, so It will test logic and typesetting ability even more. I hope that every article I have written can improve compared with the previous ones. Let me witness the effect after adjustment.
--Past Knowledge Review--"PPT Whitening Tutorial" has been fully updated for 6 issues (not counting this issue), and I will sort it out for you, what content has been updated in the previous issues: Preparation for "Phase 1"< span>Phase 1: My PPT learning experience. Issue 2: Novices often make mistakes when doing PPT. Phase 3: The software version of PPT. Phase 4: Operating habits before doing PPT. "Second Stage" General AwarenessNo. 5: PPT structure and style. Basic operation of the "third stage" softwarePhase 6: PPT interface operation guide. The next few issues are still in the third stage, but they have entered the specific explanation of common functions. Start introducing the first one today. Then#第7期# is: the text attribute of the "text box". The reasons for starting with this topic are the following ↓ 1. There is no doubt that text is one of the most commonly used elements in PPT. 2. As a basic function of PPT, text is more or less related to other functions. 3. There are many ways to play fonts, otherwise there will be an extra field of "font design" for no reason.
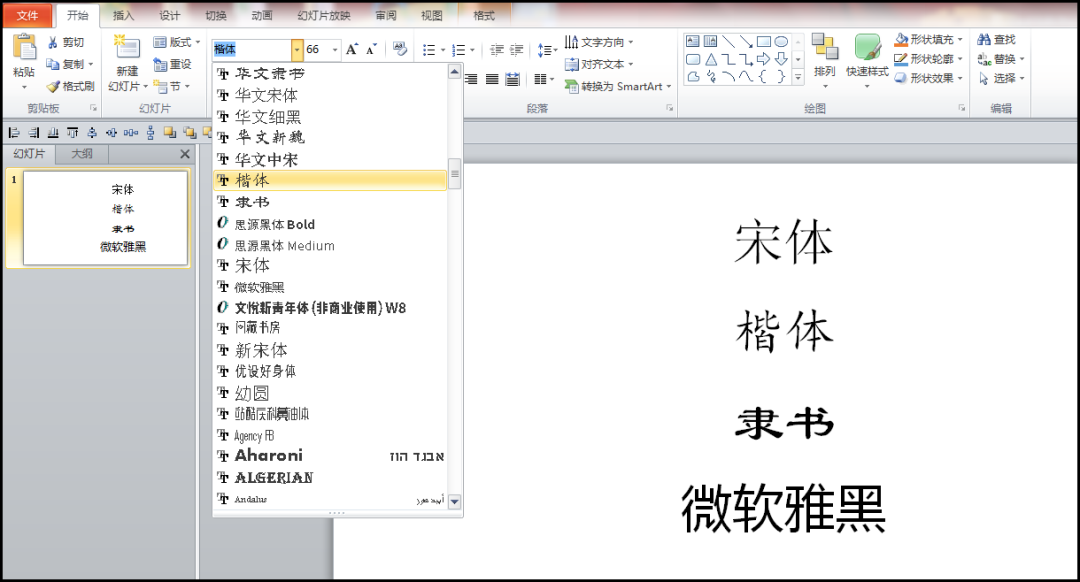
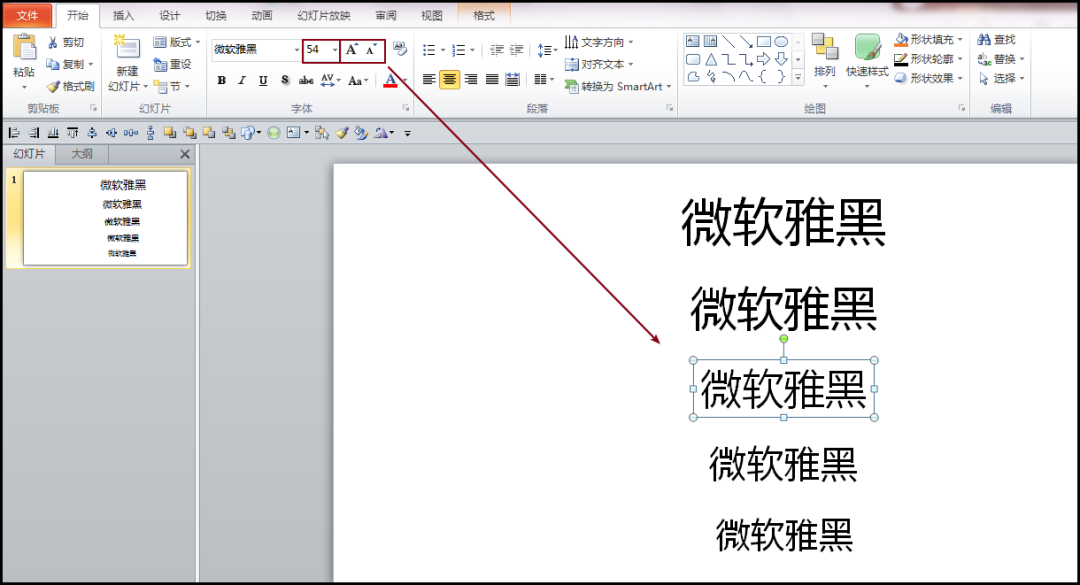
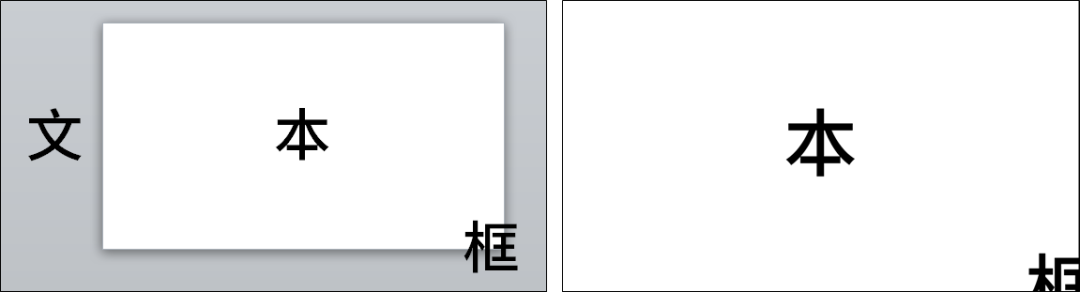
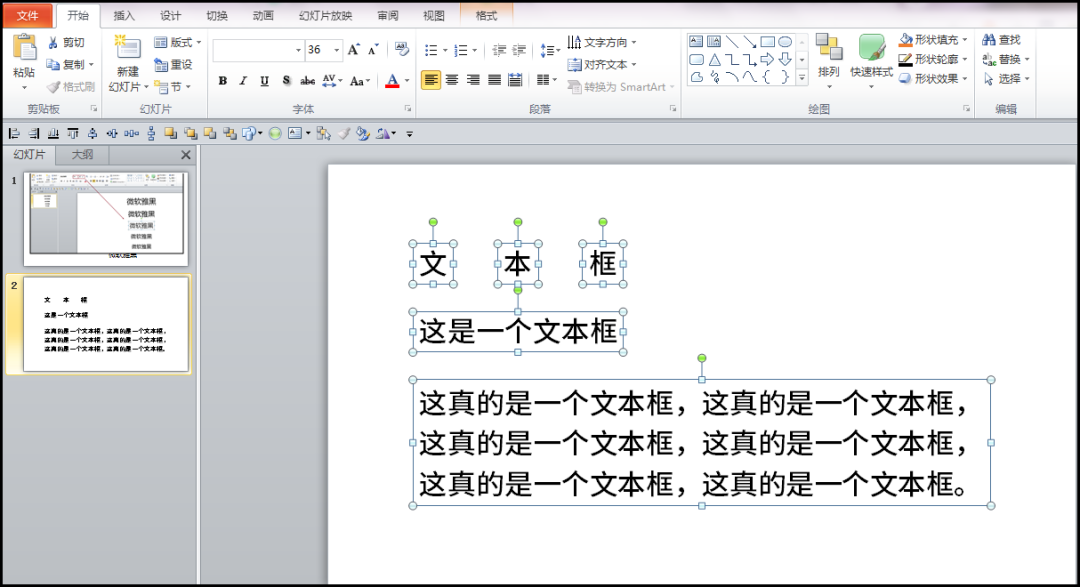
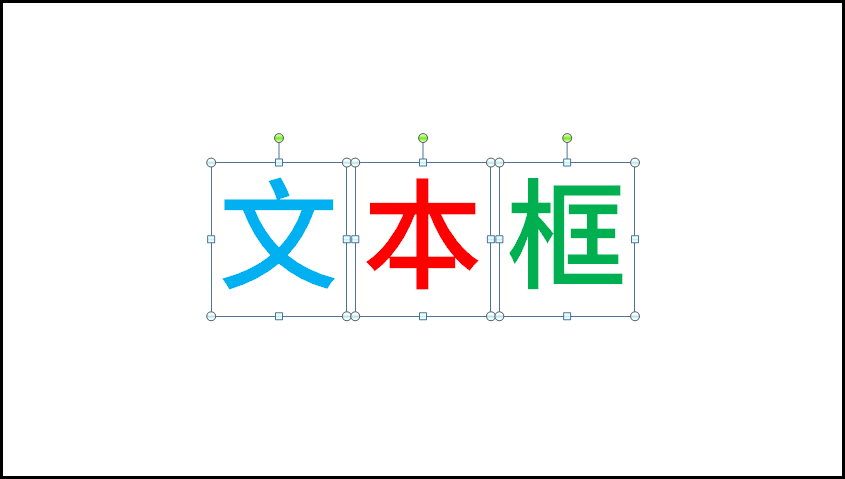
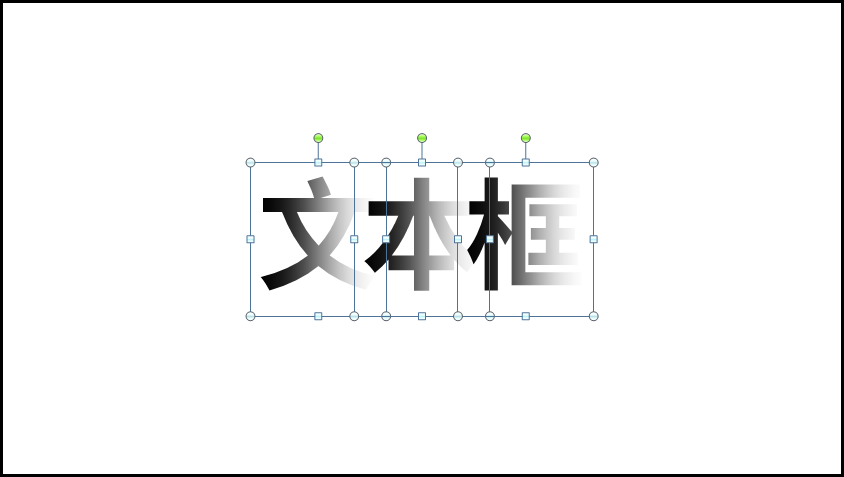
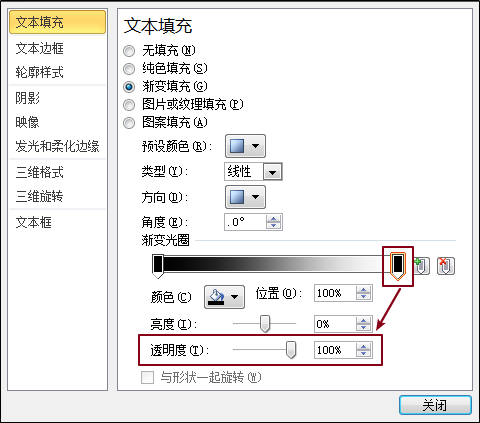
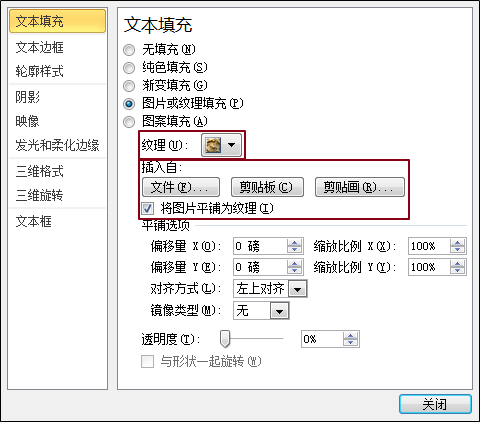
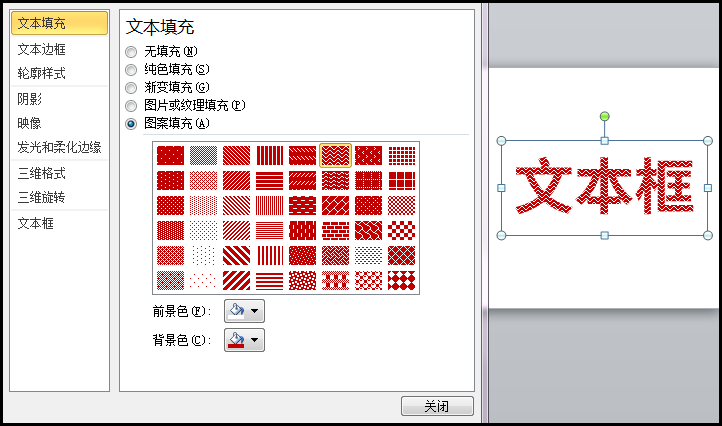
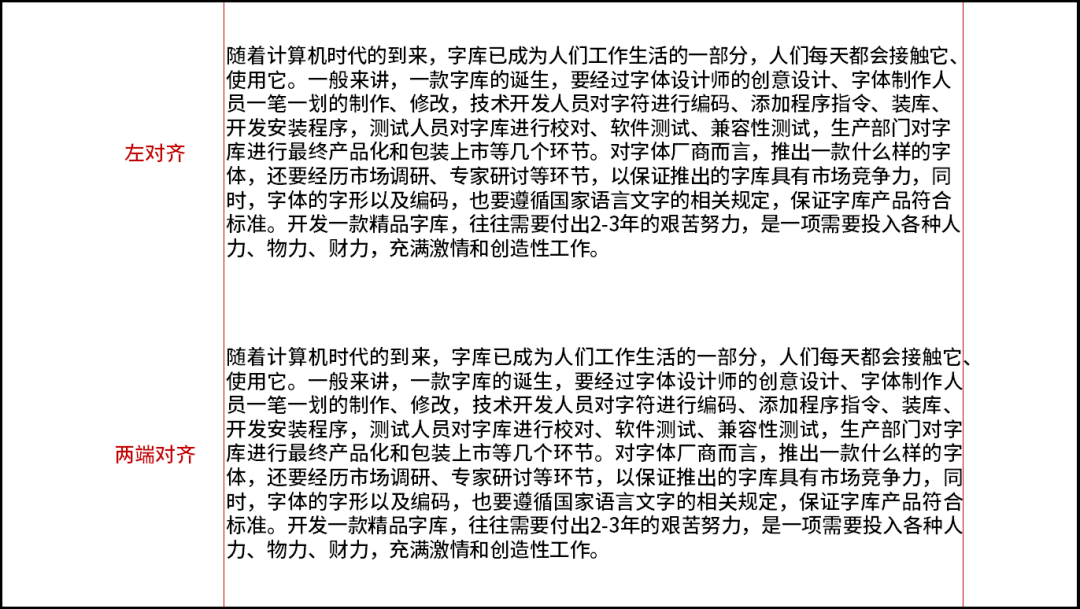
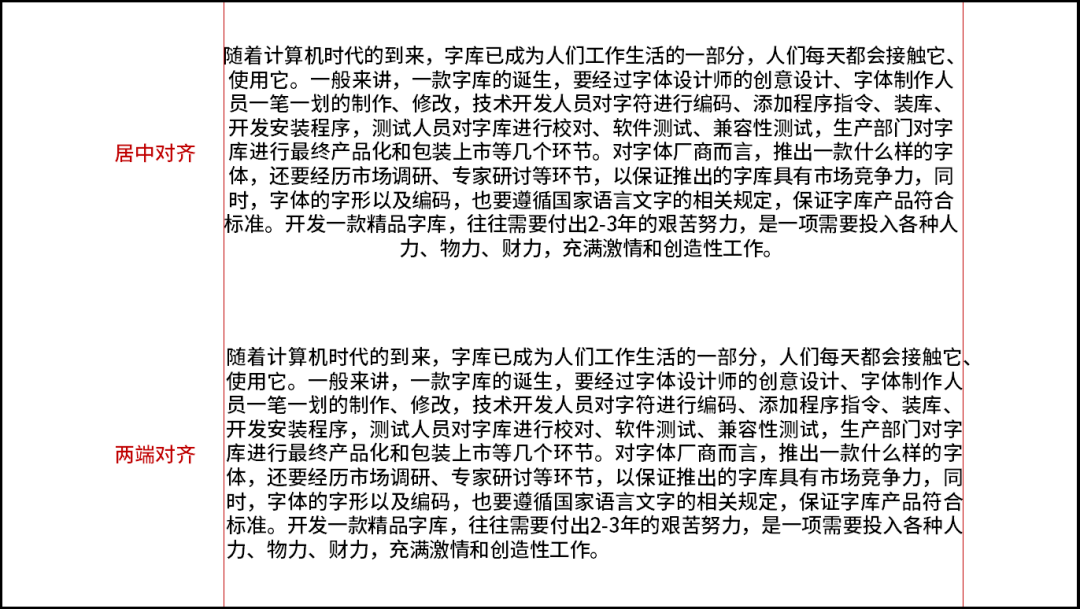
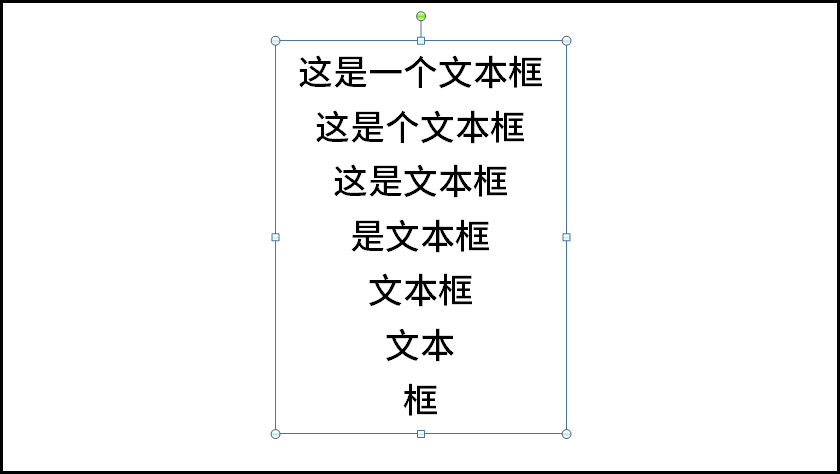
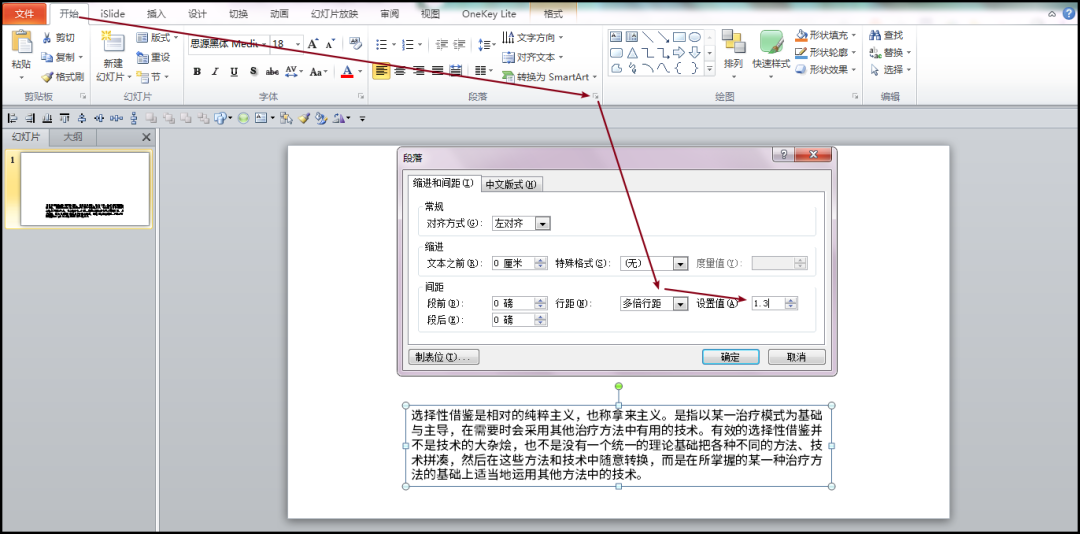
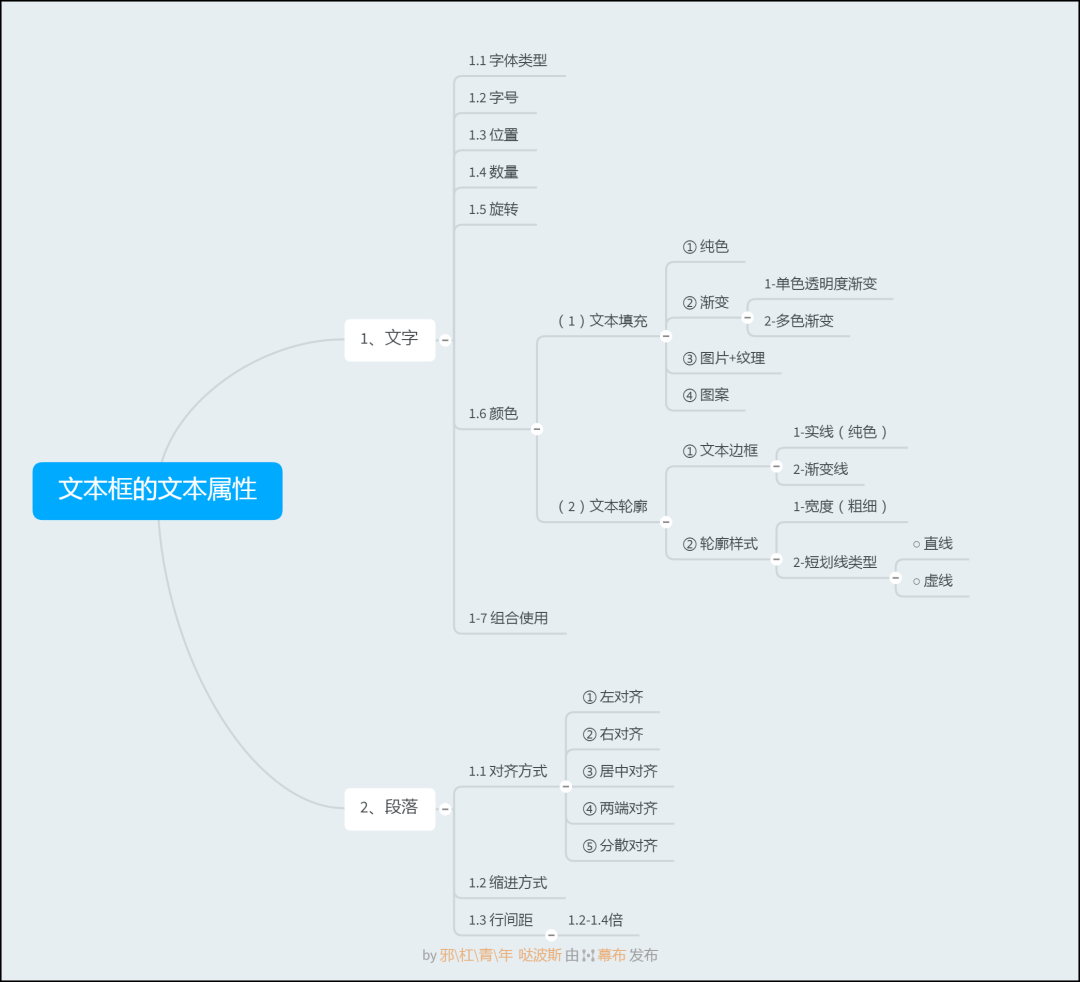
The introduction of the text boxMaybe before you and me Same, only heard of the text box, but do not know what it is for? So, how did I input text in PPT before? In my impression, I used to do this ↓ [Method 1] Use the text box placeholder in the default layout. [Method 2] Copy a paragraph of text from other PPTs, paste it into the PPT you made, and modify the content. Perhaps you will be wondering now why novices don’t know how to input text in PPT? Let me ask you three questions first↓In Word How to enter text? Answer: After the blinking cursor, enter the text directly. (no technical content)How to input text in Excel? Answer: Select a cell and enter text directly. (no technical content)How to input text in PPT? (Without copying and pasting, and text box placeholders)Answer: You need to insert a text box before entering text. (打手┓(;´_`)┏)So you understand? In the three-piece office software suite, the operation of PPT is a little cumbersome, and the name is called "text box", not the "typing box" that we can understand at once. To sum up, The text box is used to enter text. [Operation] How to insert a text box:Insert (tab) → Text (function group) → text box. Know the function of the text box (input text), and how to insert the text box, the rest is about its properties. We can understand from the name, text box=text+box. This article will first talk about the "text" of the text box, that is, the "text attribute". We talked about it in the last issue of "PPT Interface Operation Guide" , the ribbon is generally composed of 9 tabs. When we insert a text box, we will find that there is an additional "Format" tab in the ribbon. Click the "Format" tab and find that there are two properties about the text box: "Shape Attribute" (box) on the left and "Text Attribute" on the right (text). Let’s start to explain in detail ↓It is what fonts we often talk about. At first, the fonts we are familiar with may include: Song, Hei, Microsoft Yahei, Kai, Lishu, Chinese Xingkai, Chinese Amber, Chinese Caiyun... is the size of the font. There are two main methods of modifying the font size:【Method 1】Manually modify the font size directly in the "Font Size Box", or click the "drop-down button" to select the font size. 【Method 2】Click the two buttons on the right to modify the font size. is the position of the text box. It can be placed inside the canvas, or outside the canvas, or partly inside the canvas and partly outside the canvas. (left picture is normal view, right picture is slide show) is the number of words in the text box. No one has asked that "a text box must contain a whole paragraph of copy". It can be one a word, a sentence, or a paragraph. The text cannot be rotated in the text box, it needs to pass Rotate the text box to achieve the effect of rotating text. The usual case is for "text boxes with only a single text". There are three main rotation methods: [Method 1] Place the mouse near the green dot, Click to rotate. [Method 2] Format → Rotation → Other rotation options (manually enter the specific rotation angle). 【Method 3】Shortcut keys (Alt + left/right arrow keys), rotate 15° in turn. is to fill the text A fixed color: such as black, white, red, yellow, blue...There are two main ways to modify the color:[Method 1] Start< span>→Font (tools group)→Font color. 【Method 2】Format → WordArt style (tool group) → Text fill. 1- Monochromatic transparency gradient is the gradient of a single color with different transparency. (black transparency gradient) Step 1: Insert three text boxes, input "text, text, box" respectively. Step 2: Select a text box, Format → "Art Word Style" drop-down triangle → Text Fill → Gradient Fill. Step 3: Type "Linear", angle 0°, left and right gradient aperture color "black". Step 4: Change the opacity of the rightmost aperture to 100%. Step 5: Select the adjusted text box, double-click the format painter, and copy the effect to other text boxes. that is, multiple Gradient of colors. (This is easy to understand, I won’t explain the operation in depth)PS: Click on the color bar to add An aperture, modify the color of the aperture to the color we need. We are doing For the gradient effect, the main parameters that need to be adjusted are ↓○ Type: linear, ray, rectangle, path. ○ Angle: commonly used angles are 0°, 45°, 90°, 135°, 180°, 225°, 270°, 315 °, 360°. ○ Gradient aperture:Amount, color, position, transparency. ③Picture and texture filling "Texture filling" fills the texture material that comes with PPT. There are three methods of "picture filling": 【Method 1】File: Directly fill the local pictures of the computer . 【Method 2】Clipboard: If there is a picture material in the PPT, select the picture material, press Ctrl+C to copy (it has been copied in the clipboard), and click " clipboard". [Method 3] Clip art: fill in the clip art material that comes with PPT. < span> Try to fill it yourself and you will understand. The above picture is an example, the following three aspects need to be adjusted ↓1- Pattern Style: Zigzag. 2-Foreground color: white. 1-solid line (solid color)2- Gradient line: single-color transparency gradient, multi-color gradient. 1-width (outline Thickness)2-dash line type (contour line type)1.7 Combination use(emphasis)A total of 6 types are summarized above: font, font size, position, quantity, angle, and color. Many font designs, in fact, many of them are combinations of the above basic usages, and some font designs also need to cooperate with shapes, three-dimensional rotation, etc. We need to watch more, practice more, and think more. Regarding the gameplay of fonts, another series will be made later. The focus of this series is mainly to explain the content of operations. 2, paragraph< /section>The focus of the first part is mainly for some attributes of the text itself, and the following will focus on paragraphs (large paragraphs of text). 1) Type: Left Justify, Right Justify, Center, Justify, Disperse. 2) Comparison between alignments: ①Left alignment v.s. both ends alignmentUsually do PPT, You may not be able to see the difference between the two, but if there is punctuation at the end, the difference between the two will show up ↓It can be found that when there are more punctuation points in the copy, the two sides of "alignment at both ends" are much neater than "alignment at left". ②Center alignment v.s. Both ends alignment The text of each line is center-aligned based on the length of the text box. < section> is more commonly used for word spacing adjustment of single-line copy. Word spacing varies with the length of the text box. The so-called Indentation is a bit like elementary school writing on grid paper, requiring two spaces before the first word of each paragraph. But the indentation method and indentation length in PPT are up to us to adjust. "Novices do PPT Mistakes made" As we mentioned in the fourth point of the operation level, the line spacing can be kept between 1.2-1.4 times. [Operation] Start → Paragraph → "Spacing" Line spacing: Multiple line spacing → Setting value: 1.3. Purpose: Prevent large sections of text from looking too dense and not breathing.
Today's article is almost finished. Although it is some very basic knowledge points, it is still a lot for novices. So I still summed up a mind map, which is also my thinking in the process of writing this article. Quality first, then quantity!
Articles are uploaded by users and are for non-commercial browsing only. Posted by: Lomu, please indicate the source: https://www.daogebangong.com/en/articles/detail/PPT%20Whitening%20Tutorial%20Issue%2007Teach%20you%20to%20understand%20the%20text%20box%2001.html


 支付宝扫一扫
评论列表(196条)
测试