ClickBlue WordFocus on Online Teaching Technology
Hold on, we can win< em >
< svg viewbox='0 0 1 1' width='0' >_ Everyone understands the current situation. Although the specific requirements vary from place to place, most regions require a certain degree of online teaching up. At this time, if you master a little more technology, you will be able to have a temporary workaround, in an unstable network , In the face of uncertain school start time, you can have a little more confidence. Xiaoyun’s series of online teaching technology posts will start with the simplest and easy-to-use recorded lessons , the follow-up will gradually cover the introduction of various live broadcast tools, micro-lecture production, interactive tool selection, etc. Let’s talk about the most stupid and the most stupid today Three simple screen recording solutionsPresentation Recording Show
Built-in video software to record computer screen
Online conference software record and watch video
< section>
Pre-recorded micro-lessons, presentation of knowledge points, extended supplementary materials, etc. Parts with low interaction requirements;
You can also consider combiningrecorded video with unified online live broadcast, because online Q&A and dialogue are generally better than offline Interactions in the classroom take longer, and the same teaching time may not be enough to complete the content originally planned;
Using recorded and broadcast videos can also improve the utilization rate of students' relativelyflexible time at home.
Presentation built-in recording
This function may feel tasteless at ordinary times, and it can be used now Useful, mainstream presentation software, such as Microsoft PowerPoint, WPS, Keynote, can record. Here we take Microsoft PowerPoint and WPS as examples to introduce how to use the recording function.
Record presentation steps with PowerPoint< /strong>1. First open the PPT courseware you made
2. After opening, click the Slideshow button, then click Record slideshow, click The small arrow here, and then click the record from scratch button here, as shown in the figure to open it. 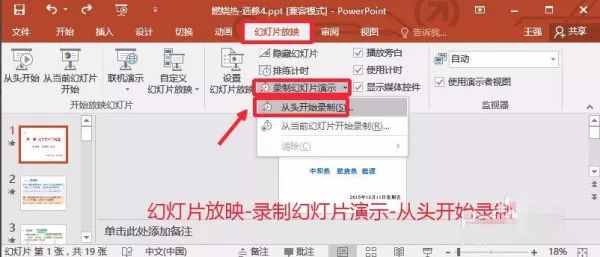
3. In the recording slideshow window, we select the two items here, and then click to start recording. 
4. Enter the slide show mode at this time, there is a button in the upper left corner, we can click the arrow here to control the slide show, of course, we can also click to play directly on the slide, everyone should remember, if the slide show If there is audio or video, you can follow the steps of your class and click to play. If something happens temporarily during the recording process, we can pause the slide show until the recording starts. You can do it yourself as shown in the picture. 5. When you click to play the slideshow, use the microphone to input your voice explanation, prepare and debug the computer microphone in advance, you can use The external microphone also uses the built-in microphone [such as an all-in-one computer]
6. In this way, we will explain and record the slideshow until the end of the slideshow, as shown in the figure, at this time we can click Start from the beginning in the slideshow to preview the slideshow we have recorded to see the effect. Everyone should be clear that there will be a volume icon on each slide in our recorded slide presentation, which is normal. 
7. Finally, we click the File menu, and then select the Save As button to save the slideshow . 
8. Then in the save type, we choose MP4 and other video formats to operate, as shown in the figure
9. Now we can see the progress bar of video saving at the bottom, just wait for the saving to complete. 
10. Finally, we can find the video we saved on the computer and upload the video to the desired place. Of course, before uploading, we can also preview whether the saved video is satisfactory, as shown in the figure. 
Record demo steps with WPS< /section>1) Open one of the "Demo (ppt)" documents;2) Click "Featured Application - Lecture Record"; 
3) After adjusting, click the "Screen Recording Button". 
Note: Microsoft PowerPoint on the Mac laptop also has the function of recording presentations. When you click to record, remember to check the play narration next to it. However, the Mac version of PPT can only be saved as a projection file (.pps or .ppsx) at present, rather than converted into a video. After the show file is opened with PPT, it will automatically play according to the recording.
The computer comes with video playback software Screen recording function
If you want to record something , cannot be placed in the PPT. For example, if you need to demonstrate other software or use other program interfaces, what should you do?
Some computer video playback software also has the function of recording video. For example, users of Apple Mac laptops can use the built-in Quicktime software to record whatever is happening on your computer screen.
Screen recording steps with Quicktime
1. Find this built-in software

2. After opening, you may not see the interface directly, but the menu on the top line of the computer has changed, we chooseFile → New Screen Recording 

3. Next, you will see a pop-up to prepare for the recording interface. Of course, if you need some configuration, for example: you need sound, we need to configure it in advance.
Click the small arrow next to the record to selectBuilt-in input: external microphone input, which is one of the earphones with microphone Category. Line-in refers to the microphone that comes with the computer.


4. If you want to see the mouse click status after the recording is complete, you can chooseShow mouse click during recording< /span>. This will not be displayed when recording, and the effect can only be seen when the recording is completed. The effect is that a small black circle appears when the mouse is pressed
5. Click the middle red button to start recording. After clicking, there will be a prompt: "Click any area to record the full screen, drag an area to record a part".

6. After the recording is completed, press the Esc key, a box will pop up, click the stop button in the center to exit. You can also click the stop button on the top right of the screen, which is a bit hidden, like this
7. After exiting, a preview video will pop up, which can be saved from the top menu, select file → Storage, to save the video. Record and watch video with online meeting software
Many online conference software now have the ability to save conference recordings The function is convenient for those who cannot attend the live broadcast meeting to watch back. Combined with the function of sharing your own screen with online conference software, these software can also be used as a tool for recording video lessons.
Zoom is used as an explanation here.
Zoom recording and playback video
1. Log in to Zoom with the Zoom host account (only the host has permission to record). If you join the meeting as a regular participant, you need to apply to the host.
 Note: Generally, the free Zoom account can only be used to record on the computer, and only local recording can be selected
3. Local recording: use local recording, after the meeting ends, the recorded video, audio and shared content will be automatically transcoded into an MP4 video file , the storage location of the video file is generally in the folder related to the program by default, and it will automatically pop up when the transcoding is completed. The transcoding progress bar is shown in the figure below:In terms of the space occupied by the file, the playback video file generated by Zoom is more than the above presentation recording and screen recording The manuscript is much smaller, which is more convenient for uploading and sharing. But you must pay more attention to the font size of the shared content, so as not to appear too vague. Baidu experience sharing,Zoomofficial website
In online teaching, what else do you want to overcome technical problems? Please leave a message for Xiaoyun, technical support is on the way! If you have better Welcome to leave a message to share the technical solutions.
Tell everyone that while stuck at home, I have "watching" technology!
Articles are uploaded by users and are for non-commercial browsing only. Posted by: Lomu, please indicate the source: https://www.daogebangong.com/en/articles/detail/Online%20Teaching%20Techniques%201%20Quickly%20Get%20Started%20with%20Three%20Simple%20Screen%20Recording%20Methods.html


 支付宝扫一扫
评论列表(196条)
测试