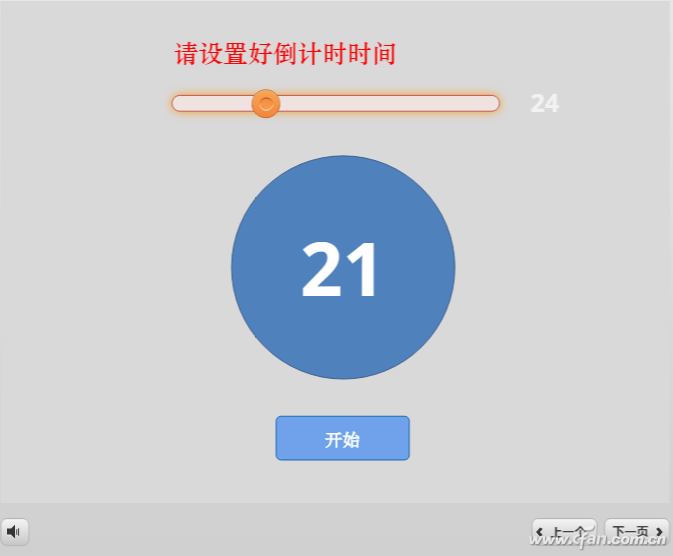
To create a countdown effect in a slideshow, generally enter several text boxes, put consecutive different numbers in each text box, set them to completely overlap, and then set them to appear and disappear at a certain time, so as to achieve the countdown effect. This method has at least two disadvantages. One is that it is time-consuming and laborious to make, and the other is that the countdown time is fixed. If you want to change it, you have to make it again, and there is no interaction. If you use Articulate Storyline 3 software, you can use variables to create an interactive countdown effect. Not only is it easy to make, but the countdown time can be input flexibly, and the interactivity is very strong (Figure 1). Next we will learn how to make it.
1. Design the countdown interface
Open Articulate Storyline 3 and create a new project. In the "Story View" state, double-click "Untitled Slide" to enter the editing window. Right-click on the blank space, select "Format Background", and set the desired background in the pop-up window; select the "Insert" tab, click "Slider" to select the slider style you like, and draw a slider at a suitable position on the slide Slider control, select it and switch to the "Design" tab, set its start to 0, end to 90, initial to 0, step size to 1, and use the default "slider 1" for the variable (the above parameters can be customized as needed adjustment); select the "Format" tab, and set the padding and border effects of the slider and track as required. Insert a text box on the right side of the slider, enter "123", set its size, font, color and other styles to display the current value of the slider, that is, the total time of the countdown; use the shape to draw in the center of the slide A perfect circle, right click and select "Edit Text", enter 456, set its size, font, color and other styles to display the current changing countdown time; switch to the "Insert" tab, click "Button", press You need to select the button style; draw a button control at a suitable position on the slide, and also select the style of the button as needed; then use the text box to mark the required text description on the slide (Figure 2).

Tip: If you don't use the slider, click "Input → Data Entry → Value Entry Field" in the "Insert" tab to insert a control that can be entered by the keyboard in the slide.
2. Add control variables
Click "Manage project variables" in the trigger panel on the right side of the window, click "+" in the pop-up window to add a new variable, set the name to djs, type to "number", and the default value is 0, so that there will be There are two variables, one is the newly created djs, and the other is the variable "slider 1" created when the slider was created above.
3. Add time-controlled animation
Using the shape tool, draw a rectangle around the outside of the slide. Select this rectangle, select the "Animation" tab, click "Add Action Path→Line", set the "Duration" to 1, that is, it takes 1 second to complete the path animation (Figure 3).
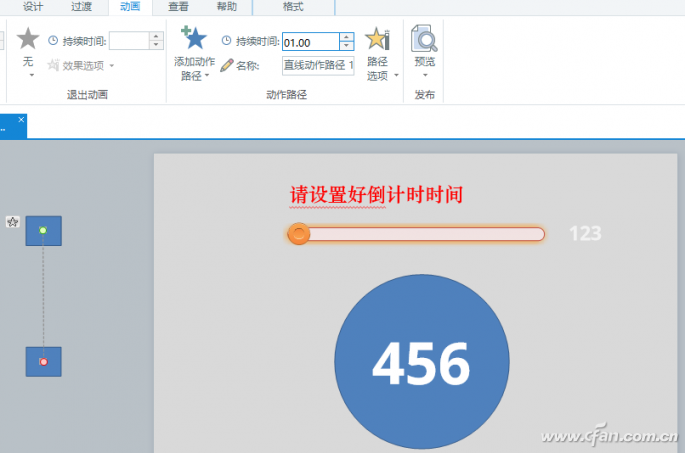
Tips: This reminder time is very important, its setting marks the accuracy of the countdown time.
4. Add variables to the slideshow
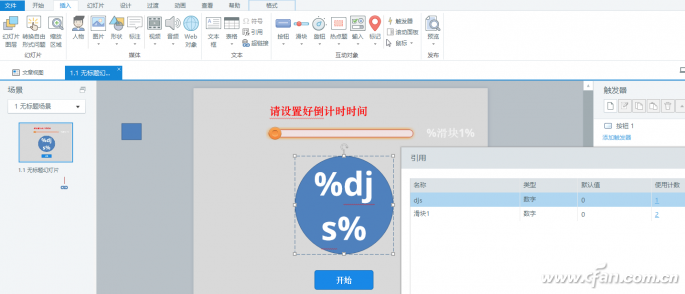
Switch to the "Insert" tab, select 123 in the slide text box, click "Reference", and select the variable "Slider 1" in the pop-up window. In this way, when the value of the slider changes, the display here also changes accordingly. Similarly, select 456 in the perfect circle, click "Reference", and select the variable djs (Figure 4).
5. Set up triggers
In the trigger panel on the right, click "New Trigger", select "Adjust Variable" in the pop-up window operation, select djs in the variable, select "= assignment" in the operator, select "Variable" in the value; select "Slide Block 1", select "User Click" for the time, and select "Button 1" for the object. In this way, when the "Start" button is clicked, the current value of the slider is assigned to the variable djs (Figure 5).

Create a new trigger, select "Move" for the pop-up window operation, select "Rectangle 1" for the object, select "Linear motion path 1" for the path, select "User Click" for the time, and select "Button 1" for the object. In this way, when the "Start" button is clicked, the rectangle will move along a straight path, and the moving time is 1 second. Since the rectangle is placed outside the slide, it is not visible during playback (Figure 6).

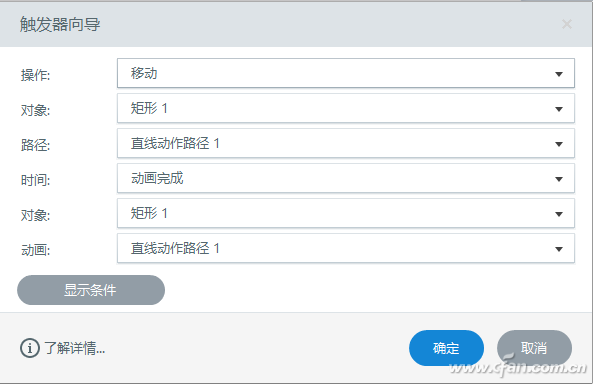
Double-click the trigger under the rectangle in the new trigger, select "Move" in the operation of the pop-up window, select "Rectangle 1" for the object, select "Linear motion path 1" for the path, select "Animation Complete" for the time, and select the object Select "Rectangle 1" for animation, and select "Straight line motion path 1" for animation (Figure 7).
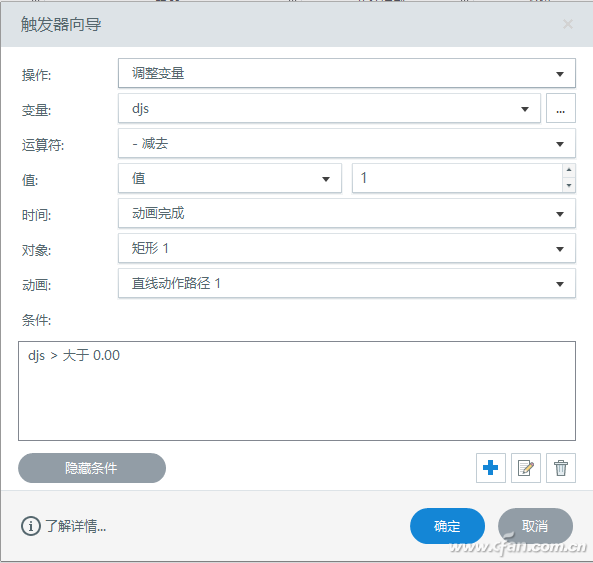
Then add a new trigger, select "adjust variable" in the pop-up window, select djs in the variable, select "-minus" in the operator, select "value" in the value, enter 1, and select "animation complete" in the time ", select "rectangle 1" for the object, select "straight line motion path 1" for the animation; click "display condition", click "+", select "variable" in the pop-up window, if select djs, select ">" for the operator ; Greater than", select "value" for the type, and enter 0 for the value (Figure 8).
6. Publication
Finally, click the "Publish" button, select the Web tab in the pop-up window, enter the title, and set the publishing folder to publish.
Articles are uploaded by users and are for non-commercial browsing only. Posted by: Lomu, please indicate the source: https://www.daogebangong.com/en/articles/detail/Office%20tips%20How%20to%20customize%20the%20countdown%20in%20the%20slideshow.html

 支付宝扫一扫
评论列表(196条)
测试