The Flame Generator filter in Adobe Photoshop CC is a new feature for rendering realistic flames on user-defined paths. This tutorial will show you how to style and texture rusty text, then use filters to add some fire, and some other smoke and spark textures to create a vibrant flame text effect.
The following assets are used in this tutorial:
1. Lihei font, download link address: http://www.fonts.net.cn/font-32040403538.html
2. The material can be downloaded from the material website, and it does not have to be exactly the same.
1. Create the background and text, and add styles to the text
Step 1
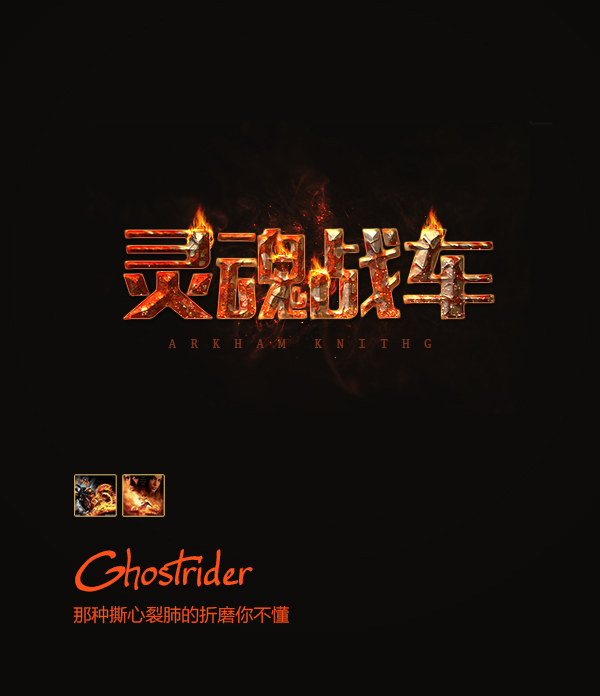
Create a new 1740 x 1170 px document and fill it with color #111111 .
Then, create the text "Chariot of Souls" using the font Intro Regular (color #d2b593, Size 350 pt) and reduce the spacing between the fonts to make it look compact.
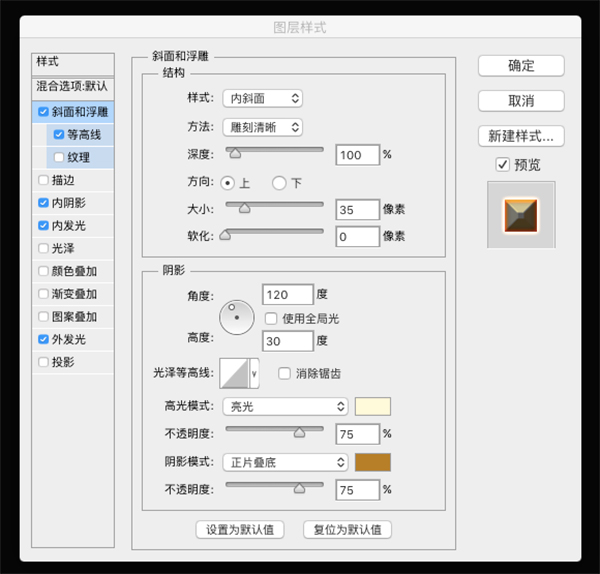
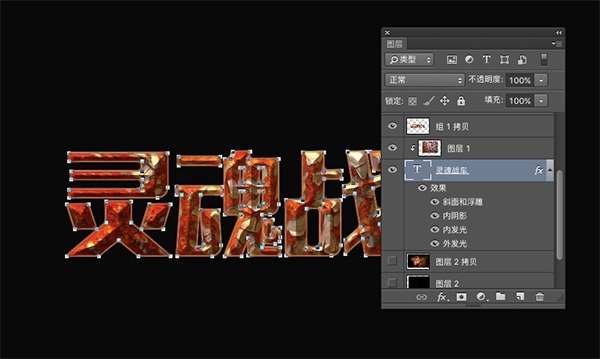
Step 2. Double-click the text layer to apply the following layer style: Use the following settings to add Bevel and Emboss, set the contour line to 50%, and other parameters as shown in the figure:
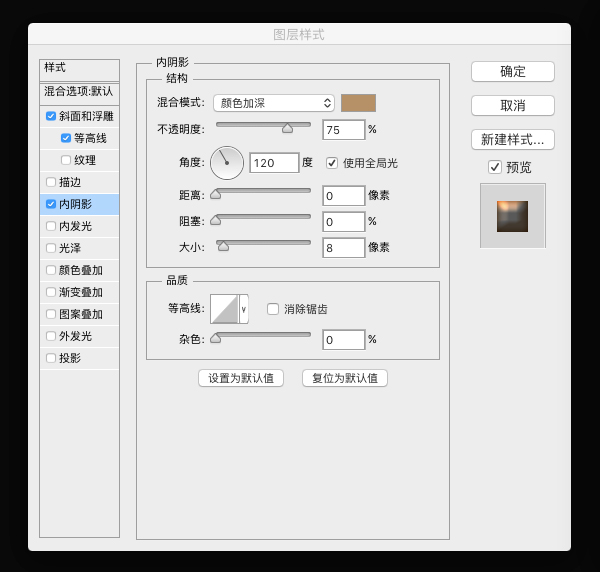
Step 3. Set the inner shadow, and the blending mode is color deepening, as shown in the figure
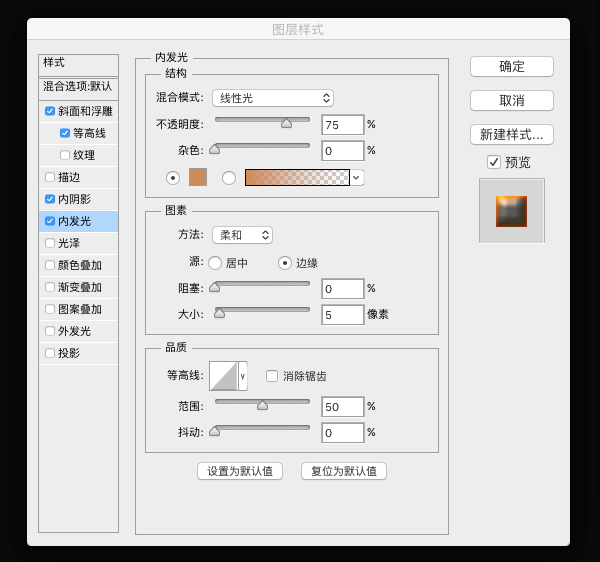
Step 4. Set the inner glow effect, select the blend mode as linear light, and the parameters are as shown in the figure
Step 5. Set the Outer Glow, the blending mode is Linear Light, the color value is #edc09f, and other values remain unchanged to get such a three-dimensional effect picture.

2. Add texture to text
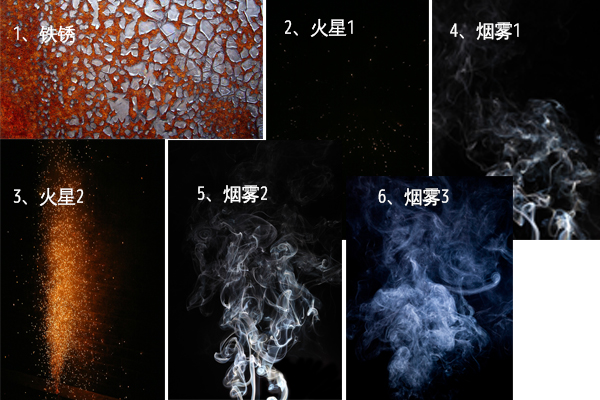
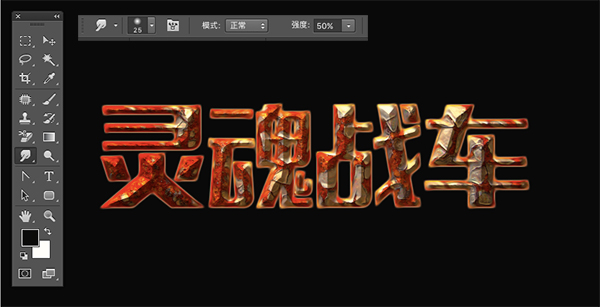
Step 1. Place the texture of rust on top of the text layer, rename it Rust, and change its layer mode to Multiply, then right click and select Create Clipping Mask, or simply click , press and hold alt and there will be a downward arrow facing the text layer, then release it. You can adjust the position of the texture according to the effect you like.

Step 2, select the text and texture layers, duplicate them, then go to Layer > Merge Layers. Make sure the blending mode of the merged layer is set to Normal.
Step 3, right click on the text layer and select Create Work Path.
Step 4 Select the Smudge Tool, choose a 25 px round tip, and make sure the Mode and Intensity values in the Options bar are set to Normal and 50%. Select the texture copy layer and press Return once to smudge the edges. Alternatively, you can select the Direct Selection Tool (A), right-click on the work path and select Stroke Path, then select Smudge from the Tools drop-down menu, uncheck the Simulate Pressure box, and click OK ". With the Direct Selection Tool selected, hit the Return key to get rid of the work path.
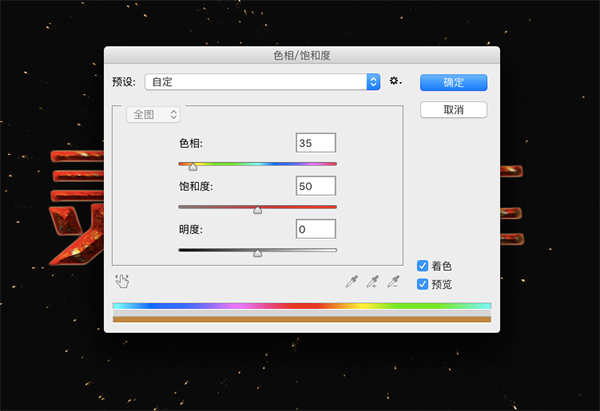
Step 5, place Mars material 1 on top of all layers, change its layer's blending mode to Linear Dodge (Add), and go to "Edit" > Transform > Rotate 90° Clockwise, then resize as desired. Next go to Image > Adjustments > Hue/Saturation, check the "Colorize" box and change the "Hue" to 35 and the "Saturation" to 50 . This step is to make Mars blend into the background better.
3. Making flames
Step 1. There are many methods for this step. If your ps version supports For the filter-flame, it can be directly used more quickly. Here I use the flame picture directly as the material.

4. Make smoke
Step 1. Select material smoke 1 and smoke 2, adjust the position and merge Layer, select layer blending mode to light.
Step 2. Add a mask to the smoke, set the foreground color to black, select a soft pen, and erase the excess smoke.

5. Add burning sparks to the text
Step 1. Open the material Mars 2, set the layer blending mode to Color Dodge (Add)
Step 2. Change the copy of the text into a selection area, then click Mars 2, invert the selection, delete the redundant ones, and make Mars attach to it as the text.
Step 3. Add a mask to Mars 2 and remove the excess.

6. Add background smoke
Step 1. Turn on the smoke 3 material, place it on top of the background layer, and change the blending mode of its layer to light. and rotate it 90° clockwise, then resize the texture as desired and place it behind the text.
Step 2, adjust the hue/saturation, you can use the shortcut key control+u, each value: 165, 32, 0. I won’t go to the picture here, it was also used when I made Mars earlier.
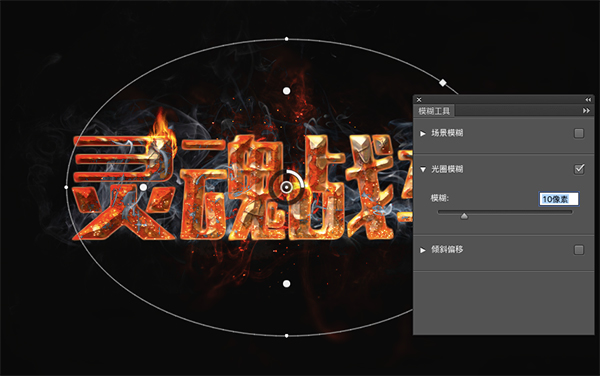
7. Add aperture blur to all background textures.
Step 1. Duplicate all the background textures, then merge the duplicated layers, select Filter-Blur-Aperture Blur, focus at 95%, and blur at 10.
Let's take a look at the final effect

Of course, we can extend it further, such as applying this effect to movie posters, which can be adjusted according to the effect you like. Of course, the appearance of the font can be customized design.
Articles are uploaded by users and are for non-commercial browsing only. Posted by: Lomu, please indicate the source: https://www.daogebangong.com/en/articles/detail/How%20to%20make%20a%20cool%20flame%20word%20effect%20with%20Photoshop.html
 支付宝扫一扫
评论列表(196条)
测试