In the design work, it is inevitable to deal with fonts, but sometimes it is necessary to have a special, at least not so stereotyped glyph to express the theme and convey the brand image. BUT Not everyone has a foundation in font design, and they may not have enough time to redefine a glyph, so it is also a good choice to attach to the existing font and adjust and modify it on this basis to achieve the desired effect. Let me share with you the process of transforming the Q-version font as follows. When a high-level watch on the font design road throws too many stones, I am a weak woman who can’t bear it~~~ hahaha. . .
1. Determine the style and find the font
I received a request to see what kind of content it is. For example, the overall color of the game "New Water Margin Q Legend" is candy and rainbow, and the style is also cute. Then let's find a few Q-version fonts as the basic shape.

Now choose a font as an example. open Create a new canvas and enter text as follows.
2. Change the characteristics of radicals
Select the text CRTL+SHIFT+O to create an outline of the text, CRTL+SHIFT+G to cancel the grouping, so that each word becomes a separate entity.

Find out the points that need to be adjusted, and you can express the radicals of the font or a certain point in one form. Because the system characters are relatively neat, it was decided to represent the apostrophe\dots in the font uniformly with circles, and the large curved hooks with arcs to make them more tense and interesting.

Using the Direct Selection Tool Or delete anchor point tool
 Trim\remove redundant parts, as follows:

Using the Ellipse Tool Draw a circle (press the SHIFT key when drawing a circle to draw a perfect circle~), and adjust it to the radical position of the font to maintain the integrity of the font.

Draw a circle with the Add Anchor Point tool Add two anchor points, using the direct selection tool
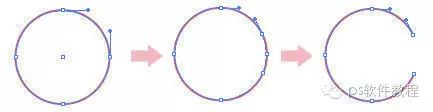 Select one of the anchor points and press the Delete key to delete the anchor point.

Set the thickness of the stroke in the stroke panel according to the actual situation, and press the rounded end option to keep the end round.

Move and adjust the drawn arc into the font.

Draw a circle and set the appropriate stroke value, use the straight line tool (press SHIFT to draw a straight line), set the thickness of the line in the stroke panel, press the rounded end option to keep the end round. Use alignment to center the circle and line, and press CTRL+G to group the circle and line.

Move the graphics just drawn to the font

Third, adjust the details to add rhythm
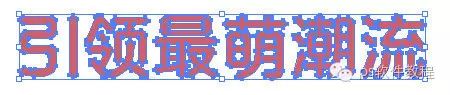
So far, the basic deformation of the font has been completed, which is more lively than the original inherent font. Next, adjust the font size and angle according to the actual situation such as the meaning of the word to make it more rhythmic.

Fourth, page effect

(This article is collected and shared from the Internet by the WeChat PS software tutorial, and the copyright belongs to the original author) 
The editor’s intimate small nest group, warm reminder, there is a mysterious gift for entering the group~~~
Long press to identify! ! !
Want to learn more? ? Click Read the original text, there is a surprise! !
Articles are uploaded by users and are for non-commercial browsing only. Posted by: Lomu, please indicate the source: https://www.daogebangong.com/en/articles/detail/Font%20Tutorial%20Make%20Your%20Fonts%20Cute.html
 支付宝扫一扫
评论列表(196条)
测试